How to Enable IP Routing
Method 1 of 3:
How to Enable IP Routing in Windows NT
-
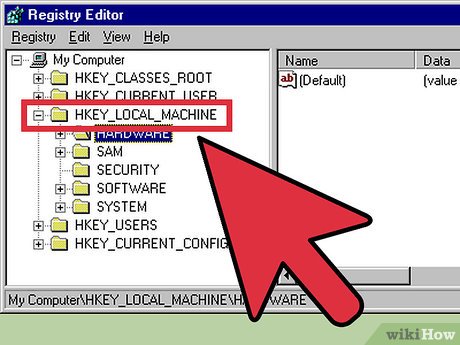
 Start the registry editor, which is a tool that allows you to make changes to Windows programs. Open the start menu, and type REGEDT32.EXE into the search box. Hit enter, and select the correct name from the list. You can also click on "Run," and type REGEDT32.EXE to open it.
 -
 Find the registry key that reads: HKEY_LOCAL_MACHINESYSTEMCurrentControlSetServicesTcpipParameters, and then choose "Add Value."
 - Enter the following values into the corresponding locations in order to enable IP routing through Windows NT:
- Value Name: IpEnableRouter
- Data Type: REG_DWORD
- Value: 1
- Exit the program, and then restart your computer and Windows NT.
Method 2 of 3:
How to Enable IP Routing in Windows XP, Vista, and Windows 7
- Start the registry editor. Select the start menu, and enter REGEDIT.EXE into either the "Run" program or the search box. The run program will be available for Windows XP operating systems and the search box will be used for Vista and Windows 7 operating systems.
- Find the sub key that reads: HKEY_LOCAL_MACHINESYSTEMCurrentControlSetServicesTcpipParameters. Scroll down or by use the search option to locate it. Make sure that you select the right one, especially if you haven't backed up your registry recently.
- Set the registry values into the corresponding section to enable IP routing in Windows XP:
- Value Name: IpEnableRouter
- Value Type: REG_DWORD
- Value Data: 1. This will enable transmission control protocol and IP forwarding, also called TCP/IP forwarding, for all of the connections installed on your computer. TCP/IP forwarding is essentially the same thing as IP routing.
- Exit the registry editor to complete IP routing in Windows XP and other Windows operating systems.
Method 3 of 3:
Another easier method for Windows 7
- Go to Run type "services.msc" without quotes
- Search the service "Routing and Remote Access", it will be disable by default.
- To enable it right click on it and then select properties and change the "Startup Type" to
- "Manual" if you want to start it when you require or
- "Automatic" to start it whenever computer boots on else
- "Automatic delayed" if you want it to initiate a little bit later after the other services in your computer are started at boot time.
- Now apply and press ok
- Now right click the Routing and Remote access service and press start and let the progress bar complete.
- Now go to run and type "cmd" to get command prompt and type "ipconfig /all". and you should see this line "IP Routing Enabled. . . . . . . . : Yes" which will be the third line. This means Routing has been enabled.
- You can disable by changing the startup type to disabled and check "ipconfig /all" to see the status.
- Note: The services method was tried in Win 7 Ultimate Other versions may not have that service listed This also works on Windows Server 2012 R2 Datacenter
This also works on Windows Server 2012 R2 Datacenter
Update 24 March 2020
You should read it
- Configure Windows 2008 Server IP Routing
- How to browse anonymously with Garlic Routing
- Set up static routing between the router and another network
- How to fix Pin to Start error on Windows 10
- How to Type Symbols on a Keyboard
- How to Get Your Windows 10 Start Menu Back
- Routing and filtering network traffic - Part 2: Windows Firewall
- How to Create and Manage a Hidden Account in Windows 7
- Troubleshooting TCP / IP: Structure method - Part 2: Troubleshooting routing tables
- Add the Start button for Windows 8 in just a few minutes
- How to type VNI in Windows
- Routing and filtering network traffic - Part 1
Maybe you are interested
Action Notch app adds a new invisible button to the front of your Android phone How to Keep Healthy Family Relationships Apple's Family Sharing feature saves you money. Here's how to set it up How to Cope with Sheltering in Place with Your Family How to Help Others How to Create an Apple ID for Children
