
How to disable audio devices on Windows 11
Here is how to disable the sound device on Windows 11
Disable Sound Devices on Windows 11
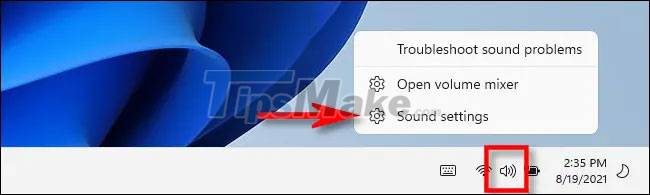
First, go to the sound settings page on Windows 11 by pressing Windows + i to open the Start menu, then navigate to System > Sound. Or you can right click on the speaker icon on the taskbar and select 'Sound Settings'.
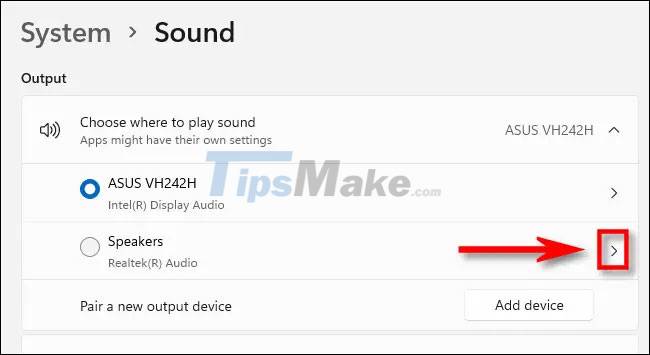
You are now on the Windows 'Sound' settings page. In the 'Output' section near the top, click the arrow icon to the right of the name of the audio output device you want to disable.
On the Properties page of the audio device, in the 'General' section, find the 'Audio' option (content Allow apps and Windows to use this device for audio below). Click the 'Don't Allow' button on the right.
The audio device will be disabled immediately. If you close the Settings app and reopen it later, you'll notice that the turned off device is no longer listed in the 'Output' section of the audio settings page as before.
Re-enable audio devices in Windows 11
To re-enable an audio device that you turned off using the method described above, follow these simple steps.
First, right click on the speaker icon on the taskbar and select 'Sound Settings'.
Windows Settings will open to System > Sound. Scroll down until you find the 'Advanced' section. Then click on 'All Sound Devices'.
In the list of available audio output devices, click the audio system you want to reactivate.
On the device's Properties page, under 'Audio', click the 'Allow' button.
The audio device will then be reactivated and displayed again on the list of available output devices on the system sound settings page.
Enjoy listening to music!
You should read it
- How to enable Spatial Sound in Windows 11
- How to Update Sound Drivers
- How to turn off the startup sound on Windows 11
- The sound system on Windows 11 is tweaked to be softer, less jarring
- How to Fix Muddy Sound With Real Tech Audio and Windows 7
- How to Create a Sound Recording on Windows 8
- How to fix sound errors on Windows 10
- How to set up Spatial Sound with Dolby Atmos on Windows 10
- Tips to maximize sound quality on Windows 11 systems
- Steps to open sound settings on Windows PC
- How to manage and improve sound quality in Windows 10
- How to Change Windows Startup Sound