Table of Contents
This practical guide explains how to connect and use the hi-fi stereo amplifier with clear steps and useful context. It also covers common requirements, potential problems, and the details that can help you get better results.
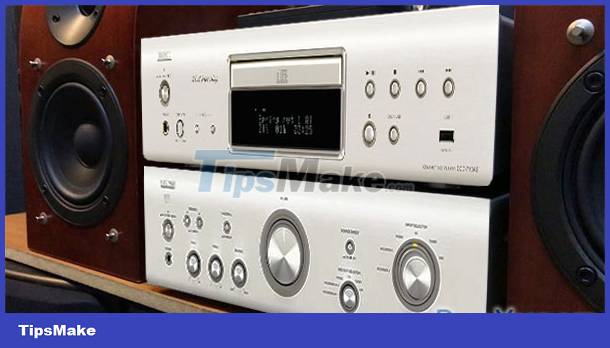 How to connect and use the Hi-Fi Stereo Amplifier
How to Connect the Audio Signal Wire of the Hi-Fi Stereo Amplifier
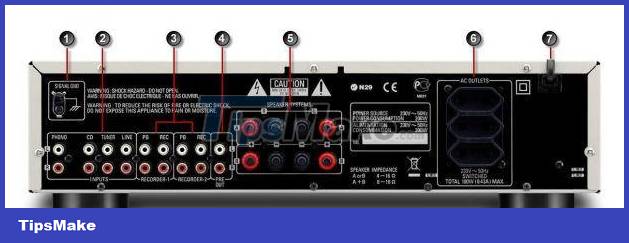 Connect the amp's audio signal wire
- Signal GND : The station attaches the ground wire, which helps prevent interference and avoid electric shock when there is an electric leakage.
- Inputs : Ports for connecting audio signals to:
- Phono : The port to connect to a large phonograph, this port is only for small power signals, not connected to other signal sources.
- CD : Connector to CD/VCD/DVD player.
- Tuner : The port to connect to the radio player - Radio.
- Line : Port to connect to other audio signal sources such as TV, MP3.
- Recorder : Port used to connect devices with sound recording function.
- PB - Playback : The port connects to the audio signal out - Audio Out of the receiver.
- Rec - Recorder : The port connects to the input audio signal - Audio In of the receiver.
- Pre Out : Audio output port as a pre-amplifier - small-level audio amplification, used to connect to other audio amplification devices.
- Speaker Systems : Ports for connecting speakers.
- AC Outlets : Power supply ports for other surrounding devices such as CD/VCD/DVD players. these are power supply ports that are turned on/off through the Amply's On/Off switch. Devices that draw power through this port usually will always be in the On - On state and use the amp's switch common to all. You need to pay attention to the allowed capacity record to avoid overload.
- Power cord for the amp to work.
The audio connections all use a pair of Composite signal leads - the lotus plug, in which the white wire transmits the audio signal - Audio for the left channel - L/Left and the red wire transmits the signal to the right channel - R /Right.
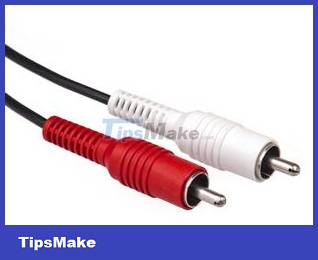 Audio signal connection wire
How to Connect Speakers to Hi-Fi Stereo Amplifier
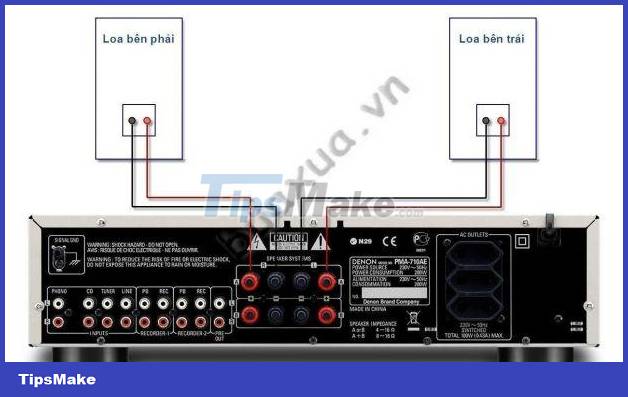 Connect Speakers to Amply
The port to connect to the speaker, is divided into two connecting stations A and B, each station has 4 connection ports for Negative (-) and positive (+) signals of the two left channels - L/Left and right - R/ Right. When connecting to the speaker, you need to pay attention to connect the correct color or the correct symbol on the connection ports of the Amply and the speaker.
Two docking stations will allow connection to 4 speakers, 2 left speakers and 2 right speakers. If there are only 2 speakers, please connect to station A.
- This is just a normal speaker connection, other connections for more complex audio systems will be covered in other articles.
- The position of the left and right speakers is calculated according to the position of the listener, not the position of the Amplifier.
- It is necessary to use the right type of wire to connect the speaker to the Amplifier with the connection ports of the Speaker and Amply. Some connection ports allow the use of bare wire ends, just remove the plastic insulation at the end of the wire, then attach it to the connection port and tighten it.
How to Use the Controls of the Hi-Fi Stereo Amplifier
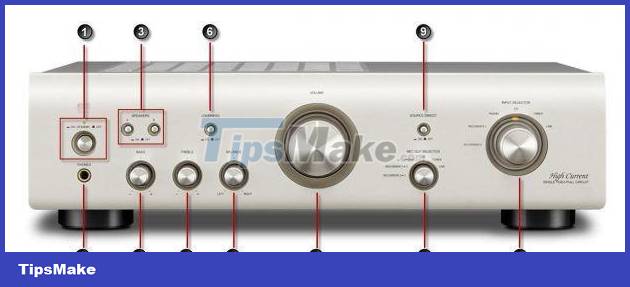 Using Amply's controls
- On/Off : Button used to Turn on/off the power of Amply.
- Phones : Headphone jack - Headphone.
- Speakers : The button turns on and off 2 speaker stations A and B. You can turn on one of the 2 or both speaker stations depending on how many speakers you use and which station you plug the speakers into.
- Bass : Button to adjust the bass sound.
- Treble : The treble control knob.
- Loudess : Bass compensation button at low volume. Usually when adjusting the volume small, the drum - bass sound will be very weak, then if the Loudness button is turned on, the bass sound will be increased, making the sound more balanced. This function only works when the volume control button - Volume is at a small level, when adjusting the volume from the middle level upwards, the Loudness function will no longer work.
- Balance : Equalizer knob for left channel - L/Left and right channel -R/Right.
- Volume : Volume control button - large and small volume.
- Sound Direct : The On/Off button allows direct audio playback without going through the equalizer - Bass, Treble, Balance. If you use an additional sound filter - Equalizer, turn on this feature.
- Rec Out Selector : The button selects the signal from one of the input ports to output the port connected to the recording device.
- Input Selector : The button selects the signal source from one of the input signal ports to amplify the sound.
Conclusion
Understanding Connection makes it easier to compare options, avoid common mistakes, and apply the information in this guide more effectively. Review the relevant requirements before making changes or choosing a solution.
FAQ
How do you connect and use the hi-fi stereo amplifier?
Follow the steps in this guide in order, confirm the required settings or tools, and verify the result before making additional changes.
Is it safe to connect and use the hi-fi stereo amplifier?
It is generally safe when you follow the recommended instructions, use trusted tools, and avoid changing settings you do not understand.
What should you do if the process does not work?
Recheck the requirements, restart the device or application when appropriate, and review each step for missed settings or compatibility issues.
Related Articles
 How to Connect Audio from VCD/DVD Player and TV to Amply7 minutes read
 How to Connect iPhone to Car Stereo: Step-by-Step Guide8 minutes read
 How to Adjust and Match the Subwoofer into a 2-channel Amplifier8 minutes read
 What Is Stereo Sound?11 minutes read
 Difference Between Repeater and Amplifier6 minutes read
 3 Ways to Connect TV with Amply Simple and Fast6 minutes read
Reader Comments 0
Sign in with email or Google to join the discussion.