Table of Contents
This practical guide explains how to connect and sync the nintendo switch controller with clear steps and useful context. It also covers common requirements, potential problems, and the details that can help you get better results.
The experience you get will definitely be very different from when using an Xbox or PlayStation controller. Learn how to do it right below.
How to Connect Joy-Cons to Nintendo Switch
Connecting Joy-Cons to your Nintendo Switch is a prerequisite for doing anything on the device. The default way to connect Joy-Cons is to attach them to the mounts on either side of the Nintendo Switch. The system will automatically recognize and establish the connection.
In case you want to experience wireless connection between Joy-Cons and Nintendo Switch, just follow these few simple steps:
- On the Switch home menu, go to the Controllers section.
- Navigate to Change Controller Grip/Order .
- Press the Sync button on the Joy-Cons you're trying to connect to the Nintendo Switch.
- Once the Joy-Cons have synced with the Nintendo Switch, press the A key.

You have now successfully connected and synced your Joy-Cons with your Nintendo Switch. The system allows you to connect up to 4 pairs of controllers at the same time. Keep your Nintendo Switch Joy-Cons up to date to ensure that they always work correctly.
How to Connect the Connect Pro Controller to the Nintendo Switch
While Joy-Cons are a great choice, you might want a more traditional gaming feel with a 'classic' controller. In this case, Connect Pro would be the logical choice.
To connect the Pro Controller to the Nintendo Switch, do the following:
- Plug the USB-C cable (preferably the one that came with the controller) into the Switch's dock.
- Connect the Pro controller to the USB-C cable while the Switch is docked.
The controller will automatically connect, allowing you to play in a more familiar way. To connect your Pro controller to your Nintendo Switch wirelessly, follow these steps:
- On the Switch home menu, go to the Controllers section.
- Navigate to Change Controller Grip/Order .
- Press the Sync button on the Pro Controller you're trying to connect to the Nintendo Switch.
- Once the controller has synced with the Nintendo Switch, press the A key.
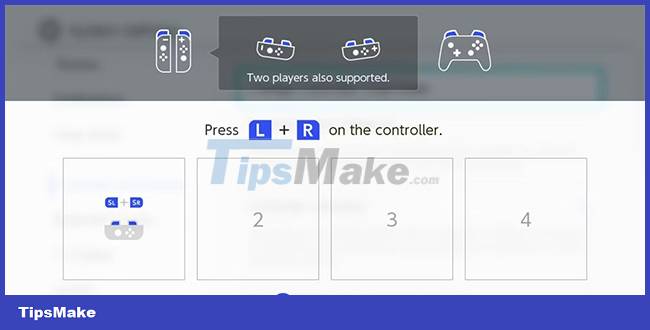
Connection has been established. Hope you are succesful.
Conclusion
Understanding Controller makes it easier to compare options, avoid common mistakes, and apply the information in this guide more effectively. Review the relevant requirements before making changes or choosing a solution.
FAQ
How do you connect and sync the nintendo switch controller?
Follow the steps in this guide in order, confirm the required settings or tools, and verify the result before making additional changes.
Is it safe to connect and sync the nintendo switch controller?
It is generally safe when you follow the recommended instructions, use trusted tools, and avoid changing settings you do not understand.
What should you do if the process does not work?
Recheck the requirements, restart the device or application when appropriate, and review each step for missed settings or compatibility issues.
Related Articles
 The Mysterious C Button on Nintendo Switch 24 minutes read
 Ways to Power Off Nintendo Switch4 minutes read
 How to Connect Bluetooth Headphones to Nintendo Switch: Clear Instructions9 minutes read
 How to Fix Joy-Con Error on Nintendo Switch8 minutes read
 How to Capture Screen and Record Video on Nintendo Switch Game Console10 minutes read
 Official: Nintendo Switch Can Run Android3 minutes read
Reader Comments 0
Sign in with email or Google to join the discussion.