
How to add Autotext in Word for faster typing
When entering data in Word, do you often have to retype long phrases? Autotext is a feature that helps create shortcuts for text paragraphs, saving typing time. This article guides you on how to add, edit, and delete Autotext on Word versions 2003 - 2021.
Creating Autotext helps you enter data quickly and reduces repetition when editing text. Below, TipsMake will guide you in detail on how to use this feature.
Table of contents:
1. How to do it on Word 2016 - 2019
2. How to do it on Word 2003
3. How to do it on Word 2007
How to add Autotext to Word
For Word 2019
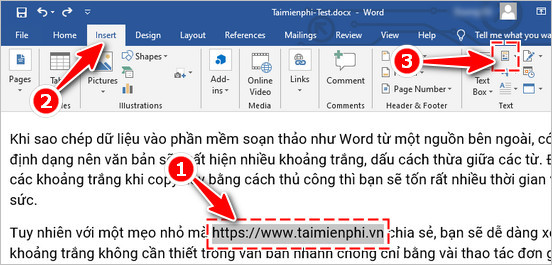
Step 1: Highlight the phrase or text you want to abbreviate, as shown below, I choose the link to Taimienphi's Homepage.
Step 2: On the Word 2019 toolbar, click the Insert tab , select Quick Parts .
Step 3: In the display options, click AutoText , then select Save Selection to AutoText Gallery .

Step 4: In the Create New Building Block window , you need to pay attention to the Name section. This is where you enter the keyword, set the abbreviation for the phrase you need. In this example, I set it to TMP.
Step 5: Click OK to save the changes.
Step 6: Return to the text entry window, enter the keyword "tmp", then press the F3 key to get the result as shown below.
Or if you are looking for a way to insert a signature into Word to copyright your document, you can refer to the instructions here.
Step 1: First we need to highlight the text that needs to be defined, then go to the Insert menu and select AutoText / AutoText…
Step 2: When the AutoCorrect dialog box appears, enter a short and memorable name for the selected text in the Enter AutoText entries here field , then click Add and click OK to complete.
From now on, whenever we need to type the above text, we just need to open the AutoCorrect window and type the previously defined abbreviation (here is the word ch ) and then press Insert .
Step 1: Click the Office Button in the upper left corner, then select Word Options . When the window appears, select Customize.
Step 2: In the Choose commands from section, select Commands Not in the Ribbon . Scroll down to find AutoText , select it and click the Add >> button on the right side and click OK.
Now the AutoText icon has appeared on the Word 2007 toolbar. To create AutoText for a certain text section, just highlight it, then click on the AutoText icon, select Save Selection to AutoText Gallery to open the Create New Building Block window .
You can also open this window with the shortcut key Alt + F3.
Step 3: Then enter a short name for your AutoText in the Name section , select Gallery as AutoText, press OK to complete!
Type the exact name and press F3 (in this example the name is vidu). Or click on the AutoText icon and select the text you want to insert (in case there are many AutoTexts that you don't remember all the names).
Additionally, you can also edit or delete AutoText by right-clicking on the drop-down text in the AutoText button and selecting Edit Properties… or Organize and Delete…
So, we have guided you on how to add Autotext in Word, helping you enter data faster and optimize the text editing process. These tricks apply to all versions of Word from 2003 to 2021.
Additionally, if you need a tool to help you type automatically, try Smart Auto Typer and Talker or AutoCorrect in Word. These software help save shortcuts and speed up your typing, suitable for office workers and content writers.
You should read it
- How to create AutoText in Word
- How to use the AutoText format of Microsoft Word
- Create Autotext in Word 2007, edit documents faster
- How to add AutoText in Word 2016 document quickly
- How does the word in Microsoft Word jump?
- Steps to fix Word Count not showing up in Microsoft Word
- How to create text inverted, reverse the word in Word
- Basic tasks in Word 2013
- Fix word sticking errors in Word 2007
- Create a quick dot (……………) line in Microsoft Word
- Create a new Word file, open the file in Word 2013
- 9 best alternatives to Microsoft Word