Create Autotext in Word 2007, edit documents faster
Creating AutoText is a trick that helps Microsoft Word users edit documents faster. On each version of Word, the way to create Autotext is different. In this article, we will show you how to create Autotext in Word 2007, making editing faster for users.
With the current Word 2016 Full version, perhaps some users have forgotten the Word 2007 version. However, for low-configuration computers, installing Word 2007 is a smarter choice than Word 2016. Another reason is that many users do not like the cumbersomeness and too many features of Word 2016, so they choose to stay loyal to the Word 2007 version. To edit documents quickly, users need to create Autotext in Word 2016 . This is a way to save time when drafting long, repetitive text clusters.
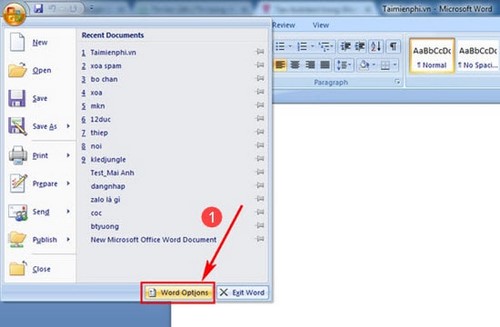
Step 1: In Word 2007 there is no default AutoText, so you must add AutoText to the toolbar.
Click the Office Button (Word icon) in the left corner and select Word Options.
Step 2: In Word Options , select Customize . In the Choose commands from section , click Commands Not in the Ribbon . Find the AutoText section , select it and click the Add button to move Autotext to the right and click OK .

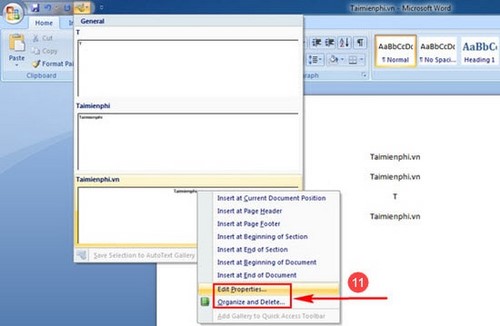
Step 3: To create AutoText, highlight the text and select Save Selection to AutoText Gallery.
Can be opened quickly with Alt+F3

Step 4: At the Create New Building Block dialog box . Enter an abbreviation for Autotext and press OK.

To delete AutoText, press the Autotext icon or the key combination Alt+F3. Then right-click on the text and select EditProperties … or Organize and Delete …
Above are detailed instructions on how to create AutoText in Word 2007 for users.
Another trick that is also quite important for users is adding fonts to Word. There are diverse fonts in Word, you will be able to draft and design banners, cover photos, and magazines right on Microsoft Word. With impressive fonts like calligraphy and capitalization fonts, you can't ignore adding fonts to Word, right?
On Word, users not only edit but also easily insert images into Word. This is how you write articles and illustrations for your documents on Word. If you are a new user, please refer to this very useful tip for inserting images into Word. If you have difficulty using Word and other software, please comment below the article for help from TipsMake.
When preparing a lesson plan or making a project book, thesis. your document needs to have a table of contents and clear page numbers. If the document is simply for review, you can also number the pages. in Word for your documents, page numbering tips in Word help you write numbers from any page without any priority order.
Was this article helpful?
Your feedback helps us improve.
Related Articles
 How to add Autotext in Word for faster typing4 minutes read
 How to create AutoText in Word13 minutes read
 How to use the AutoText format of Microsoft Word2 minutes read
 How to add AutoText in Word 2016 document quickly3 minutes read
 How to edit basic Word documents for beginners4 minutes read
 How to Edit Documents on iPhone10 minutes read
Reader Comments 0
Sign in with email or Google to join the discussion.