How to Add a Network Printer in Windows XP
If you need to add a network printer in Windows XP, the steps can seem complicated for a new user. However, they really aren't if you read them closely and follow them systematically, working through the printer wizard that will help walk....
Part 1 of 3:
Adding the Printer
-
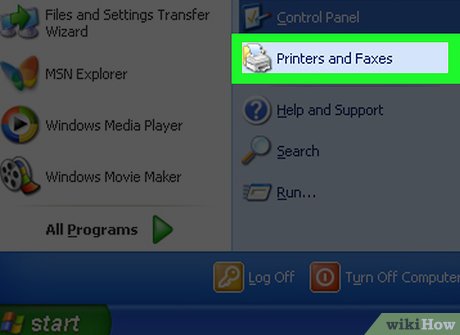 Open printers and faxes. Choose 'start,' and click on 'control panel' and then click on 'printers and other hardware.' Now, choose 'printers and faxes.'[1][2]
- You can also drag the printer from the printers folder on the print server. Now, drop it into your printers folder or right click on it, and click 'connect.'
- If the control panel window is in classic view, you could also click on 'printers and faxes' icon instead.
-
 Open the printer wizard. Find 'printer tasks,' and click on 'add a printer.' This will open the 'add printer wizard.' Click next.
- If your computer uses wireless connection, make sure that you opened a web browser and logged onto the wireless network first.
- Choose the local printer option. With this option, once you get to the 'welcome to the add printer wizard' screen, select local printer. Uncheck 'automatically detect.' Click next.
-
 Choose a new port. Where it says 'create a new port,' you should choose 'standard TCP/IP Port.' Click next.
- At the next page, which says 'welcome to the add standard TCP/IP printer port wizard' click next again. Make sure that you don't check 'automatically detect and install my plug and play printer."
- Enter the host name or IP address of your printer server. Click next. Select 'custom' and click 'settings.' You will see the network printer settings. Click 'finish.' The IP address should be on the printer itself and is a set of numbers separated by periods.[3]
- You could also call the manufacturer if you can't locate the IP address, but it's usually on the printer itself.[4]
Part 2 of 3:
Completing the Process
-
 Select your printer make and model from the list offered. Click next.
- If you don't see your printer on the list click 'have disk' and insert the printer software disk that came with your purchase.
- You could also download the software from the manufacturer website if the manufacturer offers that option.
-
 Enter a name for the printer. You will want to put in a name so you can find the printer again, and you should decide whether to make this printer the default printer.
- A default printer is the one that will be automatically used unless you indicate otherwise.
- Determine whether you want to share the printer with other network users. If you do, click on 'share name' button and add the printer name.[5]
- Click next. Make a selection. Click next. Click finish.
Part 3 of 3:
Connecting to the Desired Printer
-
 Use the method for those logged onto a Windows domain running Active Directory. This is one of three methods available to connect the printer.
- Click on 'find a printer in the directory.' Click next.
- Click the 'browse' button. You will find it at the right of 'location.' Click the printer location. Click 'OK.'
- Click 'find now.'
- Choose the printer you want to use, and click 'OK.'
-
 Search for the printer name by typing it in and browsing for it. You will type the printer name using this format: printserver_nameshare_name.
- Browse for the printer on the network.
- Click 'next' and then choose the printer in 'shared printers.' Click 'next.'
-
 Connect to an Internet or intranet printer. If you use a printer's URL, you will be able to connect to a printer via the Internet. You will need to have permission to use the printer, though.
- Click on 'connect to a printer on the Internet or on your intranet.' Type in the printer's URL using this format: http://printserver_name/Printers/share_name/.printer.
- Follow instructions on the screen to connect to the network printer.