
How to Access Data of a Password Protected User in Windows XP in Case the PC Fails to Boot
Method 1 of 2:
Using an Ubuntu Live CD
-
 Change the boot settings. Restart Computer and change the Boot Settings to read from Optical Drive before the HDD. Then Insert the "Ubuntu Live CD" (free open source download) and Restart the Computer.
 -
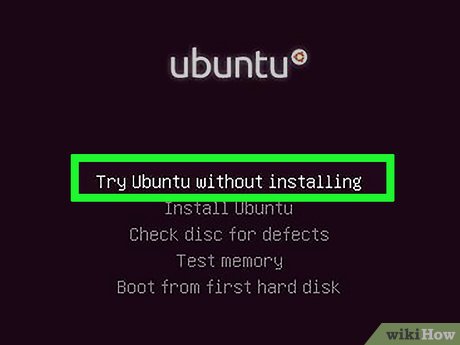 Run the disc. Run "Ubuntu Live" without installing Ubuntu onto the Hard Disc.
 - Access the files. Access the Windows Files on the HDD using the Ubuntu operating system.
- Make sure to be thorough. Scavenge through important Files, Documents, and possibly other External Drive Sources.
- Save files to an external source. Save all important files and documents onto a safe external device or burn them to a disc, if you have more than one drive.
- Change the boot settings again. Restart the Computer, change Boot Settings back to Read HDD first again.
- Reformat the drive. Reformat your HDD using Windows Setup Disc. Or, "FDisc" if you have no Windows Disc (also free open source download).
- Good Luck! This should solve the problem.
Method 2 of 2:
Using a Second Computer
- Be ready. If you feel comfortable handling computer hardware and have another computer available, you can have full access to the information by connecting the hard disk to another computer. This section assumes that you have some basic knowledge of computer hardware.
- Shut down your computer and disconnect everything. Pull out the power, monitor cables, PS/2 and USB devices, the speakers, etc. All cables and external devices must be removed.
- Open up the computer case.
- Locate the hard disk.
- Disconnect the power and IDE/Serial ATA cables.
- Either mount the drive to another computer or use an IDE/Serial ATA to USB device. Be sure to set the jumper to the correct setting, for now you may want to set it to "slave".
- Boot up the second computer and log in. Copy the information you want to save.
- Put the drive back in the original computer and wipe everything, then reinstall Windows as usual.
Update 04 March 2020
You should read it
- How to Copy Computer Games from CD to Your Hard Drive
- Change the boot order of computer boot in BIOS
- How to create a Live CD Linux disc
- How to set up BIOS to boot from USB / CD / DVD, external hard drive
- Create Hiren's BootCD from USB drive
- How to Boot from USB in Windows 7
- DLC Boot - Download DLC Boot here
- Back up the boot drive using Disk Utility
- How to Boot Linux from USB on Windows 10
- How to Play a CD on a Desktop Computer
- How to Create a Boot Disk
- What is Boot Sector?
Maybe you are interested
How to send self-destructing messages on Duckist Instructions on how to delete apps from iCloud on any device 8 solutions to improve health to increase immunity for the body Asus-Lamborghini launches an impressive notebook HP introduced the Envy high-end laptop pair in Vietnam What should people eat when they are short of blood, should they eat nothing?