Back up the boot drive using Disk Utility
This tutorial will show you one of the many methods available to backup your boot drive. This process usually takes half an hour to 2 hours or more, depending on the size of the data you are backing up.
Table of Contents
You may have heard the advice of backing up the boot drive before making any system updates. That is a great idea, but you may be wondering how to accomplish this.
This tutorial will show you one of the many methods available to backup your boot drive. This process usually takes half an hour to 2 hours or more, depending on the size of the data you are backing up.
1. How to back up the boot drive using Disk Utility

Disk Utility's Restore tab can create a copy of the boot drive.
In this tutorial, we will use OS X's Disk Utility to perform backups. Disk Utility has two features that make it a great candidate for backing up boot disks. First, Disk Utility can create a bootable backup, so you can use it as a boot disk in an emergency. Second, it's free. You already have Disk Utility, because it is included in OS X.
What needs to be prepared?
- Disk Utility, part of OS X and available at / Applications / Utilities /.
- Internal or external hard drives are large enough to store data on the current boot drive.
- A drive does not contain any data you want to keep. The method to be used will delete the target drive during the backup process.
The destination hard drive can be an internal or external hard drive. If it is an external hard drive, there are two things to consider that determine if the backup you created can be used as an emergency boot drive.
- External FireWire hard drives can be used as boot drives on both PowerPC-based Macs and Intel-based Macs.
- External USB hard drives can be used as boot drives on Intel-based Macs, and PPC-based Macs do not. Be sure to check if you can boot from your external device. An easy way to make sure is to create a bootable backup of the OS X installer, then try booting from that external device.
- External Thunderbolt memory works as a boot drive for any Mac that has Thunderbolt ports.
Even if the backup drive cannot be used as a boot drive, you can still use it to restore the original boot drive if needed (just a few more steps to recover the data is possible).
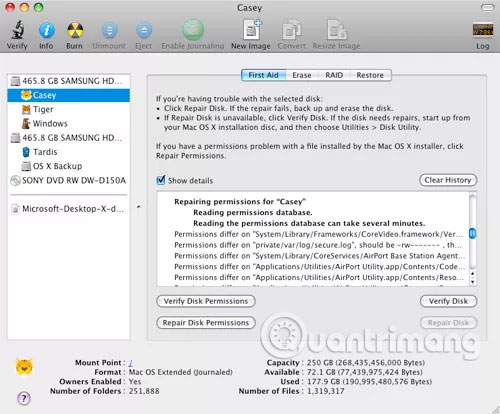
2. Before backing up, verify the destination drive with Disk Utility

Be sure to verify and repair the destination drive, if needed, before you create a backup. Before you back up the boot drive, make sure that the destination drive has no errors, which can prevent backups from being performed.
Verify destination drive
- B1 : Launch Disk Utility, located at / Applications / Utilities /.
- B2 : Select the destination drive from the device list in Disk Utility.
- B3 : Select the First Aid tab in Disk Utility.
- B4 : Click the Verify Disk button .
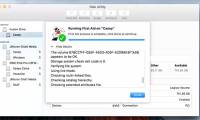
The drive verification process will start. After a few minutes, the following message will appear: 'The volume {volume name} appears to be OK' . If you see this message, you can move on to the next step.
Verification Errors
If Disk Utility lists any errors, you will need to repair the drive before continuing.
- B1 : Select the destination drive from the device list in Disk Utility.
- B2 : Select the First Aid tab in Disk Utility.
- B3 : Click the Repair Disk button .
The drive repair process will start. After a few minutes, the following message will appear: 'The volume {name of volume} has been repaired' . If you see this message, you can move on to the next step.
If an error is listed after the repair is complete, repeat the steps listed above in Verification Errors. Disk Utility can sometimes fix only a few errors in one run, so it may need to repeat the process several times before you receive a message saying the repair is complete, no longer available. any more errors.
3. Check the permissions of the boot drive on your Mac
You should modify the permissions on the boot drive to make sure all files are copied correctly to the copy.
Now that you know the destination drive is in good condition, make sure that the source drive and the boot drive have no problem with the authorization. Authorization issues can prevent the necessary files from being copied or transferred to bad backups, so this is a good time to perform this routine maintenance.
Fix disk decentralization
- B1 : Select the boot drive from the device list in Disk Utility.
- B2 : Select the First Aid tab in Disk Utility.
- B3 : Click the Repair Disk Permissions button.
The decentralization repair process will start and may take a few minutes, so be patient. When finished, you will see the "Permissions repair complete" message . Don't worry if the Repair Disk Permission process creates many warnings, this is normal.
4. Start the process of copying the boot drive on a Mac

With the destination drive ready and the rights of the boot drive verified, it's time to make the actual backup and make a copy of the boot drive.
Make backups
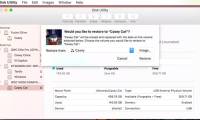
- B1 : Select the boot drive from the device list in Disk Utility.
- B2 : Select the Restore tab .
- B3 : Click and drag the boot drive into the Source field .
- B4 : Click and drag the target drive into the Destination field .
- B5 : Choose Erase Destination.
- B6 : Click the Restore button .
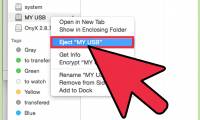
During the backup creation process, the target drive will be unmounted (disconnected) from the desktop, and then mounted again. The target drive will have the same name as the boot drive, because Disk Utility has created an exact copy of the source drive, according to its name. When the backup process is complete, you can rename the target drive.
Now, you have an exact copy of the boot drive. If you plan to create a bootable copy, this is a good time to ensure that it will act as a boot drive.
5. Check the Mac boot capacity of the created copy
To confirm that the backup will actually work as a boot drive, you will need to reboot the Mac and verify that it can boot from the backup. The easiest way to do this is to use the Mac's Boot Manager to select a backup as the boot drive. The article will use the Boot Manager to run during the boot process, instead of the Startup Disk option in System Preferences , because the choice you make when using Boot Manager only applies to that specific boot process. The next time you start or restart your Mac, the default boot drive will be used.
Use the Boot Manager
- B1 : Close all applications, including Disk Utility.
- B2 : Select "Restart" from the Apple menu.
- B3 : Wait for the screen to turn black.
- B4 : Hold down the
Optionkey until you see the gray screen with icons of the hard drive that can boot. This may take some time, so be patient. If you are using a Bluetooth keyboard, wait until you hear the Mac boot sound before you hold down theOptionkey. - B5 : Click the icon for the backup you just made. The Mac will now boot from the backup of the boot drive.
When the desktop appears, you will know that the backup can be used as a boot drive. You can restart the computer back to the original boot drive.
If the new backup fails to boot, the Mac will stall during the boot process, and then automatically restart with the initial boot drive. Backups may not start due to the type of connection (FireWire or USB) that the external hard drive uses (return to the first section of this tutorial for more information).
Hope you are succesful.
Was this article helpful?
Your feedback helps us improve.
Related Articles
 How to use Disk Utility to repair the hard drive and decentralize the drive10 minutes read
 Use Disk Utility to copy the drive on Mac8 minutes read
 How to Create Disk Images with Disk Utility (Mac OS)3 minutes read
 Fix Mac hard drive with Disk Utility's First Aid feature8 minutes read
 How to Create a Boot Disk8 minutes read
 How to delete a drive cannot be deleted with Disk Management16 minutes read
Reader Comments 0
Sign in with email or Google to join the discussion.