How to Boot from USB in Windows 7
This wikiHow teaches you how to boot from a USB flash drive rather than your computer's hard drive on a Windows 7 computer. Booting from a USB allows you to do anything from run a light operating system to use command line services such as...
Table of Contents
Part 1 of 4:
Preparing to Boot
-
 Understand how booting from a USB works. By default, your computer starts up by reading the operating system information from its built-in hard drive. You can change this by telling it to prioritize plugged-in USB items over the built-in hard drive.
- The settings for your computers boot behavior are in a menu called the BIOS, which is a pre-startup menu you can access by pressing a key specific to your computer model as your computer turns on.
- In order to boot from a USB flash drive, the flash drive must be set up as a bootable item, and it must have a disk image (ISO) file with an operating system or similar service installed on it.
-
 Determine your computer's BIOS key. The key that you press to access the BIOS varies depending on your computer manufacturer and model. You can look up your computer's BIOS key by typing your computer's manufacturer and model name, along with "bios key", into a search engine and reviewing the results, or you can consult your computer's manual if you still have it.
- Most computers use one of the function keys (e.g., F12) as the BIOS key, though some computers will use the Esc key or the Del key.
-
 Plug your USB flash drive into your computer. The USB flash drive should plug into one of the rectangular USB ports on your computer's housing.
- On a laptop, the USB ports are typically on the sides of the housing, while desktop computers typically have the USB ports on the front or back of the tower.
-
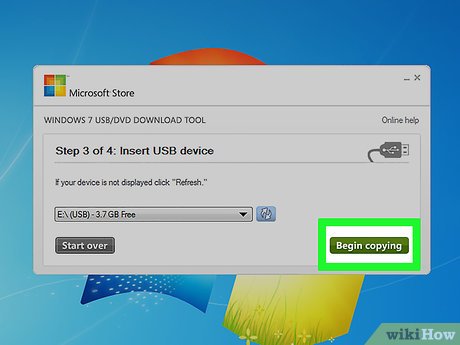 Make the USB flash drive bootable. If your flash drive isn't already bootable, use the Command Prompt or one of the Windows installation tools to make it so.
 -
 Add the file to which you want to boot to the flash drive. Copy the ISO file you want to boot from by clicking it once and then pressing Ctrl+C, then open your flash drive and press Ctrl+V to paste in the file.
- For example, if you're attempting to install or use Ubuntu Linux from the flash drive, you would paste the Ubuntu ISO file into the flash drive's window.
- Skip this step if you created a bootable USB using the Windows 7 or 10 installation tool.
-
 Save and close any open work. Before you proceed with accessing the BIOS, you'll want to save any open work and then close any open programs to avoid losing your progress.
Part 2 of 4:
Accessing the BIOS
-
 Open Start. Click the multicolored Windows logo in the bottom-left corner of the screen.
-
 Click Shut down. It's on the right side of the Start menu. Doing so will prompt the computer to begin shutting down.
- You may have to confirm this decision.
-
 Wait for your computer to finish shutting down. Once your computer falls completely silent, you can proceed.
 -
 Press your computer's Power button. Your computer will begin to start up.
-
 Immediately begin tapping the BIOS key. You'll want to do this as soon as you release the Power button, and don't stop until the BIOS screen appears.
 -
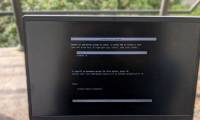
 Stop pressing the BIOS key when the BIOS page loads. The BIOS page usually resembles a blue screen with white letters, though your BIOS may look different. At this point, you're free to change your computer's boot order.
Part 3 of 4:
Changing Boot Order
-
 Find the "Boot Order" section. You may see this option on the main BIOS screen, but you'll most likely have to scroll left or right (using the left and right arrow keys, respectively) through the tabs at the top of the screen until you find the "Boot Order" section.
- You'll probably find this section on the Advanced tab, though many BIOS variations have dedicated Boot Order tabs as well.
-
 Open the "Boot Order" menu. If the "Boot Order" section is a menu item instead of a heading, select it by using the arrow keys and then press ↵ Enter.
 -
 Select the "USB" option. Find and scroll down to the "USB" option in the list of boot locations.
 -
 Look for the key legend. You'll usually find this in the lower-right side of the screen, though it may be at the bottom of the screen instead.
 -
 Determine which key to use to move up the selected option. Usually you'll press the + key to move up the selected option, but check the key legend's information to be sure.
 -
 Move the "USB" option to the top of the list. Press the proper key until the selected "USB" option is at the top of the "Boot Order" list. This ensures that, when you boot up your computer again, your computer will look for a bootable USB option instead of defaulting to the hard drive.
Part 4 of 4:
Booting from USB
-
 Save your changes and exit the BIOS. Press the "Save and Exit" key as specified by the key legend, then press the "Confirm" key when prompted.
- For example, you might press Esc to save your changes and then press Y to confirm that you want to save and exit.
-
 Restart your computer if necessary. If your computer doesn't boot from the USB flash drive the first time, it might have already selected your hard drive as the boot location. If so, you'll need to restart your computer (with the USB flash drive plugged in) before proceeding.
 -
 Wait for your USB program's menu to appear. Once your computer recognizes the USB flash drive as a bootable location, you should see the USB flash drive's installed program, service, or menu appear.
 -
 Follow any on-screen instructions. When the menu appears, you can proceed with running and/or installing your USB flash drive's program or service.
Was this article helpful?
Your feedback helps us improve.
Related Articles
 How to implement Clean Boot on Windows 10/8/73 minutes read
 Windows 10 won't boot? Here are 10 steps to fix Windows 10 not starting8 minutes read
 How to fix Windows 10 not booting error11 minutes read
 How to fix boot errors on Windows 86 minutes read
 Instructions to edit or replace Boot.ini file on Windows XP3 minutes read
 Steps to fix dual boot option not showing in Windows 106 minutes read
Reader Comments 0
Sign in with email or Google to join the discussion.