How to Create a Boot Disk
A boot disk can help restore and recover your computer if a major error or virus renders your computer unusable, or unable to boot. Learn how to create a backup boot disk for your Windows or Mac computer. Swipe in from the right edge of....
Method 1 of 3:
Creating a Boot Disk for Windows 8
-
 Swipe in from the right edge of the screen on your Windows 8 device.
- If you're using a mouse, point to the lower-right corner of your screen.
-
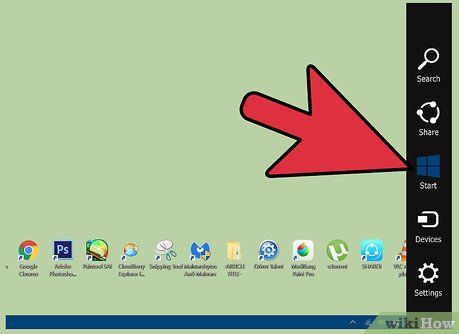 Tap or click on 'Start.'
 -
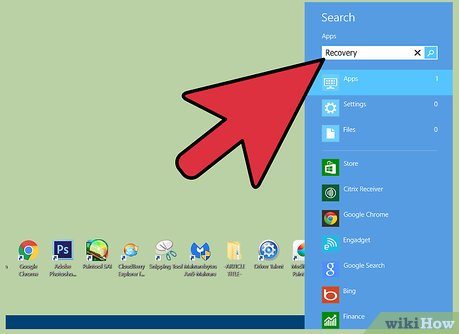 Type 'Recovery' into the search field. A search results pane will appear onscreen.
 - Click on 'Settings' and select 'Create a recovery drive.''
-
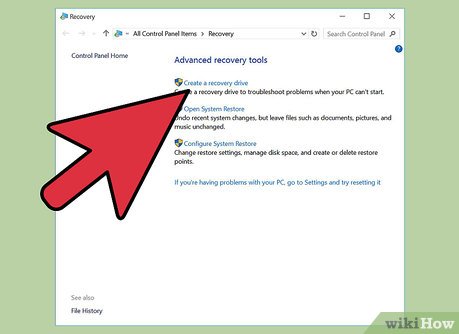
 Place a checkmark next to 'Copy the recovery partition from the PC to the recovery drive.'
 -
 Click on 'Next.' The screen will then inform you how much data capacity you will need for the boot disk.
 -
 Verify that you have a USB flash drive or blank CD with enough memory to support the capacity you'll need to create the boot disk. The data capacity will vary depending on the type of Windows 8 device you're using. For example, if your device requires 6 GB capacity for the boot disk, you'll need a USB flash with at least 6 GB of free space.
 -
 Insert a USB flash drive into one of the empty USB ports on your Windows 8 device.
- If you're using a blank CD or DVD, select 'Create a system-repair disc with a CD or DVD' from the dropdown menu before inserting a CD into the disk drive.
-
 Follow the remaining prompts provided by Windows 8 to finish creating the boot disk. After its creation, the boot disk can be used to restore or repair Windows 8 if at any time you have problems booting your device[1].
Method 2 of 3:
Creating a Boot Disk for Windows 7 / Vista
-
 Click on the 'Start' button of your Windows 7 or Windows Vista computer.
 -
 Select 'Control Panel.'
 -
 Click on 'System and Maintenance,' and select 'Backup and Restore.'
 -
 Click on 'Create a system repair disc' in the left pane of the Backup and Restore window.
 -
 Insert a blank CD into the disk drive of your computer.
 -
 Select the name of the drive you're using from the dropdown menu next to 'Drive.'
 -
 Click on 'Create disc.' Windows will then begin to write the files needed to repair the system onto the disk you inserted.
 -
 Click on 'Close' after Windows informs you that the boot disk has been created. You will now have the ability to use the boot disk at any time you're having difficulty booting up your Windows 7 or Windows Vista computer[2].
Method 3 of 3:
Creating a Boot Disk for Mac OS X
-
 Open the Applications folder on your Mac.
 -
 Open the Mac App Store application.
 -
 Search for and download the latest OS X installer from the App Store. At this time, OS X Mavericks 10.9 is the latest installer being provided by Apple.
- If you want to use an earlier version of OS X that you previously purchased from the App Store, hold down the 'Option' key and click on 'Purchases' within the App Store to access and redownload that particular OS X installer[3].
-
 Insert your USB flash drive into a USB port on your computer. The flash drive must have at least 8 GB free space.
 -
 Open the Applications folder and click on 'Utilities.'
 -
 Select 'Disk Utility.' Your computer will start to collect disk information from the USB flash drive you inserted.
 -
 Click on your USB drive after it displays in the left pane of Disk Utility.
 -
 Click on the tab labeled 'Partition' in Disk Utility.
 -
 Select '1 Partition' from the dropdown menu below 'Partition Layout.'
 -
 Select 'Mac OS Extended (Journaled)' from the dropdown menu next to 'Format.'
 -
 Click on the 'Options' button near the bottom of the Disk Utility window.
 -
 Select 'GUID Partition Table' and click on 'OK.'
 -
 Open 'Terminal' from within Utilities in the Applications folder.
 -
 Type the following command into Terminal: 'defaults write com.apple.Finder AppleShowAllFiles TRUE;killall Finder;say Files Revealed'
 -
 Press 'Return' on your keyboard to execute the command. Your Mac will then start to format your flash drive for the Mac OS X installer program.
 -
 Open the Applications folder and locate the installer program you downloaded from the App Store. For example, if you downloaded OS X Mavericks, the installer program will be called, 'Install Mac OS X Mavericks.app.'
 -
 Right-click on the installer app and select 'Show Package Contents' from the list of available options.
 -
 Click on 'Contents' and select 'Shared Support' within the package contents window.
 -
 Double-click on 'InstallESD.dmg.' An icon labeled 'OS X Install ESD' will display on the desktop of your Mac.
 -
 Double-click on the 'OS X Install ESD' icon. The folder will open to display a series of hidden files, including 'BaseSystem.dmg.'
 -
 Go back to the Disk Utility application and click on the name of your USB flash drive in the left pane.
 -
 Click on the tab labeled 'Restore' in Disk Utility.
 -
 Click and drag the hidden file entitled 'BaseSystem.dmg' over to the 'Source' field in Disk Utility.
 -
 Click and drag the new partition from below the name of your flash drive in the left pane over to the 'Destination' field. In most cases, the new partition will be labeled 'Untitled.'
 -
 Click on the 'Restore' button within Disk Utility.
 -
 Click on 'Erase' when prompted to confirm that you want to replace the contents of your USB flash drive.
 -
 Wait for your Mac to create a boot disk on your USB flash drive. In most cases, the process will take up to 1 hour to complete.
 -
 Click on 'System' in the left pane and select 'Installation' after your Mac has finished copying files over to the flash drive.
 -
 Delete the directory file labeled 'Packages.'
 -
 Go back to the mounted folder named 'Install ESD.dmg' on the desktop.
 -
 Copy the folder named 'Packages.'
 -
 Go back to the Installation directory and paste the 'Packages' folder. The new folder will replace the directory file you previously deleted.
 -
 Eject your USB flash drive from your Mac computer. The flash drive can now be used as a boot disk in the event you need to reinstall or restore your current version of Mac OS X[4].