How to set up BIOS to boot from USB / CD / DVD, external hard drive
Setting up the BIOS to choose to boot from the support tools is a necessary step in the process of reinstalling the computer. We can use USB / CD / DVD or portable hard drive to reinstall Win. Therefore, setting up this BIOS will help the computer to boot with the corresponding boot device USB / CD / DVD or external hard drive that we are using. In the following article, we will guide you to read step by step BIOS setup to boot from USB, CD, DVD or external hard drive.
1. Access computer BIOS:
Depending on the brand and different laptops, the BIOS access key is not the same. For example, with Sony Vaio laptop, we will use F2 key, Acer laptop will be F12 or F2, and Lenovo will be F1 to access the computer BIOS.
Read the article How to access BIOS on different computers for details on how to access the BIOS the computer is using.

2. Set up BIOS to boot:
As mentioned, the access keys to the BIOS of each model will be different and the BIOS interface may be different, but the following actions apply to all computer models.
Step 1:
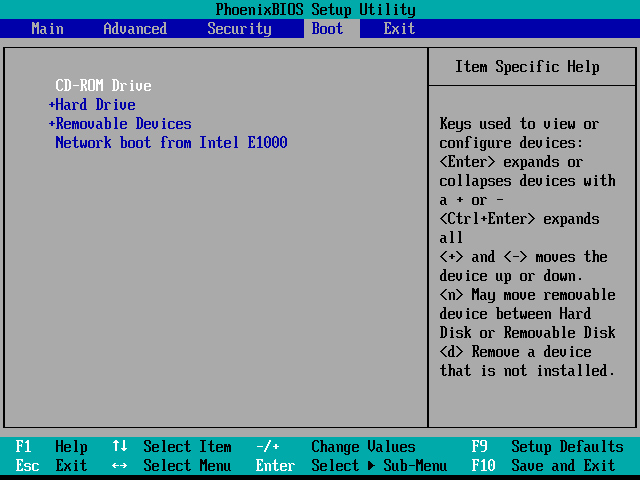
Once we have successfully accessed the BIOS, click on the Boot menu tab. You will see a lot of options as follows:
- Hard Drive: Windows will boot from the hard drive on the computer. This is the default boot. After resetting the win, we need to go back to re-set this option.
- CD-ROM Drive: boot from CD or DVD drive.
- Removable Devices: use USB or external hard drive to boot. Note to users, some of these optional models will display as External Drive, Removable Device or USB.

Step 2:
Normally, the machine will boot into CD or USB first to check if there is any installation device such as Windows disk or Hirent Boot disk.
- Create Hiren's BootCD from USB drive
- Hiren's USB creation guide is quick
Next is the boot order to hard drive to run the operating system. In the case of users proceed to install win or computer ghost need to change the default order above.
Case 1:
The boot order will always default to Removable Devices. We will use the up and down arrows to change the boot, select the first boot and then press Enter to select.

Case 2:
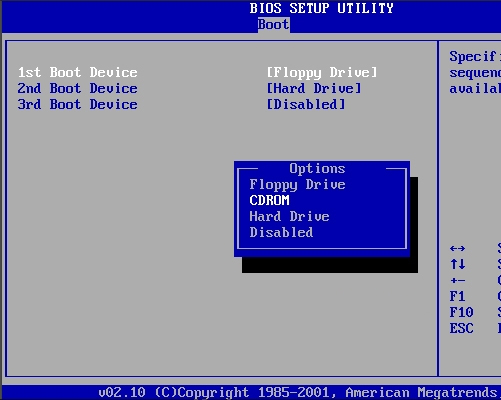
With the order on the left, we use the arrow on the keyboard to select. We go to the first option and press the left arrow key, right or press Enter to bring up the menu, then select the place to start first.

Case 3:
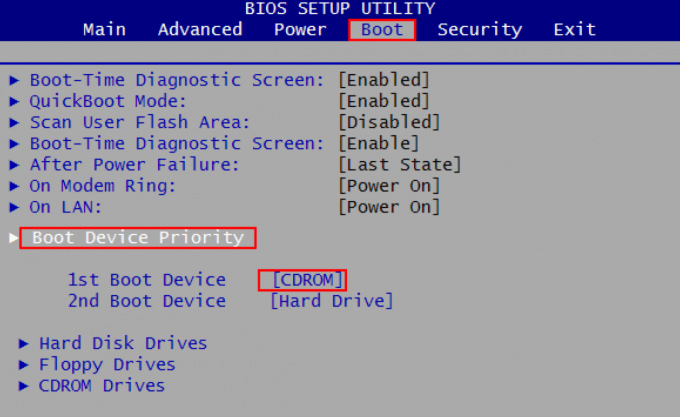
The interface has a Boot Device Priority section , the user will access it and use the arrows to select the part to boot in the 1st Boot Device .

When you don't see the USB or External Device option, we will go to the Boot Configuration section, the External Device Boot section to change Disabled to Enabled .

Finally save and press F10 to exit the BIOS.
Refer to the following articles:
- How to create USB Boot, USB install Windows by Rufus
- How to get the main ISO file from Microsoft
- Instructions to create USB installation, boot Windows with Windows 7 USB Download Tool