Configuring Exchange Client Access with ISA 2006 (Part 1)
Configuring Exchange Server Client Access with ISA will be an easy task without any hassles? Actually this is not..
Rui Silva
Configuring Exchange Server Client Access with ISA will be an easy task without any hassles? Actually this is not. Although there are many sources on the Internet writing about this topic and Microsoft also provides extensive technical documentation with many different or brief steps, but the truth is that each time a process of providing access is made In Exchange for users to expand with ISA Server we encounter some difficult problems.
This article will discuss with you some of the following issues:
-
Configure ISA Server
-
Configure Exchange
-
Certificates: how to get, install and export
-
How to create an appropriate web listener
-
Principles for configuring ISA Server
-
Control again (directories and protocols)
This article applies to both Exchange 2003 and Exchange 2007.
The main object
The main objectives to implement are:
-
Configure the full Exchange Client Access on the Internet
-
Outlook Web Access (OWA)
-
Outlook Mobile Access and ActiveSync
-
RPC on HTTP (s) / Outlook Anywhere
-
-
Use a simple URL without having to type HTTPS or / exchange (or / owa)
-
Use Forms-Based Authentication on the Internet
-
Open a small set of TCP ports on the firewall.
Solution structure
As mentioned above, we will introduce the most common scenario to give you 'complete solution', which is the solution we will focus on our own configuration.
Below is a picture of the structure that will be used in this article:

Figure 1: Exchange structure
Main features of this structure:
-
ISA Server is a working group
-
ISA Server only has one network interface
-
ISA Server in a DMZ
Configure ISA server
Our first task is to configure ISA Server in the workgroup with only one network interface. We will skip the procedure to install ISA Server, so it will start from the point ISA was installed in the Windows Server 2003 environment that does not belong to any domain. What we have to do is apply Single Network Adapter Template .
- Open the ISA Server Management Console. Go to Configuration > Networks . On the Templates window, you will find Single Network Adapter . Select it and you will activate the configuration window. Click Next twice.
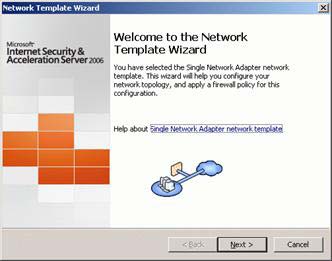
Figure 2
-
On the Internal Network IP Addresses window, you will see the addresses that will be configured to define the default ISA firewall Internal Network. You can accept the default options. Click Next .
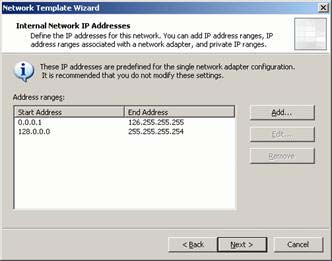
Figure 3
-
Select Apply default web proxying and caching configuration then click Next .

Figure 4
-
On the Completing the Network Template Wizard window, click Finish .
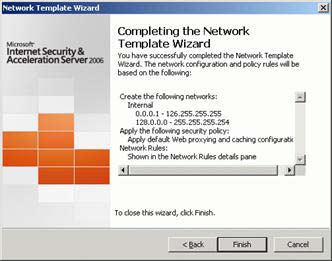
Figure 5
-
A warning will appear. Click OK

Figure 6
-
Click Apply to save the changes and upgrade the firewall policy. Click OK in the Apply New Configuration dialog box .
Certificates
To ensure communication between all devices is safe, you need to install server certificates on both Exchange CAS / Front-End and ISA Server. If this certificate comes from an internal CA, you need to install the CA certificate on both the server and the client with the same CA inside.
When you install Exchange 2007, you can install the Secure Sockets Layer (SSL) certificate by default, which is the certificate created by Exchange Setup. However, we do not recommend using it, because this certificate is not a secure SSL certificate.
-
To obtain a new server certificate using the Web Server Certificate Wizard, in IIS Manager, you must open the local computer, and then open the Web Sites folder. Right-click the Web site in the Exchange services and select Properties . On the Directory Security tab, click Server Certificate . Use the wizard to request and install a Web server certificate. In the Web Server Certificate Wizard, select Create a new certificate .

Figure 7
-
On Delayed or Immediate Request page , select Send the request immediately to an certification authority online if you have a Windows Server 2003 enterprise CA installed in the domain, otherwise choose Prepare the request now, but send it later .
-
Enter the required information on the Name and Security Settings and the Organization Information pages.
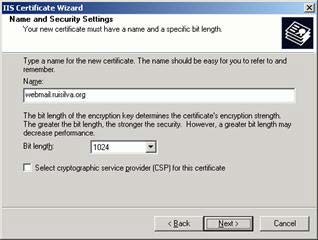
Figure 8
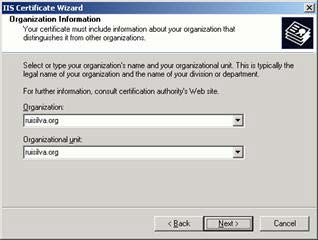
Figure 9
-
Type FQDN in Your Site's Common Name window. This name must match the name that ISA Server will use to communicate with the Exchange server. It is not the last extension name as we will see ahead.
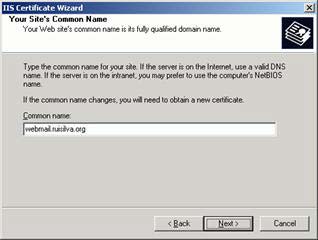
Figure 10
-
Enter the required information on the geographic information window - Geographical Information.

Figure 11
-
If you have selected Send the request immediately to an online certification authority , accept the default port of 443 on the SSL Port window and from the list under Certification authorities , select CA from the internal business. Click Next to submit your request. These actions will also install the certificate for your Web site.
If you have selected Prepare the request now, but send it later , save the request to a text file and submit it in a browser. If it is a Microsoft CA, the URL will be http:/// CAServerName / CertSrv . Select Request a certificate , click Next and select Advanced request . Click Next and select Submit a certificate request using a base64 encoded PKCS # 10 file . Click Next , and open the request file that you saved from the Web Certificate Wizard in Notepad. Paste the entire text of the file, including the BEGIN and END lines into the Base64 Encoded Certificate Request text box . When the certificate is issued, go back to IIS Manager, right-click the site on the Directory Security tab, click Server Certificate . Select Process the pending reques t.
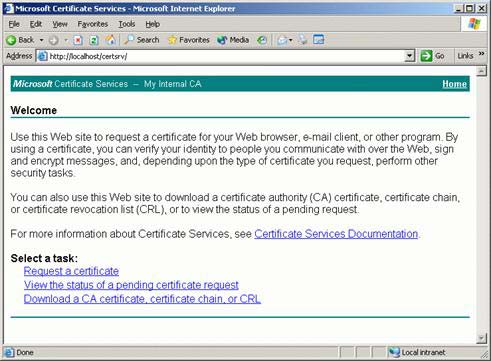
Figure 12
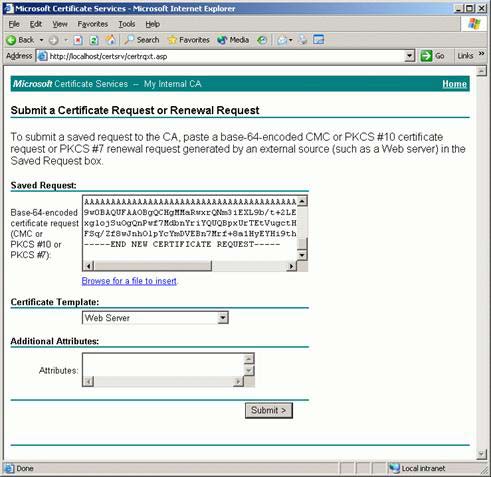
Figure 13
The next step is to install the server certificate on the ISA Server computer, to enable a secure connection between the client and ISA Server. If a private CA is used, the root CA certificate from the private CA will need to be installed on the client computer to create a secure connection (HTTPS connection) to the ISA server.
This certificate may have the same name as the certificate installed on the Exchange CAS / Front-End, if the internal name corresponds to the public name. In that case, we will perform the following procedure to export the server certificate:
-
On CAS / Front-End, in IIS Manager, expand the local machine and then open the Web Sites folder. Right-click the Web Site in the Exchange services, and then select Properties .
-
On the Directory Security tab, click Server Certificate to start the Web Server Certificate Wizard . Click Nex t on the Welcome page.
-
Select Export the current certificate to a .pfx file on the Modify the Current Certificate Assignment window .
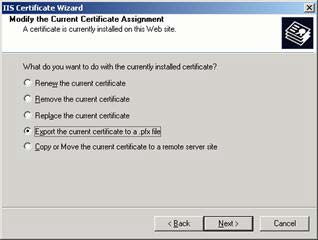
Figure 14
-
Type the path and file name on the Export Certificate window, click Next . Enter the password for the .pfx file, it is best to choose a strong password. This password will be required when the user is loading the .pfx file.
-
Copy the .pfx file created in the previous section to the ISA server.
-
On the ISA server, click Start , and then click Run . In Open, type MMC and then click OK . Click File, click Add / Remove Snap-in , and click Add to open the Add Standalone attachment. Select Certificates , click Add , select Computer account , and then click Next . Select Local Computer , and then click Finish . Click Close and click OK .
-
Open the Certificates button, right-click the Personal folder. Select All Tasks, then click Import . You will then go to the Certificate Import Wizard.
-
On the File to Import window, browse to the file you created before and copy to ISA server, then click Next .
-
On the Password window, type the password for this file, and then click Next .
-
On the Certificate Store window, select Place all certificates in the following store and Certificate Store is set to Personal (the default setting), and then click Next .
-
On the completed page, click Finish .
-
If you are using a private CA, you will need to enter the CA certificate. If it is a Microsoft CA, you must go to http:/// CAServerName / CertSrv and select Download a CA certificate, certificate chain or CRL . Repeat steps 6 through 11, but when asked where to place the certificate (step 10), select Trusted Root Certification Authorities .

Figure 15
-
Confirm that the server certificate has been installed correctly. Double click on the new server certificate. On the General tab, there must be a note to show that You have a private key that corresponds to this certificate . On the Certification Path tab, you must see the hierarchical relationship between your certificate and CA, and a note displays This certificate is OK .
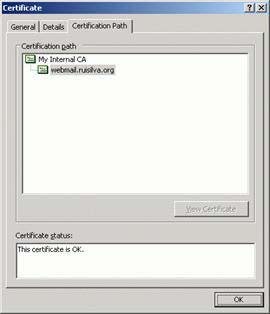
Figure 16
Conclude
In this first part, we introduced you to the structure and set up the main purposes of the lesson. We also saw how to configure ISA server in a configuration that has only one network interface and how to create, export, and import certificates.
In the next section, we will continue the configuration settings needed for the Exchange CAS / Front-End Server and how to configure the authentication mechanism for ISA servers when it is not part of the Active Directory domain. .
 Configuring Exchange Client Access with ISA 2006 (Part 2)