Instructions on how to install and use the wifi transmitter at home
Demand for installing wifi transmitters is becoming more and more popular. However, not everyone knows how to install wifi and how to use the wifi transmitter?
Table of Contents
In the midst of the speedy development of science and technology, the need to install wifi transmitters has become more and more popular in all corporate offices, business organizations, even in residential houses. However, not everyone knows how to install wifi at home as well as how to use this specific wifi transmitter to achieve the highest efficiency? So today's article quantrimang will help you learn more offline!
Instructions on how to install a wifi transmitter at home
Step 1: Prepare
First, you need to choose a location to install a fixed wifi transmitter, note that you should choose an open space with few obstructions. After that, prepare a piece of network cable that has been pressed with the length of the network nut in accordance with the working position (usually when buying a wifi transmitter, it will be available).

Step 2: Connect
Turn off computer devices, wifi transmitters (often called routers) and modems. Adjust the antenna of the router so that it is vertical, perpendicular to the ground.
You plug one end into the LAN port on the Router (yellow as shown), the other end plugs into the computer. Connect the internet cable from the modem to the WAN port (blue) on the Router.
After that, reboot all devices that will see the light on icon positions: power, system, wan / lan, wlan.

Step 3: Determine the IP address of the wifi transmitter.
Usually, to perform this step, you only need to flip the back of the device to see all the information that the manufacturer prints on it along with the IP address and password we need to access.
Step 4: Configure wifi on the Router
4.1. Configure TP Link wifi configuration
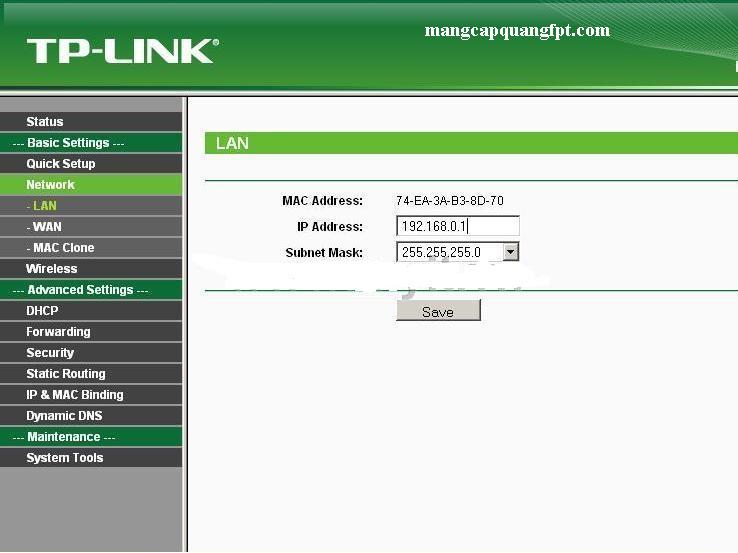
+ Use any browser to access the IP address 192.168.1.1 with username and password as admin.
+ Wifi management interface appears, in the left column you select Network> LAN to change the IP address and then click Save to change the device to the default IP range.
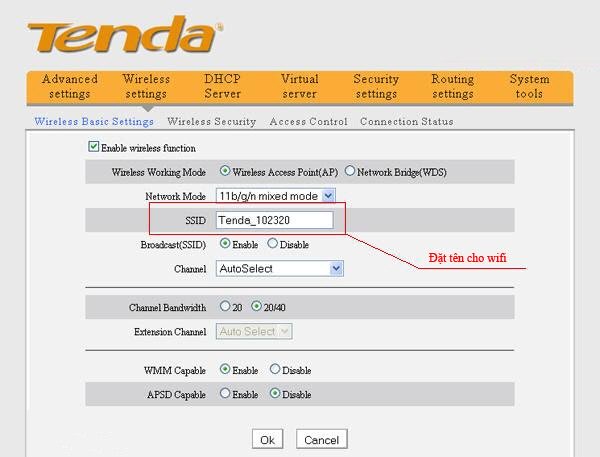
+ Next, in the left column, select Wireless> Wireless Settings. Here you enter the new wifi name in the Wireless Network Name section then click Save as shown below.
+ Set password for wifi transmitter. Also in the Wireless tab you select Wireless Security.
- Item Version and Encryption: select Automatic mode.
- Wireless Password: enter the password for the device.
- Click Save to save the process.
4.2. Tenda wifi configuration settings
+ Access via any web browser. Normally, the default address of Tenda will be 192.168.0.1 with the username and password as admin.
+ Select DHCP, then enter the WiFi password you want to put in the Security Key box and then click OK.
+ Click Advanced to enter the device custom settings, here you click the Wireless tab> enter the new wifi name in the SSID (Network Name) box and then click OK to save.
So, with some simple steps, you have installed TP Link and Tenda wifi. With VNPT or Viettel wifi transmitters and a few other brands, you can also manipulate the simple steps as above. Only thing each device will configure their user / pass logins differently.
Reference : The best wifi transmitters, wifi modems, worth buying for you
Detailed instructions to use wiffi transmitter at home
The wifi router (Router), also known as a wifi transmitter, is a useful tool to help you manage the internet access of computers in your home network. Below we will show you some ways to use the wifi transmitter at home:
How to view the list of devices in the home network
Using your family's WiFi hotspot, the first thing you should do is look at the list of devices on your home network and manage it.
First, access the router's administrative interface, enter the default login user / pass of each router or user / pass type that has been changed. Then, navigate to the list of devices that are using wifi.
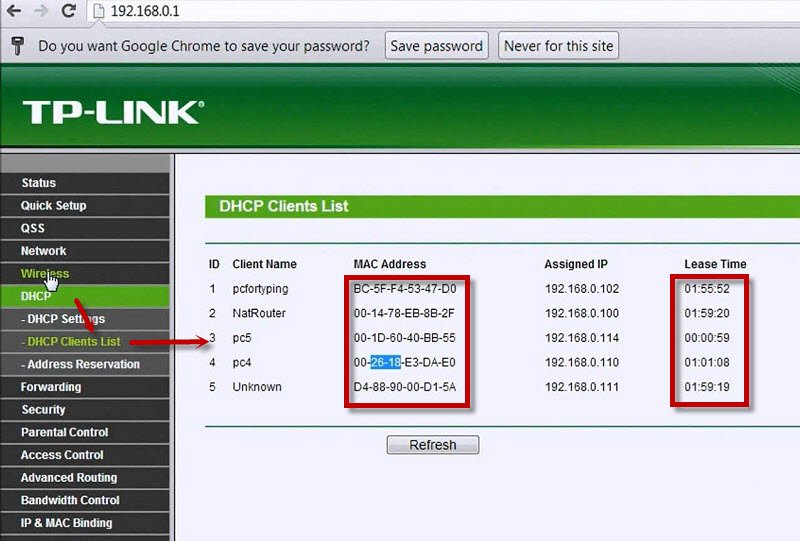
Each type of router has a different interface, so look for an item that has a name such as Attached Devices or Device List. Here you will see a list of IP addresses, Mac addresses and device names (if the router recognizes them) connecting to your WiFi network.
Compare this list to your devices to see if anyone uses your wifi without permission. If necessary, you can then change the wifi password
Change the new wifi password on the Router
- Change wifi password on Router Tenda
Access the default address 192.168.0.1 on the web browser, select the Wireless tab.
- To change the password, click Wireless Security and set the following:
+ Security Mode: choose Mixed WPA / WPA2 PSK.
+ WPA Algorithms: select TKIP & AES and enter the password in the Security Key box below.
+ Click OK to complete the password change process.

- Change wifi password on TP-Link Router
+ Access the address 192.168.0.1 on the web browser, with Username / password as admin / admin (or the current password that you need to change) and press Enter
+ Wireless => Wireless Security, in the Wireless Password field, enter the password to be changed and go to System Tools => Reboot => click Rebot.
Change channels on the wifi hotspot
Changing the channel for a wifi transmitter may help you to increase the speed when using WiFi. Tools like Wi-Fi Analyzer for Android or inSSIDer for Windows will help you find the best wireless channel you can use to access WiFi. The steps are as follows:
Step 1: Open the admin page of the Router
Step 2: Type 192.168.0.1 or 192.168.1.1 into the browser. You will need a username and password to access the administrator area.
Step 3: Each admin page of different Routers will display different options. Specifically:
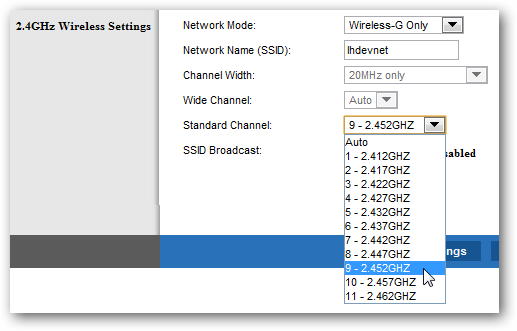
- With TP-Link Router, the Wireless Settings option is in Wireless, you look to the right will see Channel to Auto, select the channel you want to change for the Router and save it.
- With VNPT Router, go to Router administration page, select Network Settings> Wireless> Advanced, change channel option on the first line, change to the channel you need and then save it.
- With Router Tenda, select Wireless> Wireless Settings, then select the channel, select the channel you want to change.
Set Router to repeater
One of the most common ways to use WiFi transmitters at home is to turn the Router into a Repeater. Repeater is basically a tool to help you increase the coverage of WiFi network.
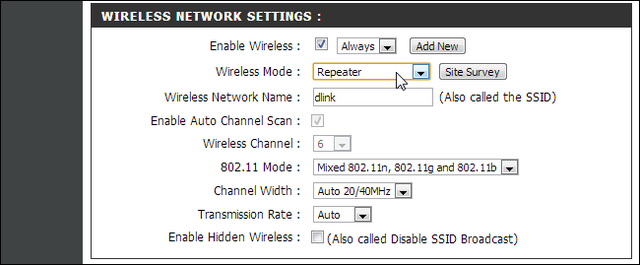
In case you are redundant with an old router or router and want to increase coverage, you can use this redundant router as a repeater. You can easily follow the way to turn the old Router into a Repeater, it is not too complicated.
Above is our share on how to install the wifi transmitter at home in the simplest and most detailed way and how to use the wifi transmitter in detail. Hope it can help you to use this device effectively and effectively.
Was this article helpful?
Your feedback helps us improve.
Related Articles
 Why should the WiFi transmitter be turned off for 10 seconds before restarting?3 minutes read
 Top 6 best 3G / 4G mobile WiFi transmitters8 minutes read
 Revealing the 5 best 4g wifi transmitters today6 minutes read
 How to use WiFi device from SIM 4G5 minutes read
 Should use Dongle or portable WiFi transmitter?6 minutes read
 What is Department of Mobile WiFi?4 minutes read
Reader Comments 0
Sign in with email or Google to join the discussion.