How to remove and use the juicer simply
Being able to make these delicious, nutritious juices by yourself is nothing better, right? If you don't know how to remove the juicer and how to use it effectively, don't miss this article. Surely you will be confident to be able to make attractive drinks for the whole family!

How to properly install the juicer
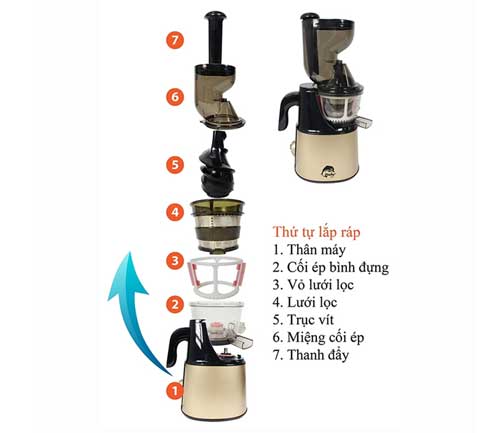
On the market today there are many different types of presses. Depending on the model, they also have different designs. However, in general, a fruit juicer will consist of main parts such as:
- Machine body
- Pressed mouth
- Squeeze the container
- Crushed blade
- Residue tank
- Juice container
- Filter net
- Screw
- Push bar
- Brush

With such a normal machine, we proceed to mount as follows:
Step 1: Check if the rubber cover under the press is closed
Step 2: Install the cover to protect the sieve and sieve together
Step 3: Install the mortar to press into the body, then install the filter net into the press. Note to turn the clockwise direction, so that the arrow on the filter mesh matches the arrow on the press.
Step 4: Insert the screw into the filter net
Step 5: Insert the mortar mouth into the press. Note: When the installation is complete, the start pin on the press housing must match the body and emit a sound when mounting.
Step 6: On the mouth of the press jar with a protective cover, you can open or close them at will.
So the way to install the fruit press was done.

How to remove the juicer
The way to remove the juicer is extremely simple. You do the opposite compared to the above installation process. Which part is finally installed will be removed first.
How to use the juicer to bring optimum results
How to use the juicer
Step 1: Check if the press is properly installed
Step 2: Set the pitcher, the container of residue at the right position
Step 3: Plug in the power
Step 4: Select function buttons, for example:
- ON: Start the product
- OFF: Turn off or temporarily stop using the product.
- RESERVE: Rotate reversal, only use when there is food trapped inside to turn around to squeeze food back.
Then put the material in the pressing bowl.
Note:
- Read the instruction manual for each machine
- Choose materials suitable for the type of machine you use. Because there are some models that will not be suitable for pressing soft fruits such as bananas, mangoes, papayas .
- If it is necessary to shred it, cut up the ingredients before putting them in the machine. Some hard-seeded fruits such as plum, peach, toad . must be removed seeds before use.
- When you continue to feed the material, you should avoid cramming slowly
- If during the process of pressing, there is a material jam. You turn off the machine then take out all the food for a few minutes before proceeding to press it
- If you are using it, you will have to turn off the machine, remove the electricity, then remove the compartment to remove the debris and re-install it as the original to press
- Do not allow the device to operate when there is no food
- Each press should not be operated continuously for more than 20-30 minutes (depending on the model). If you have to squeeze a lot of food, you should try to squeeze it into different batches.
- For machines with a grinding function, remember to open the rubber button under the mortar to install it.
- Fresh fruits and vegetables should be used to increase juice quality
- Juice should be used always, avoid long time to make water change color, degenerate .

How to clean and preserve the juicer
When the press is finished, you turn off the machine, unplug the power then proceed to clean immediately, avoid the case for too long after use, the materials will stick to make it difficult for the cleaning process.
- Remove the residue tray and discard it, depending on some models if you find that the amount of residue remains, you can use it to cover your face, exfoliate skin, apply it to plants .
- Remove machine parts from the camera body
- Clean the parts with water, soap . to remove food residues
- Dry and dry the parts
- With the camera body, it is recommended to get a soft damp cloth to clean it
- When the parts are completely dry, carry out the installation and storage in a cool, dry place, avoiding invasive insects for future use.
Above is how to remove the juicer and how to use the juicer effectively. Hopefully they will help you so you can make nutritious glasses for yourself and your family. Good luck!
>>> Reference:
- Is the Hurom review machine slow down good? How much?
- Which juicer is the cheapest today?
- Should choose a normal juicer or a slow press?