
The following article introduces you in detail How to draw a table - Add, edit, delete column rows in Word 2016 table.
1. Draw tables, create tables in Word 2016
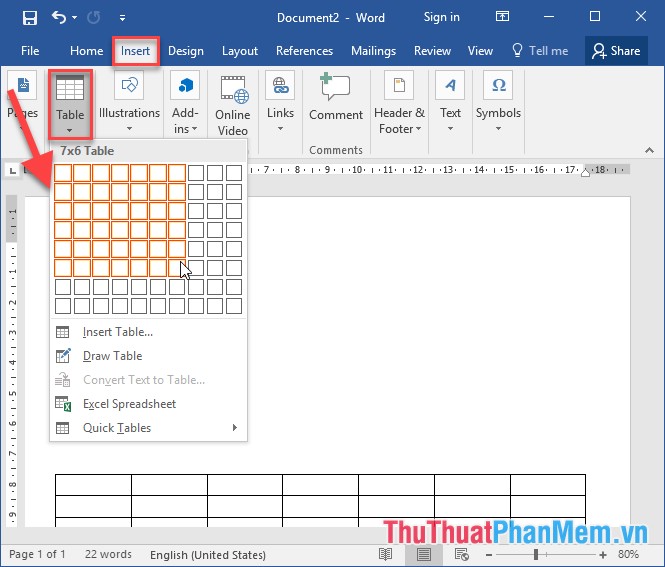
Method 1: Go to Insert -> Table -> using the mouse to select the number of rows and columns to create the table:
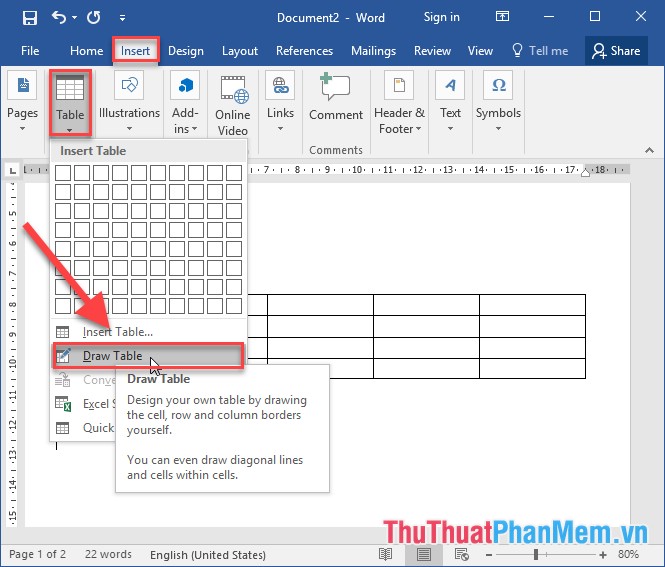
Method 2: Go to the Insert tab -> Table -> Draw Table -> allows you to create a table using a pen to draw the board:
The borders of the board are drawn using a brush:
Method 3: Go to the Insert tab -> Table -> Insert Table :
The dialog box appears enter the number of columns to create a table in the Number of Columns , enter the number of rows to create in the Number of Rows:
So with the above 3 ways you can create standard data tables to use. Also in some cases it is necessary to have a diagonal border in a cell you choose Design -> Boders -> Borders -> Diagonal Down Border:
The result has created a data table as shown:
After you finish drawing the table, you can adjust the display and background color for the table by clicking the Design tab to select the style for the table in the Style Table:
2. Insert more rows and columns in tables in Word 2016
MS Word 2016 supports quite good features to help you manipulate on the board quickly and easily. To insert more rows, you just need to move the line between the two lines when the mouse cursor turns the plus sign (as shown) and left click on the symbol, you can insert a column immediately after the selected row:
For inserting columns, you do the same thing:
In addition to inserting rows and columns, the Layout tab option has the following options:
- Insert Below: Insert more rows below the selected row
- Insert Above: Insert more rows above the selected row.
- Insert Left: Insert 1 column to the left of the selected column.
- Insert Right: Insert 1 column to the right of the selected column.
(Note: For this operation, you need to select the column or row before using the feature in the Layout tab).
3. Change the width of rows and columns in tables in Word 2016
To change the width of the row, you just need to move the position between the two rows when the mouse cursor turns into a 2-way arrow and drag and drop as you like:
Do the same with the column:
If you want to adjust the column and row widths of all rows in the table equally, go to the Layout tab - > select:
- Distribute Rows: Adjust all rows are equal.
- Distribute Column: Adjust all the columns are equal.
4. Delete rows and columns in tables in Word 2016
To delete rows in the table, the simplest operation is to select the row or column to be deleted -> right-click and select Delete Rows if delete rows, Delete Column if delete columns.
Also you go to Layout tab -> Delete select features:
- Delete Cells: Delete cells in a table in Word 2016
- Delete Columns: Delete columns in the table.
- Delete Rows: Delete rows in the table
- Delete Table: Delete the selected table.
After adjusting the contents and complete the table structure, if the table size exceeds the paper size, select the table in Layout -> Autofit -> select Autofit Window so that the whole table content does not exceed the number paper size:
The above is a detailed guide on how to draw a table - Add, edit, and delete column rows in a table in Word 2016.
Good luck!