Table of Contents
This guide explains how to draw a Table - Add, Edit, and Delete Column Rows in a Table in Excel, with clear steps, practical tips, and important checks before you begin.
1. How to draw a table, create a table in Excel 2016
Select the data area to create a table -> go to the Insert tab -> Tables -> Table:

The Creat Table dialog box appears and click OK:

As a result, you have created a data table with the selected data range. By default, when your data area has no title, you need to enter the column header content again:

If the selected data area contains a title, check the My table has header section to get the first row as the title:

Result of creating table with available title:

After creating the table you need to edit the table style -> click the Design tab -> Quick Styles -> choose the templates and styles for your table:

In addition, you can choose to add other features to the data table in the Design tab -> Tables Style Options :
- Header Row: Allow to hide or show the title of the table
- Total Row: Lets hide the total row at the bottom of the table.
- First Column: Create special format for the first column of the table.
- Last Column: Create special format for the last column of the table.

2. Insert more rows and columns in the table in Word 2016
The simplest and quickest way to create the last row of a table is to place your cursor in the last cell of the table:

Then press the Tab key for the last row created:
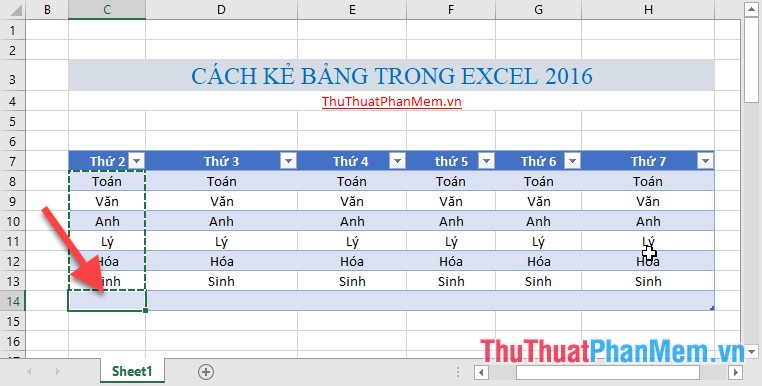
In case you want to insert a row at any position that is not the last position of the table -> place the cursor in the row adjacent to the row you want to create more -> right-click and select Tables Row above:
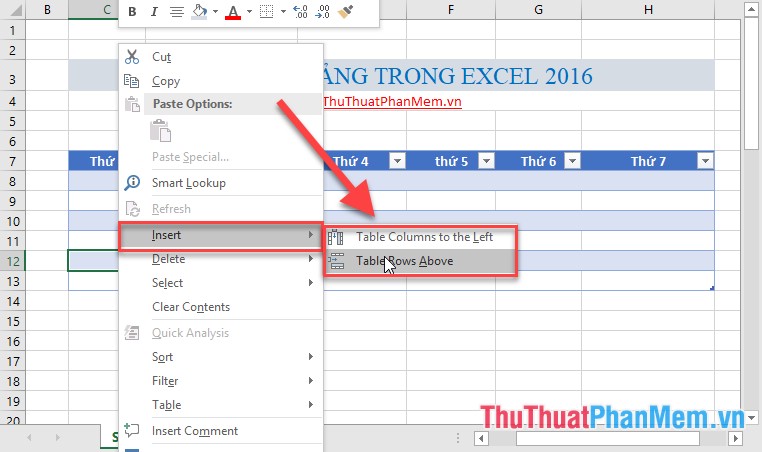
Alternatively you can go to Design -> Insert tab with the following options:
- Insert Cells: Insert more cells
- Insert Sheets Rows: Insert more rows
- Insert Sheets Columns: Insert additional columns
- Insert Table Rows Above: Insert rows above cells containing mouse cursor.
- Insert Table Column to the left: Insert a column to the left of the cursor position.

For inserting columns, you do the same thing.
3. Delete rows and columns in a table in Word 2016
To delete rows and columns, follow these steps:
Step 1: Select the rows or columns to delete -> go to the Design tab -> Delete including the following options:
- Delete Cells: Delete cells
- Delete Sheets Rows: Delete rows
- Delete Sheets Columns: Delete columns
- Delete Table Rows: Delete the table row
- Delete Table Column t: Delete the column of the table

It is up to you whether you want to delete the row or delete the column to select the features accordingly.
In addition, you set up some other features in the Format tab :

The above is a detailed guide How to draw a table - Add, edit, delete column rows in Excel 2016 tables. Wish you success!
FAQ
What should I know about Draw a Table - Add, Edit, and Delete Column Rows in a Table?
Focus on the key features, requirements, limitations, and practical use cases explained in this guide.
How do I get the best results with Draw a Table - Add, Edit, and Delete Column Rows in a Table?
Follow the recommended steps, use current software or information, confirm compatibility, and review settings before major changes.
Are there any risks or limitations?
Potential limitations depend on compatibility, data quality, cost, privacy, support, and how the product or method is used.
Related Articles
 How to Draw a Table - Add, Edit, and Delete Columns in a Table in Word 20166 minutes read
 Table Operations in Excel4 minutes read
 How to Add Excel Rows: How to Add Rows and Delete Rows in Excel4 minutes read
 How to Fix Excel Column/row Freezing Not Working4 minutes read
 MS Excel 2007 - Lesson 5: Edit Worksheet: Insert Excel 2007 Row3 minutes read
 Complete Tutorial of Excel 2016 (Part 6): Change the Size of13 minutes read
Reader Comments 0
Sign in with email or Google to join the discussion.