
How to create a folder tree in Word 2016 simply and easily
Drafting theses, projects or scientific research on Word 2016 will be easier if you know how to create a directory tree. This method helps organize content effectively, making it easy to edit and search.
Let's learn how to do it quickly with TipsMake with detailed instructions below.
Why create a directory tree in Word?
- Helps manage and edit text easily.
- Increase work efficiency, avoid wasting time searching.
- Support quick viewing of content with Navigation Pane.
Instructions for creating a folder tree in Word 2016
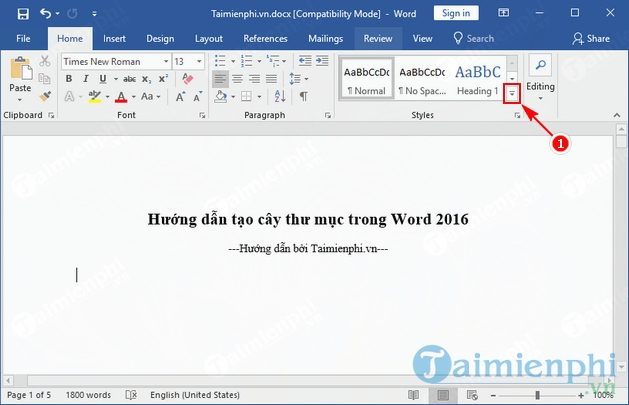
Step 1: Click on the icon in the box containing the font styles on the toolbar of Word 2016 as shown below:
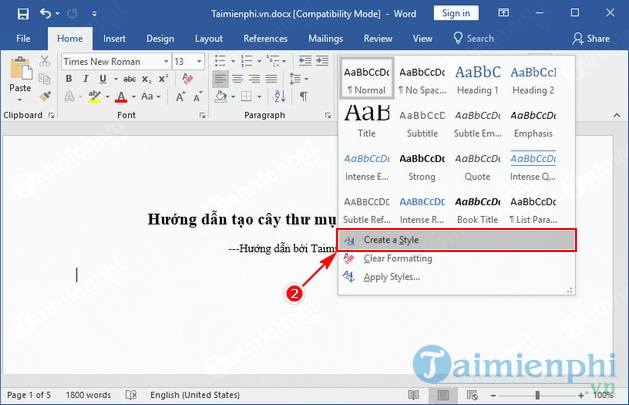
Step 2: Select Create a Style .
Step 3: Name the new style, like here I choose TipsMake-Thumuc1, then click Modify .
Step 4: In the new window Create New Style from Formatting, click Format and select Paragraph .
Step 5: In the Paragraph window, Indents and Spacing tab, General section , at Outline level you select Level 1. After selecting, click OK .
Step 6: After returning to the Create New Style from Formatting window, you can customize the font for your new style, then check the 2 items Add to the Styles gallery and Automatically update , then click OK .
Step 7: Repeat the above steps to create other styles, except in step 5 instead of choosing Level 1, you continue to choose Level 2, Level 3,. depending on the number of styles you have. As here, I have created up to TipsMake-Thumuc4 with Level 4.
Step 8: First, you set a chapter title for your text, then select the first style you create. As in the image below, I choose the style TipsMake-Thumuc1, the title I set is the same as the style name for you to easily observe.
Continue doing the same with the other subheadings to match the templates you created. Here is my Style with the font formatting processed:
So I have guided you through creating a folder tree in Word 2016. For easier viewing, open the View tab , select Navigation Pane to see the folder tree you just created.
And here is the result:
In Word 2016, you can create a folder tree to easily search and move between sections in the document quickly. If you use other versions of Word, please refer to the instructions below:
=> Create a folder tree in Word 2013
=> Create a folder tree in Word 2007
=> Create a folder tree in Word 2003
Note that creating a directory tree is different from creating an automatic table of contents in Word. If your document has many chapters and sections, creating an automatic table of contents will save you a lot of time instead of manually editing it. Word supports this feature, helping you complete it quickly without much effort.
You should read it
- Complete guide Word 2016 (Part 1): Familiarize yourself with the Ribbon interface
- Full Word tutorial 2016 (Part 4): Formatting text
- Word 2016 Complete Guide (Part 3): Get familiar with basic text manipulation
- Useful tips on Microsoft Word 2016
- Insert images into Word 2016 and align images in Word 2016
- Tutorial for Word 2016 (Part 27): How to use Style
- Complete guide Word 2016 (Part 2): Get familiar with OneDrive, create, save and share documents
- Tutorial for Word 2016 (Part 5): Use Find and Replace
- How to set up shortcuts on Microsoft Word 2016 yourself
- How to edit images in Word 2016
- How to create bookmarks in Word 2016
- How to turn off the Start interface on Word 2016
Maybe you are interested
5 smartphones with the best physical keyboard How to use Tor browser safely How to use Tor Browser to surf anonymously The mystery of the strange game appeared on Google.com without anyone knowing the author or time appeared Plug in a headset to hear the FM radio on your phone, why is it so complicated? The reason why you should assemble yourself is a Hackintosh computer instead of buying a Mac from Apple