Complete guide Word 2016 (Part 2): Get familiar with OneDrive, create, save and share documents
In addition, you can access OneDrive on devices like computers, mobile phones or other devices you use.
Part 1: Get familiar with OneDrive
To start using OneDrive, all you need to do is set up a free Microsoft account (in case if not yet).
If you do not have a Microsoft account, you can refer to the steps to create a Microsoft account here.
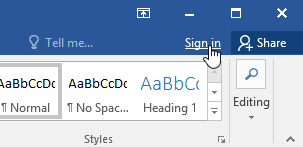
After you have a Microsoft account, the next step you need to do is sign in to Office. Just click Sign in at the top corner of Windows window.
1. The benefits of using OneDrive
After logging in to your Microsoft account, you can do some of these with OneDrive:
- Access files anywhere: When saving files on OneDrive, you can access those files on any device such as a connected computer, tablet or smartphone Internet. Also you can create a new text document on OneDrive.
- Backup files: When storing files on OneDrive also provides you with additional layers of data and file protection. If any problems occur on your computer, OneDrive will store the files securely and you can access them.
- Share files : You can easily share files on OneDrive with friends, relatives and colleagues. In addition, you can choose to edit or just read the file or not.
2. Save and open the file
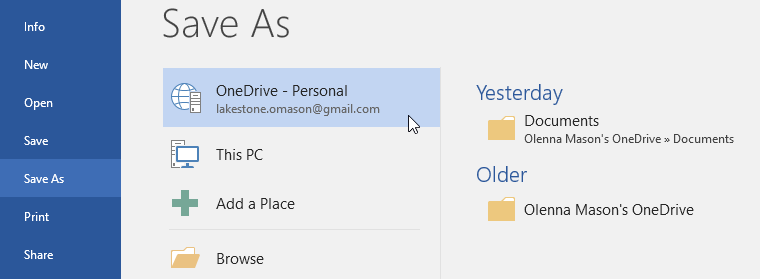
After logging in to your Microsoft account, OneDrive will display as an option whenever you open or store a file.
Also you still have the option to store the files on the computer. But however, storing files on OneDrive allows you to access on any other device, and allows you to share those files with friends, relatives and colleagues.
For example, when you click Save As , you can choose storage locations like OneDrive or This PC.
Part 2: Create and open documents
1. Introduction
Word files are also called documents. Whenever you open a new project on Word, you will have to create a new blank document or from a template.
Readers can refer to the steps to create and open documents in Word in the video below:
2. Create a blank document
When starting a new project on Word, the first step is to open a blank document.
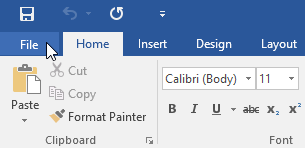
a. Select the File tab to access the Backstage view .
b. Select New , then select Blank document .

c. A blank document will appear on the screen.
3. Create a new document from Template
Templates designed and pre-documented, users can use the Template to create a new document quickly. Templates often include custom formats and designs, which can save you some time and effort when opening a new project.
a. Click the File tab to access the Backstage view , then select New .
b. Now, under the Blank document , a series of Templates will appear. You can use the Seach bar to search for specific templates. In the example below is a Search Template named Flyer .

c. You can choose a Template to preview.
d. And a preview of the Template will appear on the screen. Click Create to use the selected Template.
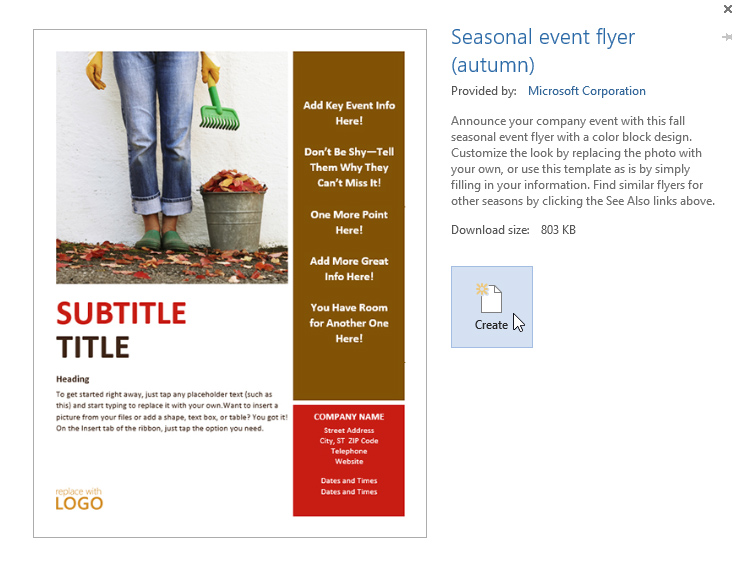
e. A new document will appear with the Template you selected.
4. Open an existing document
In addition to creating a new document, you will often have to open an existing document that you previously saved.
a. Navigate to the Backstage view , then click Open .

b. Select This PC , then click Browse . Or alternatively you can choose OneDrive to open the archived file on OneDrive.

c. Now the Open dialog box appears, navigate and select your document, then click Open .

d. The document you selected will appear on the screen.
5. How to pin a document?
If you work regularly, use a document you can pin the document to the Backstage view for faster access.
a. Navigate to the Backstage view , then click Open , then click Recent .
b. A list of recently edited documents will appear. Hover over the document you want to pin, then click the pin icon.

c. The document will be pinned to recent documents until you unpin. To unpin a document, click the pin icon again.

Part 3: Compatibility Mode
In some cases you need to work with documents created on earlier versions of Microsoft Word, such as Word 2010 or Word 2007. When opening these documents, they will be displayed in Compatibility Mode.
Compatibility Mode disables some specific features, so you can only access the program search command used to create the document. For example, if you open a document created in Word 2007 you can only use tabs and commands found in Word 2007.
In the picture below you can see Compatibility Mode can affect the available commands. And because the document in the left pane is opened in Compatibility Mode, it only displays the commands available in Word 2007.

To exit Compatibility Mode, you will have to convert the document to the current version. However, if you are collaborating with people who only have access to earlier versions of Word, it is best to leave the document in Compatibility Mode, the format will not change.
1. Convert a document
If you want to access all features in Word 2016, you can convert documents to 2016 file format.
a. Click the File tab to access the Backstage view, then navigate and select the Convert command.

b. A dialog box will appear on the screen. Here you click OK to confirm the file upgrade.

c. The document will be converted to the latest file format.
Note:
Converting a file may cause some changes to the original layout of the document.
Part IV: Save and share documents
1. Introduction
When creating a new document on Word, you will have to know how to save the document for access and editing. On previous versions of Microsoft Word you can easily save files on your computer. Also, if you want, you can save files to the cloud service using OneDrive.
You can even export and share documents directly from Word.
See more videos showing how to save and share the following Word documents:
2. Save and Save As
Word provides users with 2 options to save any file: Save and Save As . In general, these two options work similarly, with only a few important settings different.
- Save : When you create or edit any document, you will use the Save command to save the changes. In most cases you will use this command. When saving a file, the first step is to just name the file and find the location to save the file. After completing the editing process, click the Save command to save the file on the same location and the same name.
- Save As : Use this command to create a copy of the document while keeping the original. And when using the Save As command you will have to put another name and find another location to save the copy.
3. Save a document
Whenever you open a new project or make some changes on your Word document, the most important thing is to save the document. Saving documents as early and often will help you no longer worry about losing documents. In addition, you should also pay attention to the location of the document to be able to find and open documents more easily.
a. Navigate and select the Save command on the Quick Access Toolbar .

b. If you first save the file, the Save As window will display on the Backstage view.
c. The next step you need to do is to choose the location to save the file and name it. Click Browse to select a location to save the file on the computer. Or alternatively, you can click OneDrive to save the file on OneDrive.

d. Now the Save As dialog box will appear. Select the location where you want to save the document.
e. Name the file and then click Save .

f. The document will be saved. You can click the Save command again to save the edit on the document.
You can also access the Save command by pressing Ctrl + S.
4. Use Save As to create a copy
If you want to save the document to another version while keeping the original, you can create a copy. For example, if your file is called Sales Report , you can save the copy as Sales Report 2 , and you can freely edit the document on the new version that the original remains the same.
To do this, click the Save As command on the Backstage view. And do the same as when you save a file, select the location to save the file and name the new file.

5. Change the location to save the default file
If you don't want to use OneDrive, the reason is because OneDrive is selected as the default storage location, you can change the default storage location to This PC.
a. Click the File tab to access the Backstage view.

b. Click on Options .
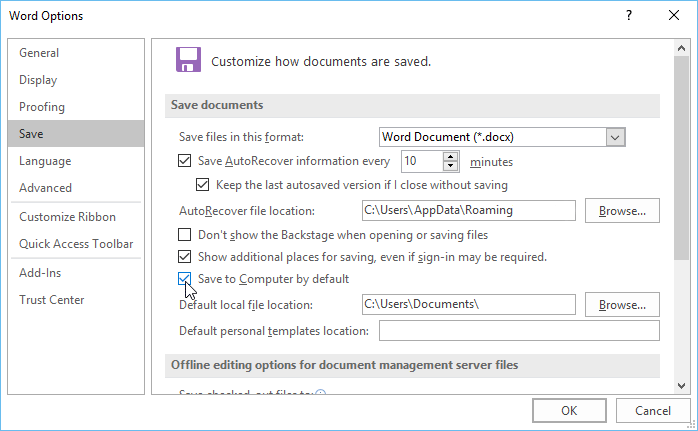
c. The Word Options dialog box will appear on the screen. Select Save in the left pane, then check the box next to the Save to Computer by default option , then click OK . And the default storage location will be changed.
Part V: AutoRecover
Word automatically saves the document to a temporary folder while you use the Word document. If you accidentally forget to save the changes on the document or if Word is suspended, then you can restore the file using AutoRecover.
Use AutoRecover:
a. Open Word. If the autosaved version of the file is detected, the Document Recovery panel will appear in the left pane.
b. Click to open the available files. And your document will be restored.

By default, Word will automatically save every 10 minutes. If you edit a document in less than 10 minutes, Word may not create an autosaved version.
If you don't see the file you need, you can browse all autosaved files from the Backstage view . Select the File tab , then click Manage Versions , then click Recover Unsaved Documents .

Part VI: Export documents
By default, Word documents will be saved in .docx file format. However, in some cases you may need to use other file formats, such as PDF or Word 97-2003 documents. The easiest way is to export your documents from Word to other available file formats.
1. Export the document as a PDF file
Exporting your document as an Adobe Acrobat document is also known as a PDF file, especially if you share a file for any user who does not use Word.
a. Click the File tab to access the Backstage view , then select Export and select Create PDF / XPS .

b. At this time, the Save As dialog box will appear. Select the location where you want to save the exported document, place any name you want and click Publish .

If you want to edit a PDF file, Word allows you to convert a PDF file to an editable document.
2. Export the document to another file format
You can also export documents to other file formats, such as Word 97-2003 documents in case you want to share with other users who are using older versions of Word, or into a .txt file if your document is plain-text.
a. Click the File tab to access Backstage view, select Export , and then choose Change File Type .

b. Select a file format then click Save As .

c. The Save As dialog box appears. Select any location you want to save the exported document, put a name and click Save .
You can also use the Save as type drop-down menu to Save as type on the Save As dialog box to save the document into different file formats.

Part VII: Share documents
Word allows users to easily share and collaborate on documents using OneDrive. Previously, if you wanted to share a file for other users, you would have to attach that document file in the email.
To share documents, the first step you need to take is to save the document on OneDrive.
Share documents:
a. Click the File tab to access the Backstage view , then click Share .

b. The Share window will appear.

Click on any Share option to share your document.
Good luck!