Table of Contents
This practical guide walks through 8 ways to take screenshots of macbook air M1 2020, explains the main requirements, and highlights common issues that may appear along the way.
In the article there are a few terms you need to understand:
- Image saved on the screen: The image is saved as a file right on the screen after taking it, not lost when taking the next photo. When you need to send photos, you have to choose a file to send, but you can't paste and send quickly.
- Photos saved to clipboard: Photos are only temporarily saved, when you take another photo, that photo will be lost. You can save these images by pasting (Command + V) them into an application (notes, word, chat messages, .)
1. Capture the full screen and save the image above on MacBook Air M1 2020
Full screen capture is to capture all the applications that are displayed on the screen from top to bottom, without leaving any part.
- Key combination: Command + Shift + 3.
- Image location: The image is saved on the screen.

2. Capture full screen and save to clipboard
This capture method is similar to the above method, it will also capture the entire screen. However, the captured image is only saved in the temporary memory, not on the computer.
- Key combination: Command + Shift + Control + 3.
- Image location: The image is stored in the clipboard.

3. Capture an area of the screen and save the image on the MacBook Air M1 2020
Unlike the above two shooting methods, you will only capture an area on the screen.
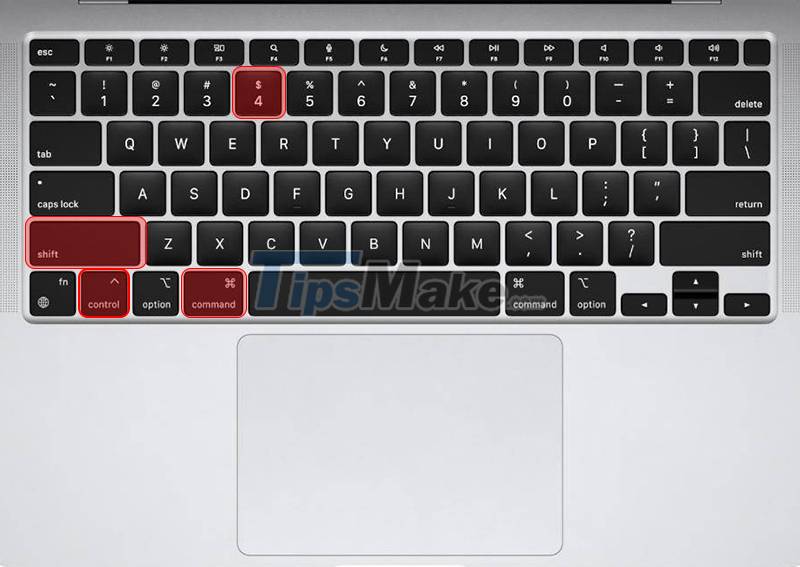
- Key combination: Command + Shift + 4 > Drag and drop the part you want to capture.
- Image location: The image is saved on the screen.

4. Capture an area of the screen and save it to the clipboard
Similar to how three à only capture a part of the screen you choose, but this way also only saves it in the clipboard.
- Key combination: Command + Shift + Control + 4.
- Image location: Save the image in the clipboard.
5. Capture an application window and save the image on the MacBook Air M1 2020
This way, you will be given the right to select a window on the open application to take pictures of them.
- Key combination: Command + Shift + 4 and Space Bar > Click on the window to capture.
- Image location: The image is saved on the screen.

6. Capture an application window and save it to the clipboard
You can capture a window similar to five and save it to the clipboard.
- Key combination: Command + Shift + Control + 4 and Space Bar > Click on the window to capture.
- Photo location: The photo will be saved to the clipboard.

7. Intuitive screen capture and screen video recording on MacBook Air M1 2020
With this key combination you have many options to capture the screen, record the screen.
- Key combination: Command + Shift + 5 > Select the function to perform.
- Image position: Depending on the user's choice.

8. Use a screen capture application on the MacBook Air M1 2020
Besides the screen capture functions available on MacBook , you can use some additional screen capture applications.
Hopefully after reading the article you can take screenshots yourself on MacBook Air 2020. Thanks for watching, see you in the next articles!
Key Takeaways
Use the information above as a practical reference for 8 ways to take screenshots of macbook air M1 2020. Review each step carefully, confirm any requirements, and choose the option that best fits your situation.
FAQ
What does this guide explain about 8 Ways to Take Screenshots of Macbook Air M1 2020?
It explains the main concepts, practical considerations, and useful steps related to 8 ways to take screenshots of macbook air M1 2020 without requiring advanced knowledge.
Who can benefit from learning about 8 Ways to Take Screenshots of Macbook Air M1 2020?
This information is useful for readers who want a clear overview, practical guidance, and reliable steps related to 8 ways to take screenshots of macbook air M1 2020.
What should I check before applying this information?
Review the requirements, confirm that your device, software, or situation matches the instructions, and back up important data before making major changes.
Related Articles
 3 Simple and Quick Ways to Take a Screenshot on Your Macbook3 minutes read
 5 Simple and Fastest Ways to Take Macbook Screenshots7 minutes read
 How to Take a Screenshot on MacBook Without Using Software5 minutes read
 5 Simple Ways to Take a Screenshot of Your Macbook, Guaranteed to Be8 minutes read
 5 Ways to Take Screenshots on Macbook10 minutes read
 How to Take Screenshots on a Macbook Extremely Fast and Easy4 minutes read
Reader Comments 0
Sign in with email or Google to join the discussion.