How to take screenshots on a Macbook extremely fast and easy
How to take screenshots on a Macbook extremely fast and easy. Unlike Windows lengthy, cumbersome operations, MacOS is shorter and more convenient. For example, if you want to take screenshots quickly on Windows, you need to use third party software to be fast
Table of Contents
MacOS is a highly customizable and highly customizable Apple operating system that gives users the most enjoyable and most comfortable experience in every operation. From the small features are also meticulously designed and created by Apple, thanks to that, MacOS users are always satisfied. Unlike Windows lengthy, cumbersome operations, MacOS is shorter and more convenient. Like taking screenshots on Windows fast, you need to use third-party software to be fast, and with MacOS, you only need to remember the shortcuts are done. Today, the software tips will guide you 3 ways to take screenshots of Macbook screen quickly and easily.

1. Capture full screen
Here's how to take a full screen shot on a Macbook, which will include everything that appears on your screen. After the capture is completed, MacOS will automatically save to the screen quickly and automatically named after the shooting date and time. Speaking of which, surely you already know how faster it is than Windows? And especially the automatic naming by the time and time makes you not be confused.
Shortcut:
Command + Shift + 3

And this is the result after the scan is completed.

2. Select the area to capture
Selecting a region to capture helps you share to the viewer what areas are needed and does not reveal too much information about your computer. The region selection for shooting is often used when you need to send samples, codes, messages by photos, . How to choose the area to capture on the Macbook is also integrated shortcuts, no need to take effort to cut the photo. whole screen.
Shortcut:
Command + Shift + 4
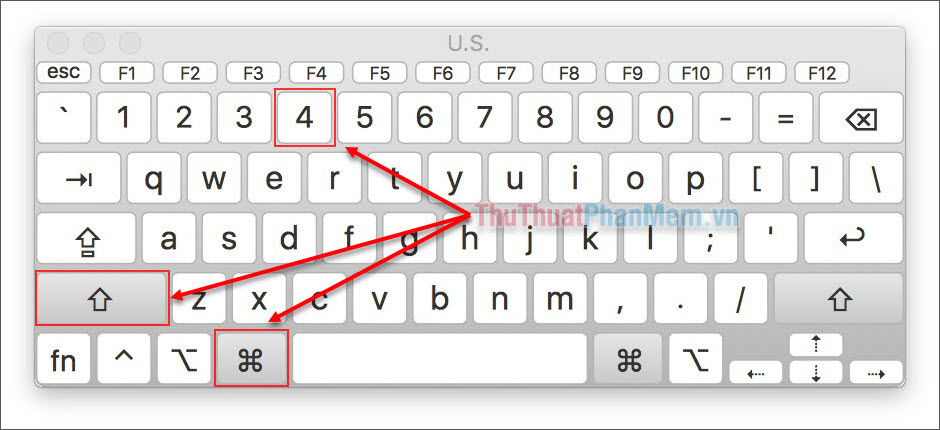
After you press the combination above, the cursor on the Macbook will become the center of the gun. Now hold the left mouse button and move the mouse to select the area to capture.

And this is the result when shooting by selection.

3. Choose a smart shooting area
This is a shot similar in nature to the Shooting Area selection, but a bit upgraded to help you work faster than the standard. With select shooting area, you have to hold the mouse and hover to select it, select Smart shooting area when you hover the software will automatically identify the area you want to capture. This saves your time.
Shortcut:
Command + Shift + 4 + Spacebar (Long bar / space)
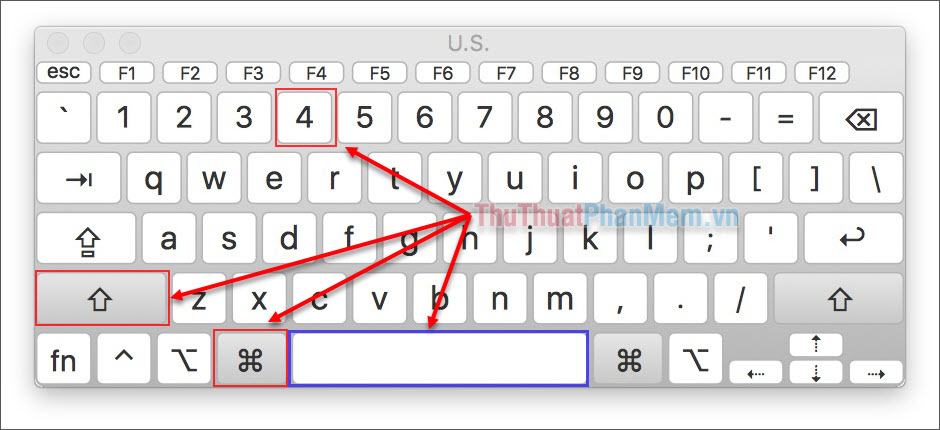
Your cursor will then be moved to the Camera icon. Now where you move the camera will appear focus area pink. This pink part will be the part the camera will take.

Results after shooting.

The above article, Software Tips introduced you to 3 ways to take a screenshot of the fastest and simplest Macbook. Through this article, we hope that this will help you quickly improve the operations on your Macbook. Good luck!
Was this article helpful?
Your feedback helps us improve.
Related Articles
 8 ways to take screenshots of MacBook Air M1 20204 minutes read
 5 Simple Ways to Take a Screenshot of Your Macbook, Guaranteed to Be Clear7 minutes read
 Ways to take screenshots in Windows 8 extremely fast and simple3 minutes read
 3 simple and quick ways to take a screenshot on your MacBook2 minutes read
 How to take screenshots Laptop HP fast and simple2 minutes read
 Instructions on how to rename Zalo extremely fast and easy2 minutes read
Reader Comments 0
Sign in with email or Google to join the discussion.