Panda - Android voice assistant that does what Siri, Google can't do yet
Panda is an intelligent assistant that can understand your commands and operate the phone interface to perform complex tasks on any app, just like a human..
Many people are used to the idea of voice assistants as limited. They'll set an alarm, answer a quiz, maybe open an app, and then quietly leave. But over the past few months, I've been using a new kind of assistant that doesn't just listen, but actually uses my phone the way you do. It reads the screen, taps buttons, enters data into fields, and automates my Android smartphone to quickly perform multi-step tasks. That app is called Panda.
What is Panda?
Panda is an intelligent assistant that can understand your commands and operate the phone interface to perform complex tasks on any app, just like a human.
Panda setup requires some permissions
Don't worry, the app only requires a few permissions.
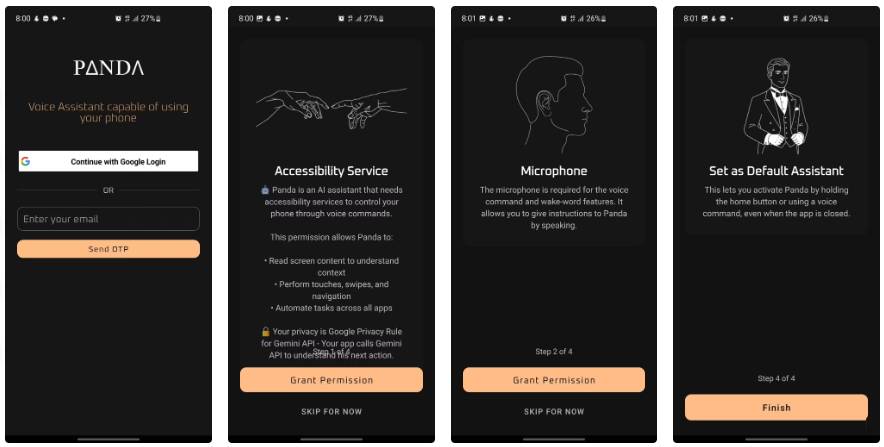
Once you install Panda, you'll see a simple login screen where you can sign in with Google or use an email-based one-time password. Both options work, but given the security pros and cons of using social login, signing in with Google is the fastest option. Once you're signed in, Panda will walk you through setting up your permissions in four steps, with clear illustrations explaining what each permission does. The process is much less technical than it sounds.
The most important step is enabling Accessibility Service. Tapping 'Grant Permission' will take you to the system settings page, where you can enable 'Panda Accessibility Service.' You'll see the standard system warning that this permission allows apps to track your actions and view what's on your screen. It might not seem like much, but it's a similar level of access to a screen reader and allows Panda to operate your device the way you want.
Step two requires microphone access, so Panda can listen for voice commands and support wake word activation.
The final step recommends setting Panda as your default assistant. This process is similar to changing the default digital assistant on Android to apps like Copilot or Perplexity .
Let's take a look at the Panda app interface!
What you will see when you open the app
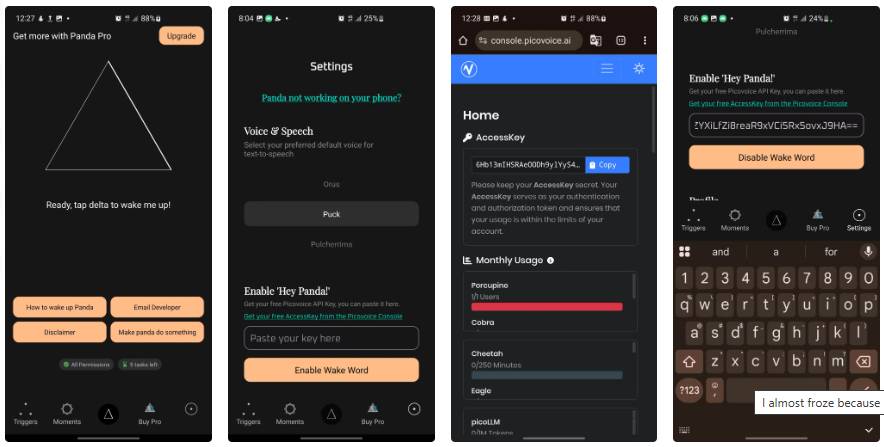
Once setup is complete, you'll land on Panda's home screen. There's a large triangle animation in the center, with an Ask Panda input field at the top. Right below that are four quick access buttons: How to wake up Panda, Email Developer, Disclaimer , and Make Panda do something . A navigation bar sits at the bottom with the Triggers , Moments , Buy Pro , and Settings tabs .
The Settings page is where you customize Panda's voice. You can choose from several voices, each with its own unique style. This page also includes the option to enable a wake word. If you want to use "Hey Panda" for hands-free activation, you'll need to request a free Picovoice API key via the Picovoice Console link.
What's the fun part?
Make Panda actually do things
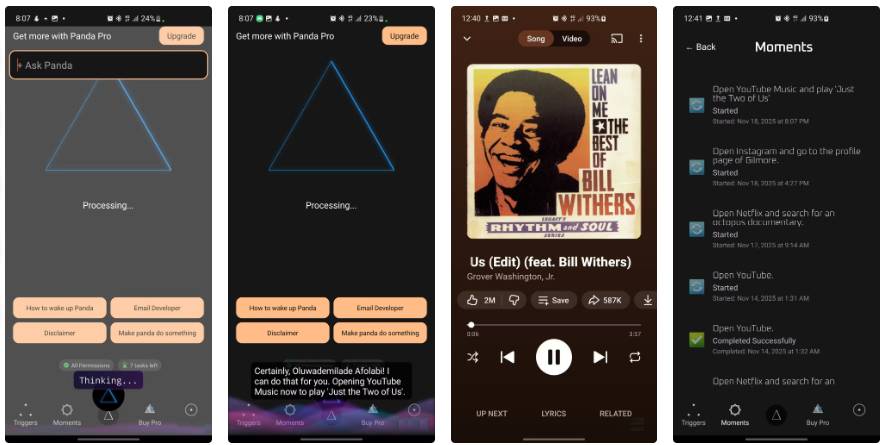
Once setup is complete, Panda is ready to go. The easiest way to get started is to tap the Ask Panda box and type or say whatever you need. While the app processes, a small 'Processing…' message will appear, and a 'Thinking…' tag will appear at the bottom as Panda pieces together the responses. From the screenshot, you can see that Panda actually made a request to play music on YouTube .
In the Moments tab , you'll see Panda's activity log. Each entry includes your original command, its status (Started, Completed Successfully, or any errors), and a timestamp. In the screenshot above, you can see completed actions like opening YouTube, searching for octopus documentaries on Netflix, and navigating to specific Instagram profiles. This history is useful for tracking what Panda has completed and troubleshooting if something isn't working as expected.
Why touch when you can teach Panda to do it automatically?
You can also automate commands.
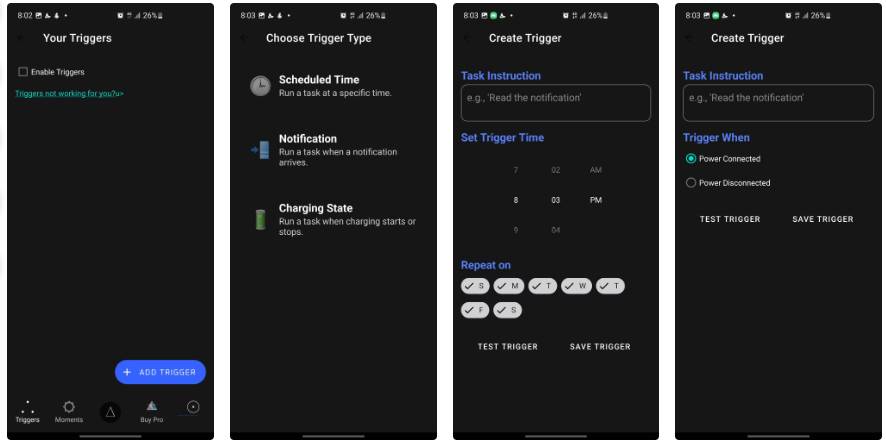
Now comes the fun part: Panda's automation features are neatly hidden inside the Triggers tab. When you click "Add Trigger ," you'll have three options to choose from: Scheduled Time, Notification , and Charging State .
Scheduled Time triggers allow you to run tasks at specific times. The setup screen includes a time picker to set the hour, minute, and AM/PM, as well as checkboxes to select the days the task will repeat.
Trigger Notification is even more flexible. When you select this option, the app will prompt you to grant notification access if you haven't already. The level of control here is on par with the handy Android apps for managing notifications.
Charging State is triggered whenever you plug in or unplug your phone. The setup screen is super simple, with two options: "Power Connected" or "Power Disconnected." Choose either, and Panda will automatically take action based on your charging habits.
No matter what trigger you're setting up, you'll always see two waiting buttons at the bottom: "Test Trigger" and "Save Trigger" . The test button is particularly handy. It lets you make sure Panda actually understands what you're asking and can execute it before you lock the automation. It's a small feature, but it will save you a lot of thinking later.