How to Draw a Panda Using Microsoft Paint
If you're not a great artist, never fear. MS Paint will let you express you artistic self with more ease than trying to learn to draw from scratch. Making a panda is a fun way to explore drawing with MS Paint and you can play around with....
Part 1 of 4:
Preparing MS Paint
-
 Open Up MS Paint (Microsoft Paint).
 -
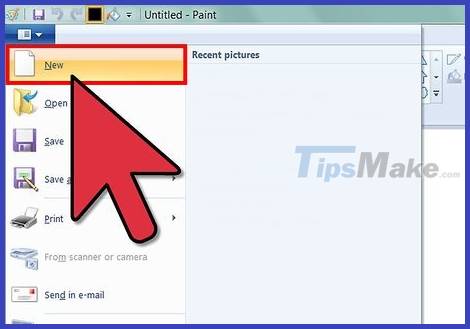 Start a New Blank page.
 -
 Make sure you are familiar with all the tools. If not, practice using them.
Part 2 of 4:
Sketching the panda
-
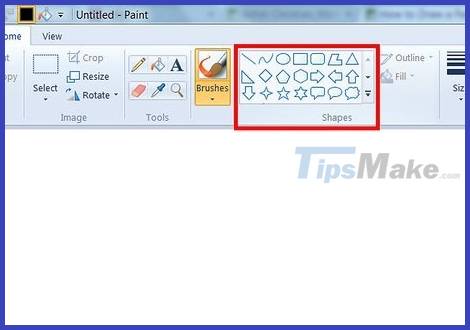 Locate the Shapes section on the top of the page. Once located, find and click the Circle/Oval tool.
 -
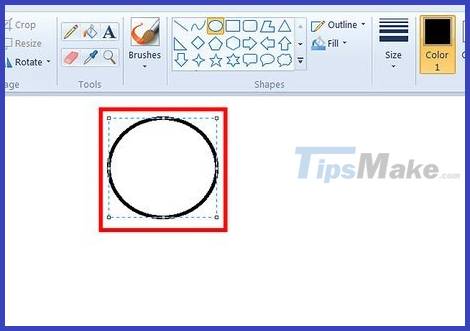 Click and hold down on the mouse. Drag to draw a small-medium circle. This is the head
 -
 Repeat. Create another circle under the first circle created. Make them overlapping. But, this time, make the circle a bit longer. 'This will be the panda's belly.
 -
 It seems your panda has no face! Using the Shapes & Paintbrush/Pencil, draw the panda's face. Example shown in picture.
 -
 Add arms, feet and his ears. This part needs some patience as it may not turn out the way you want it.
- Feet: Draw two ovals overlapping the bottom of his body.
- Ears: Draw two circle/ovals on the top of his head.
- Arms: Free draw (using the Pencil tool), or just make two long ovals.
Part 3 of 4:
Coloring the panda
If you want a simple black and white panda, leave the drawing as it is. If you want to color him in, follow these steps.
-
 Erase all overlapping lines on the inside of the panda. This will make coloring much easier and the picture will be better understood. Example shown in picture.
 -
 Add color. Color or shade in the panda's ears, feet, outer-eyes, arms/paws and nose. For this step, you may use any color you want. You could do colors from green to dark blue. You can even be unique and make him rainbow!
Part 4 of 4:
Background
Also optional, this is only if you'd like a background behind the panda.
-
 'Draw a background for your panda so he isn't lonely in a white-void. Pandas enjoy water and eating bamboo leaves so those features would make a perfect background setting.