Macromedia Flash - Create a simple menu
In this article, I will explain how to create a simple flash menu in flash 8 using the Action Script.
In this article, I will explain how to create a simple flash menu in flash 8 using the Action Script.
Step 1
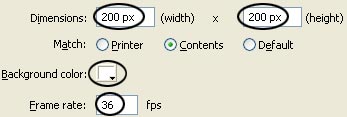
Open a new Flash file. Select Modify > Document ( Ctrl + J ). Set the width and height for your file: 200 x 200px. Select white as background color, Frame rate to 26fps> click OK.
Take the Selection Tool (V), double click on layer 1 to rename its name in the menu.
Step 2
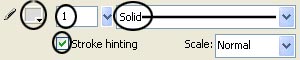
Select the Line Tool (N), in the Properties Panel (Ctrl + F3) set the following properties:
- Choose #DCDCDC color for Stroke color
- Select the type of line that is Solid with a thickness of 1
- Choose Stroke hinting to remove the book from the corners when drawing
After that, draw 4 lines like the image below

Step 3
Create the first button for the menu with the Text tool (T). In the Properties Panel , select the following options:
- Select Static Text field
- Select the Trebuchet MS fone type
- Choose font size 16
- Font color is # 9F9F9F
Then enter the name of each button

Step 4
Use the Line Tool (N) to draw the 'arrow' on the left of the text menu as shown below.

Step 5
Create other buttons in the menu in the same way as creating the first button

Step 6
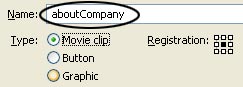
Select the first button (in the example 'About Company') and press F8 (or go to Modify > Convert to Symbol ) to convert the first button into a Movie Clip.
Step 7
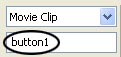
Go to the Properties Panel , at the entry, enter button1 as shown below
Step 8
Double click on the newly created Movie Clip with the Selection Tool (V). You will go to edit in Movie Clip.

Step 9
Just select the 'arrow' section, press Ctrl + X (Cut), create a new layer, select it and press Ctrl + Shift + V (Paste in Place)
Step 10
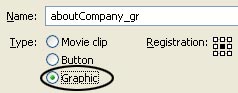
Go back to layer 1 (layer text), select it and press F8 ( Convert to Symbol ) to convert it to Graphic.
Step 11
Select frame 15 and press F6 key. After that, drag the Graphic just created to the right a little bit, remember to hold down Shift while dragging to avoid skewing.
Step 12
Pick the Selection Tool (V), click once on Graphic to select it, open the Properties Panel ( Ctrl + F3 ). On the right, you will see the Color section. Select Tint with the color # 4183BF for Color (as shown below).

Step 13
Right-click anywhere in the light purple area between the two keyframes and select Create Motion Tween from the menu that appears

Step 14
Lock layer 1, select layer 2, click on frame 15 and press F6 key. Then drag the 'arrow' to the right a bit further (remember to hold down the Shift key when dragging).

Step 15
Right-click anywhere in the light purple area between the two keyframes, select Create Motion Tween from the menu that appears.
Step 16
Return to the main scene ( Scene 1 ), create a new layer open on the layer menu and name it IB1 (Invisibale Button 1). After that, create the Invisible Button above the first button. See the picture below.

Step 17
Select Invisible Button, press F9 key or go to Window > Actions to open the Actions Panel. Then put the following ActionScript code into the Actions panel:
on ( rollOver ) {
_root .mouse_over_button1 = true ;
}
on ( rollOut ) {
_root .mouse_over_button1 = fstartlse;
}
Step 18
Create a new layer and name it AS (Action Script). Select the first frame and enter the following script:
_root .button1.onEnterFrame = function () {
if (mouse_over_button1) {
_root .button1. nextFrame ();
} else {
_root .button1. prevFrame ();
}
};
So it is done. You can download the source file here.
Was this article helpful?
Your feedback helps us improve.
Related Articles
 Macromedia Flash - Create flash menu yourself6 minutes read
 Macromedia Flash - Create flash menu with sound8 minutes read
 Macromedia Flash - Create menu effects6 minutes read
 Macromedia Flash - Create vertical Flash menu5 minutes read
 Macromedia Flash: Create effects for nature photos3 minutes read
Reader Comments 0
Sign in with email or Google to join the discussion.