Create headers and footers (Header and Footer) when printing in PowerPoint
Introduce how to create headers and footers when printing in PowerPoint. Step 1: Go to the Insert - Text - Header & Footer tab: Step 2: Header and Footer dialog box - click the Notes and Handouts tab, select Date and time to display the date and time, and select P
The following article details you how to create headers and footers when printing in PowerPoint.
Step 1: Go to the Insert tab -> Text -> Header & Footer:
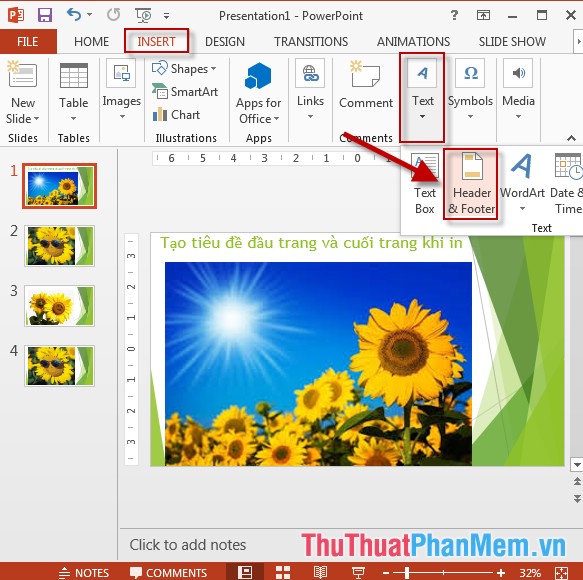
Step 2: Dialog Header and Footer -> click on the tab Notes and Handouts area select the Date and time to display the date and time, check Page number display page numbers on the slide when printing:

Step 3: Create headlines:
- Check the Header to create a header for Slide -> enter the content to create in the blank box.
- Tick the Footer option to create a footer for Slide -> enter the content to be created in the blank box.
Finally, click Apply to All to complete the title creation process:

- The result you just need to print or click File -> Print -> created header and footer when printing, accompanied by the date (as shown):

The above is a detailed guide on how to create headers and footers when printing in PowerPoint.
Good luck!
Was this article helpful?
Your feedback helps us improve.
Related Articles
 How to insert Header and Footer on PowerPoint when printing3 minutes read
 Section interrupt to create different Header and Footer in Word2 minutes read
 How to create a page header (Header) and footer (Footer) in Word2 minutes read
 Complete guide for Word 2016 (Part 14): Page title (Header) and footer (Footer)5 minutes read
 Create header and footer in Excel2 minutes read
 How to Insert a Custom Header or Footer in Microsoft Word3 minutes read
Reader Comments 0
Sign in with email or Google to join the discussion.