How to create borders in PowerPoint
Creating borders in PowerPoint also brings certain impressions to presentation slides, like when you create borders in Word. The article below will guide you to create borders in PowerPoint.
Create borders in PowerPoint 2019 with Shapes
Step 1:
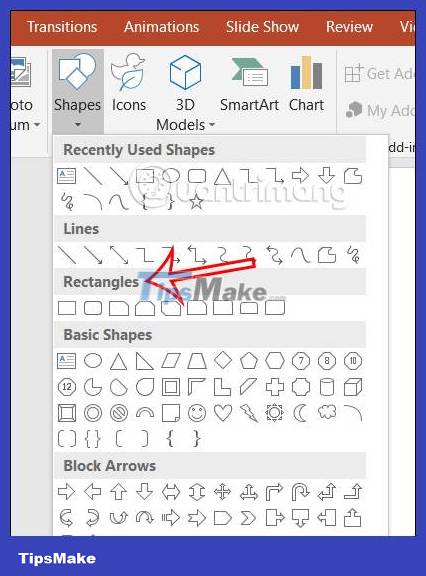
On the slide we want to create a border, click on Shapes and then look down at the Rectangles group and select the shape you want to create a border for the slide.

Step 2:
After choosing the shape, we will draw that shape around the presentation slide.

Step 3:
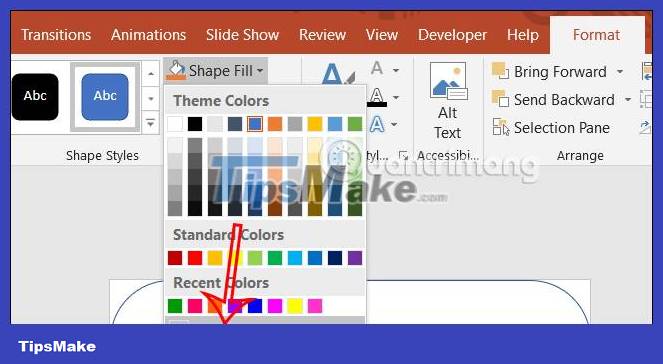
Next, click on Format and then look down at Shape Fil and select No Fill to remove the background color of the selected border.
In the Shape Outline section, choose the color for the border in the PowerPoint slide.
Step 4:
You can adjust the thickness of the border or the style of the border . Click on Shape Outline and then click on Weight to choose the border thickness.
Next, click Dashes to select the border style as shown.
Click Shape Effects to choose an effect for the border in PowerPoint.
Step 5:
To apply this PowerPoint border to other slides , click on the current border , select Copy , then click on another slide and then click Paste to apply the border to the new PowerPoint slide.
Instructions for creating borders in PowerPoint via Bing
Step 1:
First we click Insert and select Online Pictures .
Step 2:
Displays the interface for us to search for images. At this interface, users enter the keyword borders and press Enter to select.
As a result, we will see beautiful borders in PowerPoint for you to choose from. If you want to use a border for any PowerPoint slide, click on that border, then select Insert .
Immediately after that we get the outline in PowerPoint as shown.
Step 3:
Click on the PowerPoint border frame, then click on Format and then look down at the Pictuer Effects section to adjust the border effect if necessary.
How to create slide borders in PowerPoint 2007
Step 1:
In the PowerPoint presentation slide interface, click on the Insert tab .
Step 2:
Then select Shapes and click on the rectangular border in the Rectangles section .
Step 3:
Next click on a point on the corner of the slide and then drag the border bar you want to create.
After dragging the border, you will see that the border is blue by default and covers all text content on the presentation slide. Right-click on the slide and select the paint bucket icon, then click on No Fill .
So the blue background color will disappear and only create a border for the PowerPoint slide.
Step 4:
In case you want to change the border frame for the slide in different shapes, right-click on the border frame and select Format Shape.
Step 5:
In the Format Shape dialog box, you can select Line Color > Solid line and click Color to choose the color for the Powerpoint border. You can change the thickness of the border when adjusting the horizontal bar at Transparency.
The PowerPoint slide border will be colored as shown below.
Step 6:
Also at the Format Shape interface, select Shadow to create a shadow border and adjust the shadow level at the Transparency horizontal bar.
Finally, we add the background image to the presentation slide and we're done. To delete a PowerPoint slide frame, users just need to click on the border frame and then press the Delete key to delete the border frame.
With the article above, users know how to add borders to PowerPoint slides, before and after adding PowerPoint slide backgrounds. The presentation will become more attractive to readers when you add a border to each slide, then you can add a border color or shadow to the border color.
Video tutorial on creating borders for PowerPoint slides
Wishing you success!
You should read it
- How to create image borders in PowerPoint
- Instructions for creating borders in Powerpoint
- Create beautiful slides for PowerPoint presentations with 8 tips
- How to make PowerPoint for beginners
- Create beautiful border borders in Word
- Beautiful free PowerPoint slides for office workers
- How to create bottom-up scrolling in PowerPoint?
- How to create borders in Photoshop
- 5 websites and Powerpoint add-ins to find beautiful, free templates
- Beautiful free PowerPoint slides for teachers
- Summary of the most beautiful decorative borders
- PowerPoint 2016 image format
Maybe you are interested
Chrome is the reason why your iPhone battery drains so quickly Check this component now if you don't want your PC to suddenly die. Instructions on how to build a computer at home simply and quickly Microsoft announced a roadmap for removing TLS 1.0 and 1.1 from Edge, IE, and Edge Legacy Use iPhone to control remote presentations 5 biggest mistakes when choosing computer hardware
