Table of Contents
This updated guide examines How to Create Bottom-up Scrolling in Powerpoint? and organizes the essential facts, background, and practical takeaways in clear American English.
Instructions for creating end scrolls in PowerPoint
Step 1:
At the last slide we want to insert the ending word, we click on the Text box .

Then you frame and enter the content you want to end the slide . We will align the content in the middle of the frame and then change the format for the content as required and slide presentation requirements.

Step 2:
Next, click on the Animations tab and then click on the Add Animation item to expand more types of effects. When the list displays, click on More Entrance Effects .

Step 3:
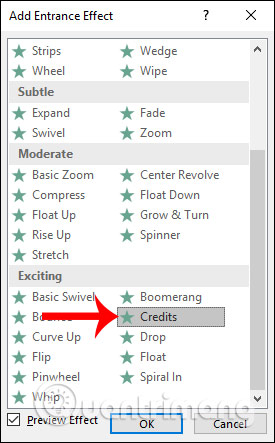
Now show the effect panel for us to choose. Go to the Exciting effect group and select the Credits effect . Finally click OK to exit.
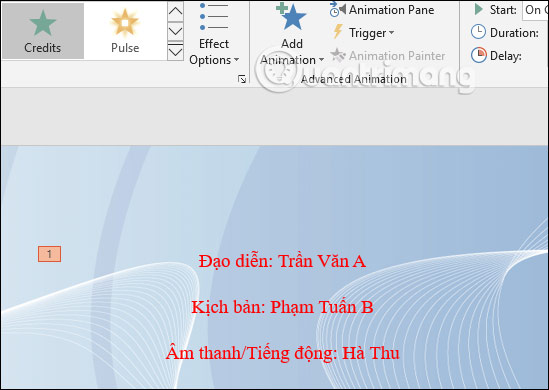
The result of the slide content has been added the effect as shown below. When slideshows content will be scrolled from the bottom to the top like the end of the movies that you watch.
FAQ
What is How to Create Bottom-up Scrolling in Powerpoint about?
It provides a structured overview of create PowerPoint slides, explains the main context, and highlights practical takeaways for readers.
Why does this topic matter?
Understanding the main concepts helps readers evaluate the issue, avoid common mistakes, and make better-informed decisions.
How should readers use this information?
Use the guidance as a practical starting point, confirm details that may have changed, and follow current product, safety, or security recommendations.
Related Articles
 How to Implement Infinite Scrolling in Vue8 minutes read
 How to Implement Smooth Scrolling in Javascript7 minutes read
 PowerPoint 2019 (Part 1): Getting Started with PowerPoint: Explained7 minutes read
 What Is Infinite Scrolling and How Does It Work?6 minutes read
 How to Create a Powerpoint File Password4 minutes read
 How to Create a Roadmap in Powerpoint4 minutes read
Reader Comments 0
Sign in with email or Google to join the discussion.