How to create borders in Photoshop
Creating borders, borders for photos to divide the boundaries between the subject and the background image is one of the basic skills in Photoshop. In the following article, let's learn about how to create borders in Photoshop like okay..
1. Create a Border with Shape
Step 1: Click on the Shape tool (1) => Custom Shape Tool (2) .

Step 2: Click on Shape: (1) => select the border pattern you like (2) . Then, click the left mouse button and draw a border around the image.

Step 3: Click on the Fill (1) to select the color (2) for the Border, and the Stroke section , you set as shown below.

Step 4: To select the width of the border, you click on the Width (1) => drag the slider (2) to select the width of the border.

Step 5: Click on the original image layer (1) => select the Eraser tool (2) => Eraser Tool (3) and delete all the excess images outside the border.

After saving the edits, we have the complete image as shown below:

2. Create a Border with the Stroke tool
2.1. Create border for photos
Step 1: Click on the Marquee Tool (1) => Rectangular Marquee Tool (2) .

Step 2: You press the key combination Ctrl + A quickly or left click and localize the whole image (1) . Next, right click on the work screen => Stroke . (2) .
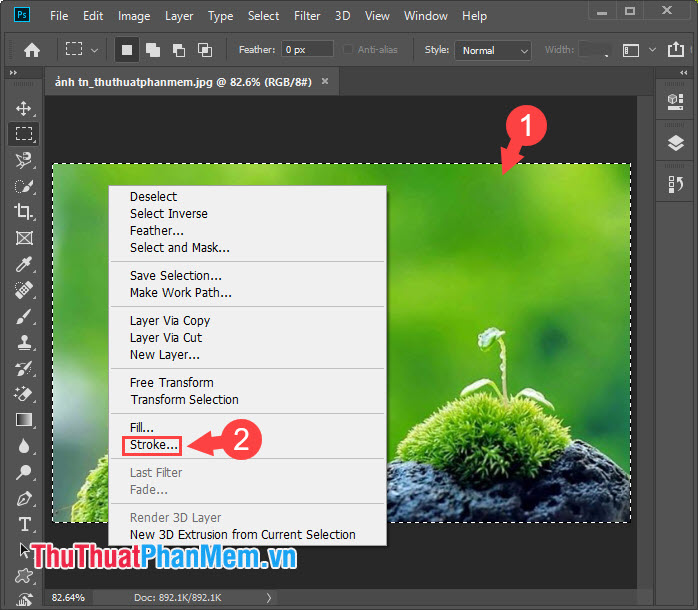
Step 3: You set the width of the Border (Width) , the color (Color) (1) . Then, you should select the type of border from inside (Inside) , in the middle (Center) or outside (Outside) (2) . As for Mode , you should leave Normal and Opacity (3) you can set arbitrary. Click OK (4) to finish.

Step 4: Go to the Select menu (1) => Deselect (2) or use the keyboard shortcut Ctrl + D to remove the selection.

And finally the photo of our border is complete.

2.2. Create border for image object
Just like the above way, we also create borders for the object in the image (people, objects) to highlight the object with the above method.
Step 1: You go to Select (1) => Subject (2) to localize the object.
Note: The Select => Subject feature is only available with Adobe Photoshop CC and versions of Photoshop CS that do not support this feature. To select the object, you can choose the Lasso Tool or Magic Wand Tool to localize the object.

Step 2: Right-click on the image (1) => Stroke (2) .

Step 3: You set Width and Color (1) , select the border type Inside (2) => OK (3) .

Step 4: You go to Select (1) => Deselect (2) or use Ctrl + D to remove the selection.

Step 5: You can add some Custom shapes or insert Emoji font on the image to decorate the image more vividly.

With a few Photoshop operations, you can quickly own quality photos with beautiful borders. Good luck!