How to Create a Sound Recording on Windows 8
Method 1 of 3:
Accessing the Sound Recording
-
 Press the "Start" button. You can find it in the task bar, on the bottom left corner of your screen. You can also find it on the bottom-left of your keyboard. It looks like a white window.
- If your device has a touchscreen, position your finger on the far right side of the screen and swipe left quickly. Click on the "Start" icon. It is towards the middle of the list and looks like a blue window. It has the word "Start" just beneath it.
-
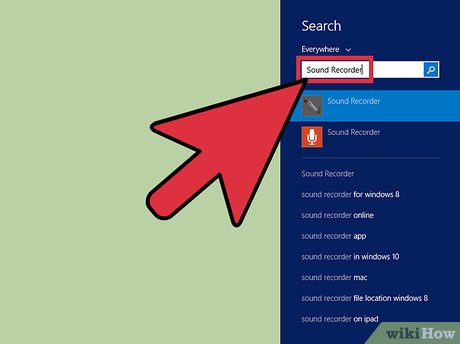
 Search for "Sound Recorder." You can simply start typing the words. This will bring up a list of applications and programs that match the query.
- You can also right-click on a blank area on your screen, select "All Apps" and scroll towards the end of the list until you find "Sound Recorder."[1]
- If you use Windows 8.1, you can also move your pointer towards the bottom of the screen and click on the icon that looks like an arrow inside a circle. Scroll towards the end of the list until you find "Sound Recorder."[2]
- Select the application you want to use. You may notice two different sound recorder applications, especially if you are using Windows 8.1: one that has a grey icon and one that has an orange icon.
- The orange icon is the app. To learn how to use it, click here.
- The grey icon is the program. To learn how to use it, click here.
Method 2 of 3:
Using the Sound Recorder App
- Select the orange Sound Recorder icon. This will bring up an application. It looks like a solid-colored screen, with a circle in the middle of it. Inside the circle is a picture of a microphone. Under the circle is a bunch of 0's.
- Allow microphone access, if necessary. If this is your first time using the app, the app may ask you for permission to access your mic. Click "yes" or "okay."
- If this is not your first time, and you see a notice saying that the app doesn't have access to your mic, you will need to change that. Swipe from the right to the left side of your screen, and select "Settings" from the menu. Select "Permissions" from the side menu that pops up. Turn the microphone option on; the bar should turn blue.[3]
- Tap the circle to start recording. You can start talking, singing, playing music, or doing whatever else you need to make noise for the recording.
- Tap the pause button to pause the recording. You can continue the recording by clicking the button again.
- Click "Stop" to end and save the recording. If you have made recordings before, you will also see a list of your other recordings. Keep in mind that the recordings made in this app are saved directly in the app. If you get rid of the app, you will lose those recordings as well.
Method 3 of 3:
Using the Sound Recorder Program
- Select the grey Sound Recorder Icon. This will take you back to your desktop screen. You will see a narrow rectangle pop-up on your screen, with a flashing green bar, and a red dot that says "Start Recording."
- Click on the red dot to start recording. As you begin recording, you may notice the slider changing colors from green to yellow to red. These indicate the volume of your recording. Green is a good volume and yellow means that your recording might be too loud and you should speak softer. Red means that you are speaking too loudly. You'd want to stay in the green or yellow area.
- Recordings that are too loud may sound staticky.
- Click "Stop Recording" when you are done. This will not only stop the recording, but give you a chance to save it.
- Save the file. When you hit "Stop Recording," you will get a pop-up that asks you to select a location in which to save the file. You will also get to name your recording. Name your file first, then select the folder in which you want to save your file. Click "Save."
Update 04 March 2020
You should read it
- The best video recording apps for Ubuntu
- How to record iPhone screen video, How to record iPhone screen with sound
- How to use Any Sound Recorder to record on Windows 10
- These quality Windows screen recording software
- Tips to increase sound quality when recording videos with smartphones
- Audio recording on your computer, the best computer recording software
- Instructions for filming the screen with CyberLink Youcam
- How to record audio on any platform using Speek.link
- How to rotate the screen and webcam with Apowersoft's Screen Recorder
- How to record using Audacity on a computer
- How to rotate the screen with iOS 11 audio microphone
- 8 free HD recording apps with noise reduction
Maybe you are interested
How to Open a Gate 11 tips to extend computer life Other diacritics in Excel, different diacritics in Excel How to calculate percentages in Excel, the percentage calculation in Excel is the fastest and most standard 5G Qualcomm modem will be available on mid-range smartphones next year, officially opening the era of 5G universalization 10 best free multiplayer games on Android, iPhone
