How to bring Windows 10's right-click menu to Windows 11
Before that, Windows 10's context menu lacked synchronicity and each application acted in a different fashion. This caused Microsoft to be criticized a lot. On Windows 11, Microsoft decided to create a more uniform context menu, trying to provide a common context menu for all types of applications.
Despite having a more modern and neat design, the new context menu causes many annoyances for users. It lacks familiar functions and has been changed in many places, confusing users who are used to the old context menu.
If you are among those who hate Windows 11's new context menu, join TipsMake.com to bring Windows 10's context menu back.
Details are as follows:
Using command line tools
Step 1: Right-click the Start button then select Windows Terminal.
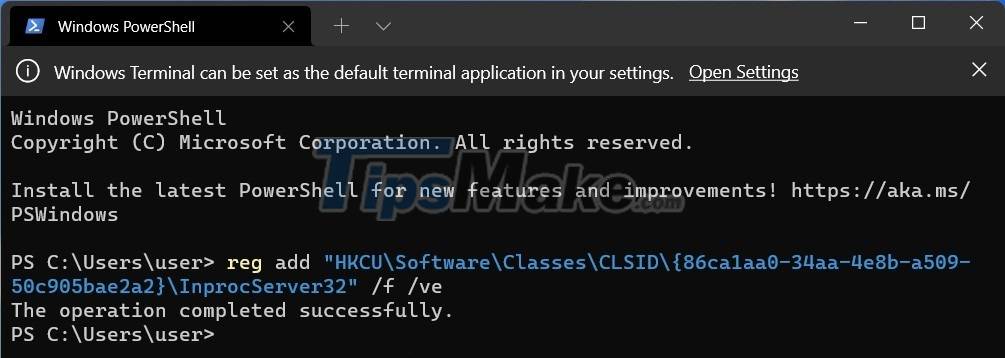
Step 2: Copy the following command line and paste it into Windows Terminal and press Enter:
reg add "HKCU/Software/Classes/CLSID/{86ca1aa0-34aa-4e8b-a509-50c905bae2a2}/InprocServer32" /f /ve Step 3: When you see the words "The operation completed successfully", everything is done.
Step 4: You close Windows Terminal and then restart the computer for the changes to take effect.

Using the Registry
Step 1: Press Win + R to open Run then type regedit and press Enter to open Registry Editor.
Step 2: Access the key:
HKEY_CURRENT_USER/SOFTWARE/CLASSES/CLSID/
Step 3: Create a new key with the name:
{86ca1aa0-34aa-4e8b-a509-50c905bae2a2} Step 4: In the key {86ca1aa0-34aa-4e8b-a509-50c905bae2a2}, continue to create a new key named InprocServer32.
Step 5: In the InprocServer32 key, open the Default file and set its value to blank, then click OK and close the Windows Registry.
Restore the context menu of Windows 11
If you want to restore the new Windows 11 context menu, just delete the key {86ca1aa0-34aa-4e8b-a509-50c905bae2a2} in the Registry Editor. You can do this by opening Windows Terminal then entering the command:
reg delete "HKCU/Software/Classes/CLSID/{86ca1aa0-34aa-4e8b-a509-50c905bae2a2}" /f After deleting the key, remember to restart your computer for the change to take effect.
Good luck!
You should read it
- This small application helps bring the context menu interface of Windows 10 to Windows 11
- The context menu of Windows 11 will have a new eye-catching design
- Microsoft is committed to improving the context menu experience on Windows 11
- How to add items to the 'Create New' context menu in Windows 10
- How to delete options in the Windows context menu
- How to fix slow context menu in Windows 10's File Explorer
- How to Clean the Windows Context Menu via Registry
- 2 simple ways to remove SkyDrive Pro option in Windows 10 Right-click Menu
- How to add / remove 'Open in Windows Terminal' context menu in Windows 10
- Microsoft changed the context menu on Windows 11 confusing many users
- How to add 'Edit or Run with' to the right-click menu of PS1 files
- How to add the Open Powershell Here option to the context menu on Windows
