How to Clean the Windows Context Menu via Registry
If you have been using Windows for some time and have installed several applications or programs, you'll probably find a lot of clutter in your context menu. If you're unfamiliar with the context menu, it is the menu that pops up when you...
Table of Contents
Part 1 of 4:
Opening the Windows Registry
-
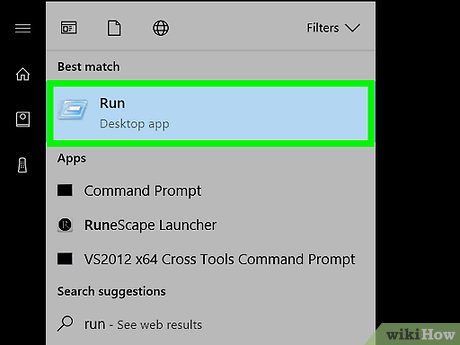 Open 'Run.' In Windows, the Run command is used to directly open an application without the need to navigate through your Start menu or your program files. It is accessible through the Start menu.
- A shorter way to call it is by pressing the Windows key + R on your keyboard.
-
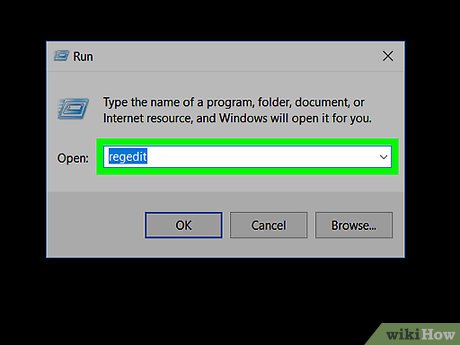 Run Regedit. In the Run box, type 'regedit' (without the quotation marks) to call the Registry Editor.
- Take extra precaution when opening and modifying contents in the registry as it can damage your computer's system. If you're unfamiliar with it, don't proceed and seek proper expertise for guidance.
Part 2 of 4:
Backing Up the Windows Registry
-
 Select 'Computer.' At the very top of the registry entries is 'Computer.' Click on it to select it.
 -
 Export registry. From the header menu, choose 'File' then 'Export.' The whole registry will be exported into a text file. Navigate to the folder where you want to save your backup then type in the name of your registry file. When you're done, click on the 'Save' button.
- Your registry will be backed up in that file with a .reg extension. If anything goes wrong with your modifications, you can always revert to this stable version.
-
 Note the registry file. Take note where you keep the registry file you've just exported in case you want to undo your changes later.
- It is always advisable to backup your registry before doing anything to it.
Part 3 of 4:
Managing 'Shell' Items
-
 Navigate to the keys. Click through the registry until you find the following entries:
- HKEY_CLASSES_ROOT*shell
- HKEY_CLASSES_ROOTDirectoryshell
-
 Identify menu items. For each of the entries above, review the menu items under them. Be careful on which entry you identify.
 -
 Disable a menu item. If you'd like to disable a particular menu item, click on it from the left panel then right-click on the right panel. Create this new string value: 'LegacyDisable'.
- You can also opt to just delete the menu item from the registry, but leave this as the last option.
-
 Continue through the rest of the menu items. Repeat navigating to the other keys, identifying the menu items, and disabling the menu items as needed for all the menu items you'd like to remove from the context menu.
Part 4 of 4:
Managing 'Shellex' Items
-
 Navigate to the keys. Click through the registry until you find the following entries:
- HKEY_CLASSES_ROOT*shellexContextMenuHandlers
- HKEY_CLASSES_ROOTAllFileSystemObjectsShellEx
- HKEY_CLASSES_ROOTDirectoryshellexContextMenuHandlers
-
 Identify menu items. For each of the entries above, review the menu items under them. Be careful on which entry you identify.
 -
 Disable menu item. If you'd like to disable a particular menu item, click on it from the left panel, and then modify the (Default) value on the right panel by putting a few dashes.
- Double-click the (Default) entry to bring out the actual contents.
- Add a few dashes in front of the Value Data and click 'OK.' This essentially disables the item without the need to delete it. This is useful in case you want to bring it back later.
-
 Continue through the rest of the menu items. Repeat navigating to the other keys, identifying the menu items, and disabling the menu items for all the menu items you'd like to remove from the context menu.
Was this article helpful?
Your feedback helps us improve.
Related Articles
 The context menu of Windows 11 will have a new eye-catching design3 minutes read
 How to add 'Move to' or 'Copy to' to the Windows 10 context menu4 minutes read
 This small application helps bring the context menu interface of Windows 10 to Windows 113 minutes read
 Microsoft is committed to improving the context menu experience on Windows 113 minutes read
 How to add items to the 'Create New' context menu in Windows 105 minutes read
 How to delete options in the Windows context menu11 minutes read
Reader Comments 0
Sign in with email or Google to join the discussion.