2 simple ways to remove SkyDrive Pro option in Windows 10 Right-click Menu
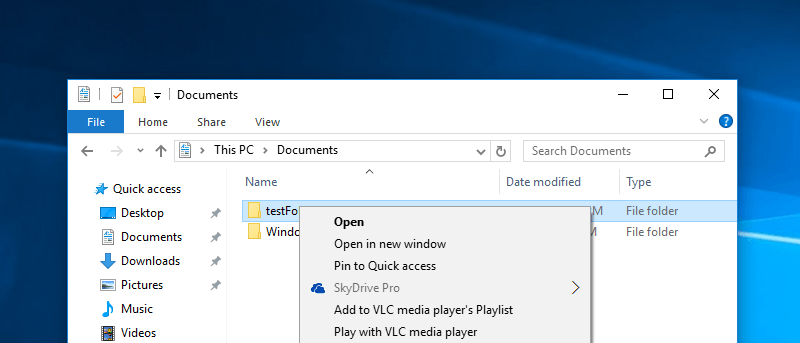
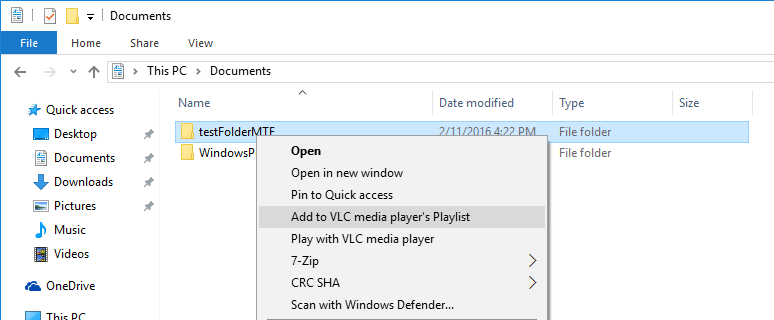
When installing Microsoft Office 2013, by default your context menu (context menu) will appear with SkyDrive Pro option. However, every time you click on any file and folder, this option always appears on the context menu (context menu) that makes you feel uncomfortable.
Table of Contents
When installing Microsoft Office 2013, by default your context menu (context menu) will appear with SkyDrive Pro option. However, every time you click on any file and folder, this option always appears on the context menu (context menu) that makes you feel uncomfortable.
In addition, if you do not use Office SharePoint applications, this option will become useless. In the following article, Network Administrator will guide you 2 simple ways to remove SkyDrive Pro option in Windows 10 Right-click Menu.
1. Use the Registry
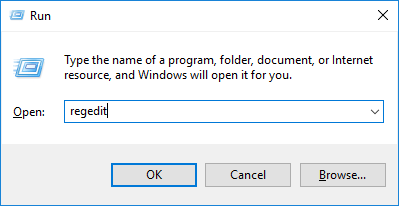
First, press the Win + R key combination to open the Run dialog box, then type the keyword regedit and press Enter to open the Registry window.
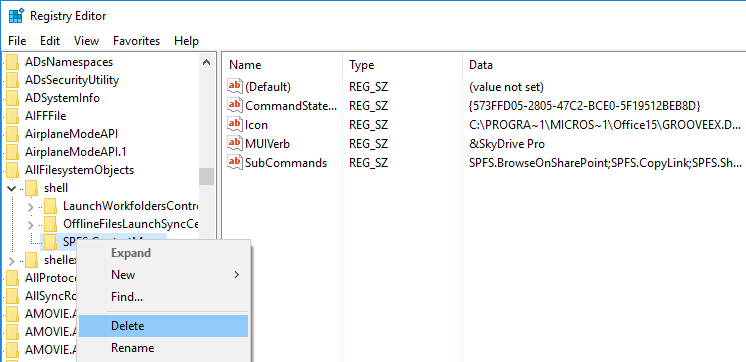
The Registry editor dialog box appears, you find the path:
HKEY_CLASSES_ROOTAllFilesystemObjectsshell
Expand the shell directory and you will see the SPFS.ContextMenu option.

Right-click SPFS.ContextMenu and select Delete .
At this time, a window will appear informing you whether you want to delete the key or not. Select Yes to delete SkyDrive Pro.
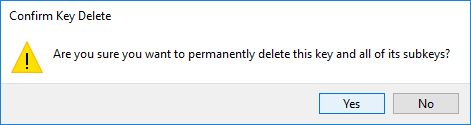
So you've completely removed the SkyDrive Pro option from the right-click menu.
2. Use Microsoft Hotfix
Download Microsoft Hotfix to your computer and install it here:
- 32-bit
- 64-bit
After downloading the application, you proceed to install, check the box agreeing to the following terms and choose Continue .

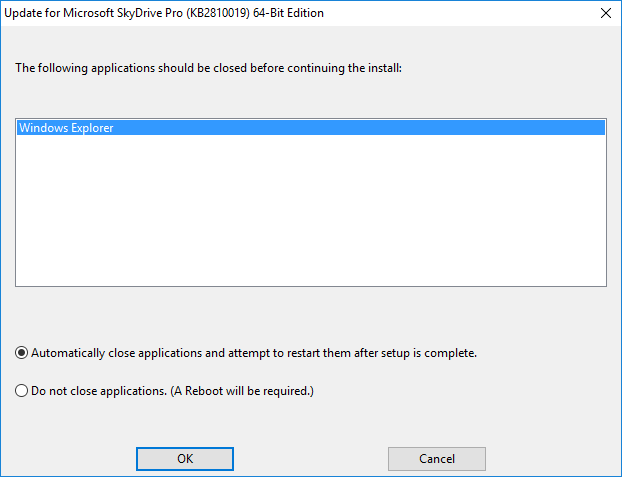
On the next window, the Hotfix application will display the applications you need to close before proceeding with the Hotfix installation.
Select one of the two options, then select OK to continue.
Next proceed to restart your system to start the installation process.
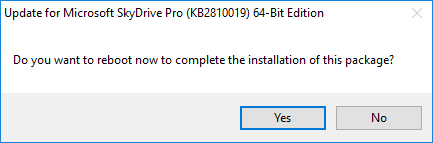
After installation is complete, Hotfix will ask if you want to restart the system. Select Yes to restart the system. When your system has finished booting, you no longer see the SkyDrive Pro option in the Right-click Menu.
You can refer to some of the following articles:
-
How to get back 20GB of storage after the Windows 10 November update
-
Instructions for fixing Windows 10 errors do not turn off on computers and laptops
-
To enable or disable Sleep mode in Windows 10
Good luck!
Was this article helpful?
Your feedback helps us improve.
Related Articles
 Delete the SkyDrive Pro command in the right-click menu2 minutes read
 Instructions to remove the All apps option on Windows 10 Start Menu4 minutes read
 Remove SkyDrive from the system3 minutes read
 How to remove Ask Copilot from Windows 11 right-click menu3 minutes read
 Add the option to Mount right-click menu in Windows 82 minutes read
 How to remove CRC SHA option from context menu in Windows 103 minutes read
Reader Comments 0
Sign in with email or Google to join the discussion.