Create borders for text pages in Word

The following article details you how to create a border for a text page in Word.

To create borders for a text page in Word 2013 there are 3 basic ways as follows:

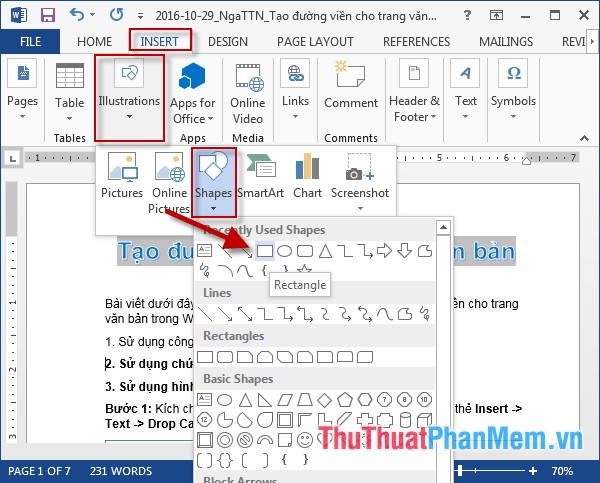
1. Use the Shapes tool.

Step 1: Go to the Insert tab -> illustration -> Shapes -> select a rectangle drawing tool.

Create borders for text pages in Word Picture 1

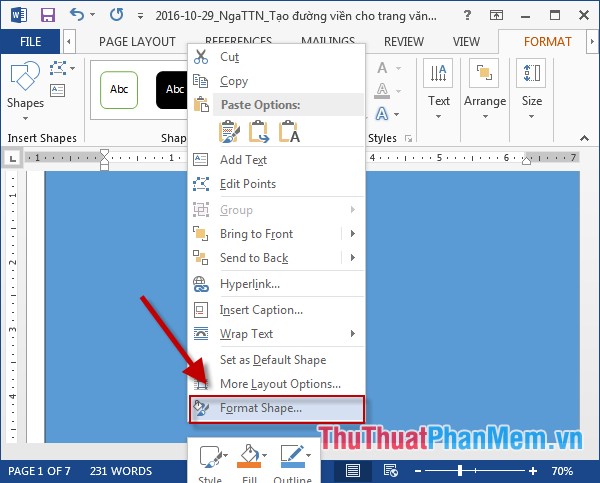
Step 2: After creating the right mouse rectangle -> select Format Shape . to remove the background color of the rectangle:

Create borders for text pages in Word Picture 2

Step 3: The Format Shapes dialog box appears with the following options:

- In the Color section : select No fill to remove the background color of the rectangle.

- In Line section :

+ Color: Choose a background color for the border.

+ Width: Select the width for the border.

Create borders for text pages in Word Picture 3

Step 4: After removing the background color and increasing the border size of the rectangle the result is:

Create borders for text pages in Word Picture 4

2. Use the built-in function Page border of Word 2013.

Step 1: Go to Design tab -> Page Borders:

Create borders for text pages in Word Picture 5

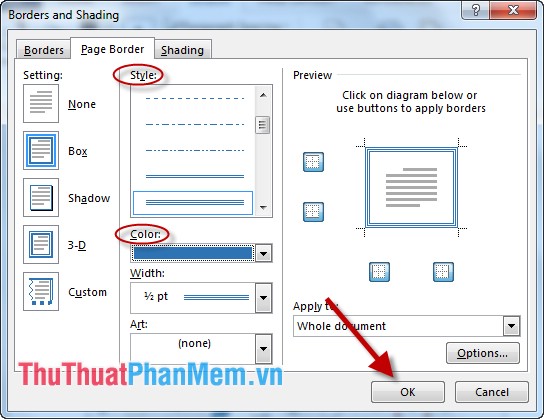
Step 2: The Borders and Shading dialog box appears with the following options:

- Item Style: Select border style.

- Item Color: Select the color for the border.

- Width: Select the size of the border.

Finally, click OK:

Create borders for text pages in Word Picture 6

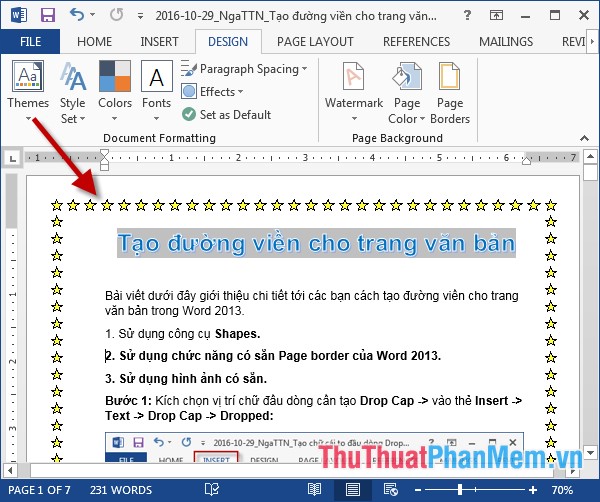
Step 3: After clicking OK -> created border for the text page.

Create borders for text pages in Word Picture 7

Step 4: In addition, you can create borders based on the available image templates: Click Art -> select the appropriate border style:

Create borders for text pages in Word Picture 8

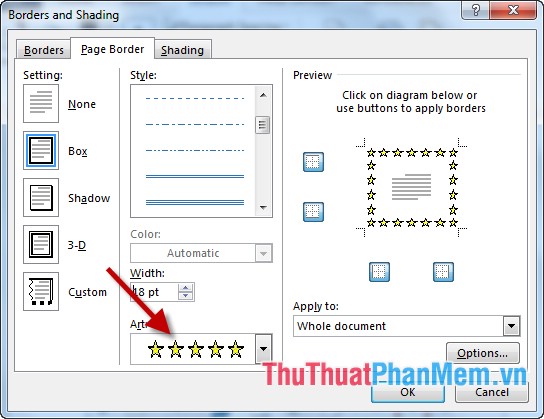
- Click OK -> create contour according to available images:

Create borders for text pages in Word Picture 9

3. Use available images.

For example, if you want to create a compliment template with an existing frame:

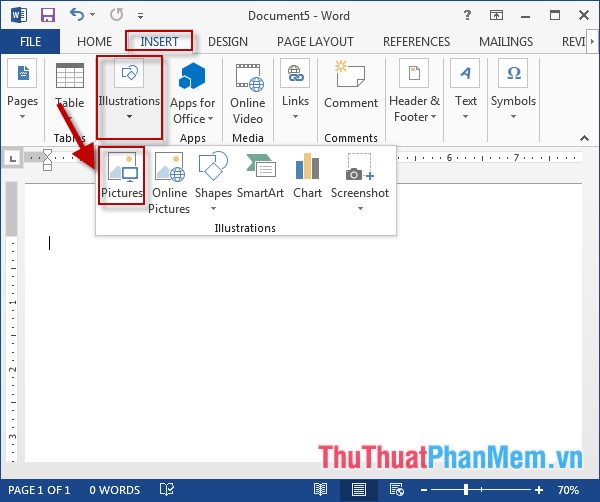
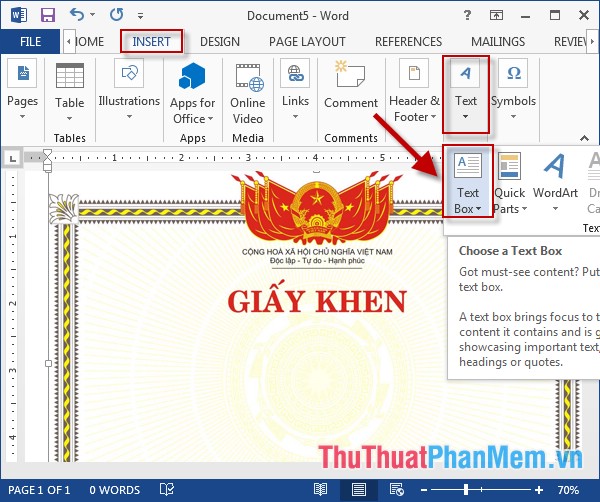
Step 1: Go to the Insert tab -> illustration -> Pictures:

Create borders for text pages in Word Picture 10

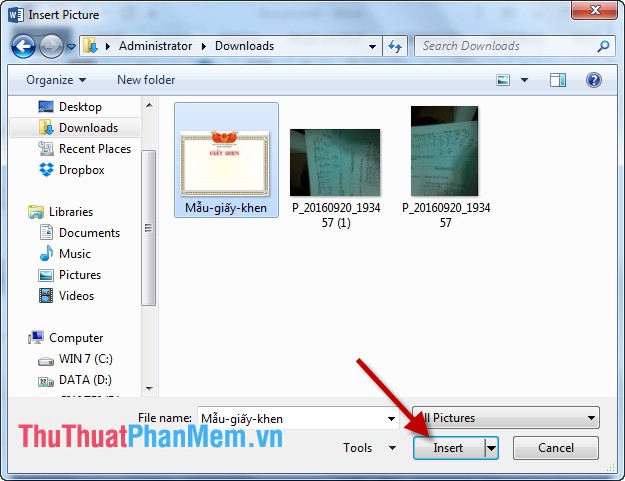
Step 2: A dialog box appears -> select the path to the image file to be inserted -> Insert:

Create borders for text pages in Word Picture 11

Step 3: After inserting the compliment image -> click Insert -> Text -> Textbox to enter the content of the compliment:

Create borders for text pages in Word Picture 12

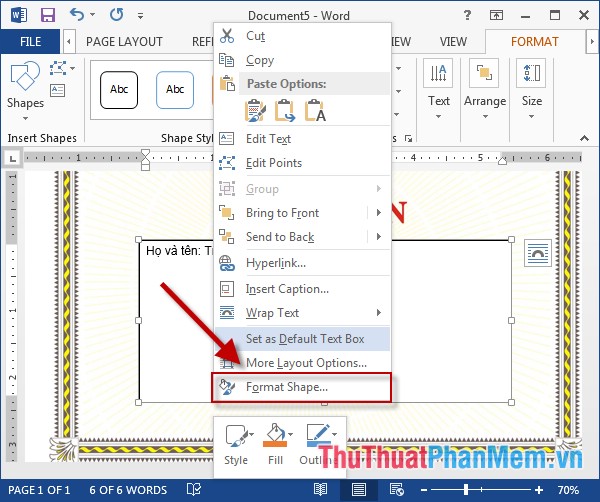
Step 4: Move the mouse to select the width of the Textbox -> Right-click and choose Format Shape:

Create borders for text pages in Word Picture 13

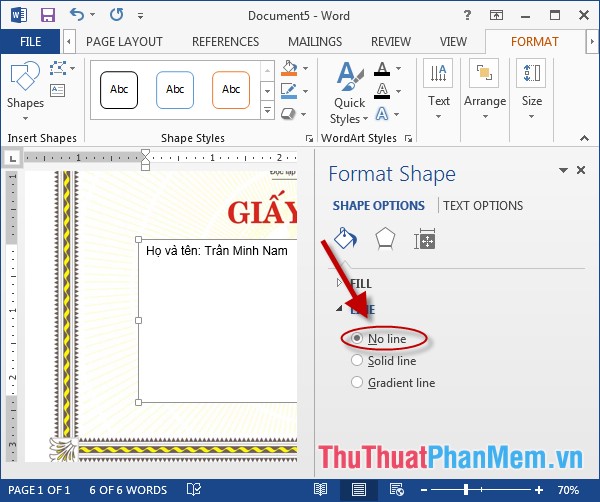
Step 5: Format Format window appears in Line select No line to remove the border of Textbox:

Create borders for text pages in Word Picture 14

Step 6: Finally, insert the content for the Textbox :

Create borders for text pages in Word Picture 15

The above is a detailed guide on creating borders for a text page in Word.

Good luck!

4.5 ★ | 2 Vote

May be interested

  • How to delete table borders in WordHow to delete table borders in Word
    how to delete table borders in word, which is a question that many people will probably wonder if not formed in using word software. first you need to black out the table cell to remove borders. the highlighted method is to click and drag the mouse to the cells you need to select.
  • How to Add a Border to WordHow to Add a Border to Word
    this wikihow teaches you how to create a border around text, images, or pages in a microsoft word document. open your word document. double-click the word document to which you want to add borders. this will open the document in microsoft...
  • How to create Header and Footer borders in Word 2019, 2016, 2013, 2010 and 2007How to create Header and Footer borders in Word 2019, 2016, 2013, 2010 and 2007
    create borders header, footer in word to make your word document more beautiful and professional. if you do not know how to create header and footer borders in word, please refer to the following article to know how to create header and footer borders in word 2019, 2016, 2013, 2010 and 2007.
  • 4 Steps to Create Beautiful Text Borders in Photoshop4 Steps to Create Beautiful Text Borders in Photoshop
    how to use border creation through photoshop software, hoang ha pc would like to share with you how to create text borders in photoshop, extremely simple.
  • How to create borders in PhotoshopHow to create borders in Photoshop
    creating borders, borders for photos to divide the boundaries between the subject and the background image is one of the basic skills in photoshop. in the following article, let's learn about how to create borders in photoshop like okay.
  • How to break pages, split sections in Word 2016How to break pages, split sections in Word 2016
    when working on a document with multiple pages, you will sometimes want to control the flow of text more precisely then breaks can help you in this case.
  • How to delete white pages in Word is easyHow to delete white pages in Word is easy
    delete pages in word or delete blank pages in word to help you delete redundant word pages, no longer needed. the following guide will help you delete one or more word pages quickly.
  • Guide font formatting, change stretch and create artistic text in WordGuide font formatting, change stretch and create artistic text in Word
    after entering the text content, users will need to reformat the entire font, change the stretch, align or can decorate the text if desired to increase the appeal of the text content.
  • Decorate text like a newspaper page in WordDecorate text like a newspaper page in Word
    want to present more lively part when reading, why not leave it like newspaper page? this article will guide you to present the text as a newspaper.
  • How to draw borders for text in GIMPHow to draw borders for text in GIMP
    using the free gimp image editing application, you can also create custom text and create outline for it with colored borders to your liking.