
3 simple ways to install additional audio devices on your computer
Computers and laptops use sound cards - sound cards to connect audio devices such as music mixers, recorders, and speakers. You can connect and install those devices via wireless standards. However, some devices work via Bluetooth standard (requires distance of operation near the computer)
Method 1: Connect to Bluetooth
Step 1: Go to Start Menu
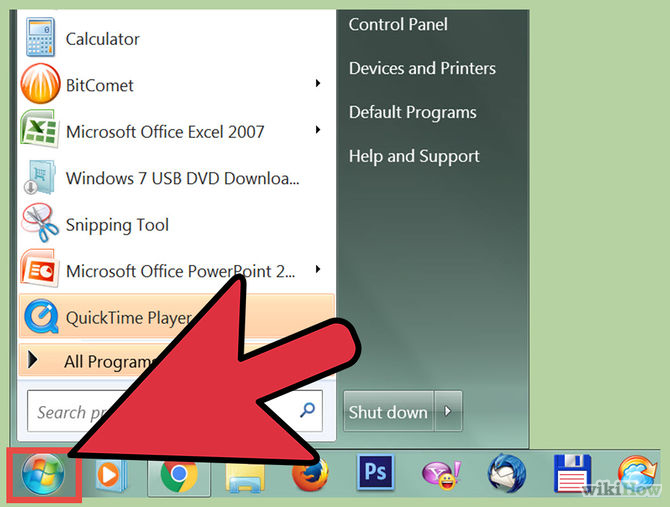
Move the mouse and click Start Menu at the bottom left corner of Desktop . Click on the Settings option on the right hand side.
Step 2: Click on "Devices"
This is the second option in the menu. Below you will find a selection list "Bluetooth, Printers (printer), Mouse (mouse)".
Step 3: On the left hand side Menu select "Bluetooth"
Click and then turn on Bluetooth on your computer by clicking the button next to the "Off" button . If available, you can skip this step.
Step 4: Wait until the device is detected
If your device is opened and within range, it will appear on the screen. Simply click to activate Bluetooth .
If your computer has trouble detecting the device, turn off Bluetooth on the device and then turn it back on.
Method 2: Install additional audio devices without Bluetooth
Step 1: Open your devices
Open your devices so that these devices will display on the new Menu. You need to use a USB port directly connected to the computer or an audio cable plugged directly into the headphone jack.
Step 2: Go to Start Menu
Click on the Start Menu at the bottom left of your Desktop screen. This is the Browser Menu that allows you to open any application on your computer.
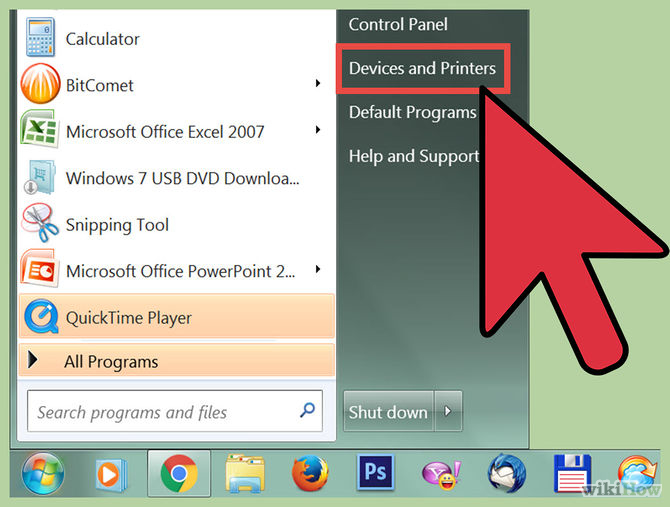
Step 3: Select Control Panel
Go to Start Menu , then select Control Panel . With Widows 8, Control Panel is located above the right corner of the screen. For Windows 10 , Control Panel is a green square on the Desktop screen.
If unfortunately you turn off the Control Panel window on the computer screen, you can click on the Settings menu on the Start Menu .
Go to the Setting Menu , click "Devices ". This is the second option in the Menu . The next step is to select "Connected devices" on the left side of your screen. Finally, scroll down and click on 'Devices and printers' . If you find the device following these steps, skip the next steps.
Step 4: Select "Hardware and Sound"
In the Menu item that you just opened, the "Hardware and Sound" option appears . On the side is the printer icon and the speaker (Speaker).
Step 5: Click on "Add a device"
"Add a device" is the blue text on the upper left corner of the Menu . When you click here, a new screen will appear. This screen will display all the devices found in your computer after it has been scanned.
If you can't find any devices, try turning them off and then on again. Then scan again. In other words, do whatever it takes to get your device "detected".
Step 6: Enter the WPS PIN code
A window will appear asking for a PIN. If you do not enter a PIN, you will not be able to follow the next steps. This PIN is the accompanying information when you purchase the device. Usually PINs usually include letters and numbers to make it difficult for strangers to detect. However, some audio devices do not require this PIN. After you have entered the PIN code, your device will connect to the computer.
If in case your computer has no sound, please refer to this article
Method 3: For Mac operating system
Step 1: Open the AudioMIDI application installation
To do this step, move the mouse to the Menu . This is the 5th option above the right corner of the toolbar. When the application is finished, scroll down to 'Utilities' . This is the 10th option. Once the menu is done, two list tables will appear. AudioMIDI will appear on the left hand side.
Step 2: Click on (+)
This is the Add button. On the screen you can see it is located in the lower left corner of Audio Devices . After Click, a new Menu will appear. On this menu , there are 2 options to choose from. You click on the first option, 'Create Aggregate Device' .
General devices including virtual audio interface work with your system. These devices help you connect the input and output elements of one or several audio tools connected to your Macbook.
Step 3: Click on your device
The new synthetic device will appear on the left side of the screen when you click to select this option. If you want to change the name, you can simply double-click it, it will allow you to edit the name.
Step 4: Activate the 'Use' feature (use)
For newly selected devices and set the correct name, after being activated, check the Use feature. This option is located in the left corner of your window.
Check multiple boxes if you want to activate multiple synthetic devices. The order of the devices you just checked is the order of input and output devices in your Menu application.
Step 5: Connect Clock
Set the clock for your synthetic devices to save the time the programs work. At the top of the screen you will see an 'Clock Source' option . Click on that option if you want to set an overall clock for the device. If you want to know how each device works, you can set each clock for your own devices.
Step 6: Use the device
After you have completed the steps, go back to the Audio MIDI folder and press the right mouse button (or Ctrl + click) on the device you want to use. A new Menu will be turned on and you can choose to use this device for input or output.
You should read it
- How to Connect PlayStation 4 to Speakers
- How to connect your phone to a mini speaker
- Instructions for connecting speakers and audio systems at home
- The easiest way to connect speakers to TVs
- How to Connect Audio Devices to Computers
- Instructions for connecting Spotify on phones with computers, televisions, speakers
- Computer does not recognize speakers - Causes and solutions và
- How to Connect Speaker to iPhone via Bluetooth
- How to connect and use the Hi-Fi Stereo Amplifier
- 5 simple ways to connect microphone to PC
- Instructions on how to adjust and match the subwoofer into a 2-channel amplifier at home
- KDE Connect - Download the latest KDE Connect here
Maybe you are interested
How to view saved Wifi password on Windows - If you accidentally forget the Wifi password Latest Resortopia Code and How to Enter Code OpenAI Wants to Halve Revenue Sharing to Microsoft Hidden features on Galaxy smartphones that many people may not know How to quickly transfer Netflix profiles Tips for playing Suspects: Mystery Mansion