Table of Contents
This updated guide explains how to Connect Audio Devices to Computers: Step-by-Step through clear steps, practical examples, and important checks that help prevent common errors.
Method 1 of 3:
Connecting Via Audio Cable
-
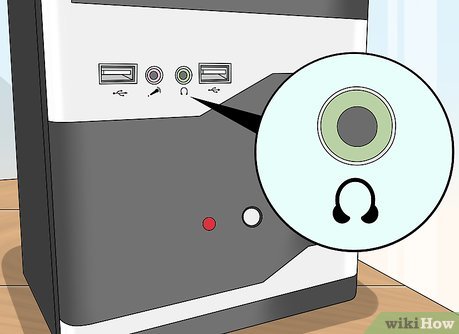 Locate your computer's audio-out port. On desktop PCs, this port is typically on the back of the CPU box, while iMacs have a 3.5-millimeter headphone jack on the back of the monitor. Some common audio-out methods include the following:
- Optical - A pentagonal port. Optical cables will usually work with high-end, modern speakers.
- RCA - A red port coupled with a white port. These ports receive 3.5 millimeter cables of the same colors.
- Headphone jack - The 3.5-millimeter headphone jack can reliably be found on most computers somewhere on the side of a laptop or the back of a computer case. For speakers or headphones, the plug is color-coded in green and usually has a headphone symbol identifying it. The pink jack is for microphones and the blue jack is for Line-In, similar to an aux input.
- HDMI - HDMI slots work the same way on your computer as they do on your TV, which includes audio transmission.
- On laptops, the audio-out port is typically the headphone jack.
-
 Find the microphone jack if necessary. The microphone jack is the same size as the headphone jack (3.5 millimeters), and it usually has an image of a microphone next to it. If you're connecting a device that needs separate microphone input (e. g., some gaming headsets), you'll need to know where the microphone port is.
- USB ports can also double as audio-in connections.
-
 Determine whether or not you need a converter. If you have a new set of speakers and an old computer, for example, you might need an optical-to-RCA adapter, since your computer likely only supports RCA or headphone input.
- You can find audio converters, also known as "audio extractors", in most tech departments in retail stores or online.
- If you have to use an audio extractor, you'll also need to purchase a separate set of cables in order to attach the extractor to your computer.
-
 Plug your audio device into a power source if necessary. Things like speakers and condenser microphones will likely need a power source (e. g., a wall socket or your computer's USB port) to function.
- You may also need to press an "On" switch on the back of the main speaker unit.
-
 Plug your device into your computer. The device's main unit (e. g., the headset or main speaker) should have an audio cable that plugs into your computer's audio output port.
- If needed, first plug your device into an audio extractor.
-
 Test your device. You can play a video or some music to determine whether or not the audio output is working, or try recording a voice memo with your new microphone (if applicable).
- You may need to change the audio output, restart your computer or update your computer's software if your device doesn't work at first.
Method 2 of 3:
Connecting Via Bluetooth on Windows
-
 Click. To do so, either click the Windows logo in the bottom-left corner of the screen or press the ⊞ Win key.
-
 Click. It's near the bottom-left corner of the Start window. Doing so will open the Settings page.
-
 Click Devices. This option is in the top row of items on the Settings page.
 -
 Click Bluetooth & other devices. It's a tab on the far-left side of the page.
 -
 Turn the Bluetooth switch"ON". To do so, click the switch below the "Bluetooth" heading that's at the top of the page.
- If you see "On" to the right of the switch, Bluetooth is enabled.
-
 Turn on your Bluetooth device and put it into pairing mode. Turn on your Bluetooth audio device and make sure it's in "pairing" mode or "discoverable" mode. If necessary, plug it into a power source.
- All devices are different so check the manual that came with your audio device to find out how to put your device into "pairing" mode if you don't know how.
-
 Click + Add Bluetooth or other device. This button is at the top of the page.
 -
 Click Bluetooth. It's the top option in the Add a Device window.
 -
 Click your audio device's name. It should appear in the "Add a Device" window; its name will likely be a combination of the model number and the manufacturer's name. Once you click it, it will begin pairing with your device automatically.
- If you don't see the device appear, double-check that the device is in "pairing" mode, then scan for nearby devices again.
-
Click Done. This button will appear in the bottom-right corner of the available Bluetooth devices window.
-
 ClickStart, then type audio in. You should see several results appear in the Start window.
-
 Click Manage Audio Devices. This option has a symbol of a speaker next to it. Doing so will open your audio manager.
 -
 Select your Bluetooth device. You should see its name in the Sound window, along with your computer's default output device if you're using a laptop.
- If you're connecting a microphone, you'll first want to click the Recording tab at the top of the window.
-
 Click Set Default. It's in the bottom-right corner of the window.
 -
 Click OK. Your device should now be the default in its category on your computer.
 -
 Test your device. You can play a video or some music to determine whether or not the audio output is working, or try recording a voice memo with your new microphone (if applicable).
- You may need to restart your computer or update your computer's software if the device doesn't work.
Method 3 of 3:
Connecting Via Bluetooth on Mac
-
 Turn on your Bluetooth device. Depending on the device, you may first need to connect it to a power source.
 -
 Click. It's the B-shaped icon on the right side of the menu bar that's at the top of the screen. Doing so will invoke a drop-down menu.
-
 Click Turn Bluetooth On if necessary. If your Mac's Bluetooth isn't enabled, you'll need to turn it on in order to view your Bluetooth device.
 -
 Click your Bluetooth device's name. This will likely be a combination of the model number and the manufacturer's name.
- If you don't see your device's name, press the "pairing" button, or turn it off and then on again.
-
 Click Connect. Doing so will prompt your Mac and the device to pair with one another.
 -
 Click theApple Menu. It's the apple-shaped icon in the top-left corner of your Mac's screen.
-
 Click System Preferences. This option is near the middle of the drop-down Apple menu.
 -
 Click Sound. You'll see this speaker-shaped icon in the System Preferences window.
 -
 Click the Output tab. It's at the top of the Sound window.
- If you're attaching a microphone, click the Input tab instead.
-
 Double-click your Bluetooth device's name. Doing so will select it as your Mac's primary output (or input, if you're attaching a microphone).
 -
 Test your device. You can play a video or some music to determine whether or not the audio output is working, or try recording a voice memo with your new microphone (if applicable).
- You may need to restart your computer or update your computer's software if your device doesn't work.
FAQ
What is the easiest way to Connect Audio Devices to Computers: Step-by-Step?
Start with the requirements in this guide, then follow each step in order. Check the result after every major change so problems are easier to identify.
Can beginners follow these instructions?
Yes. The process is organized into practical steps, and you can repeat any step before moving forward.
What should I check if the method does not work?
Confirm your software or device version, permissions, settings, file format, and internet connection when the task depends on online services.
Related Articles
 3 Simple Ways to Install Additional Audio Devices on Your Computer8 minutes read
 How to Connect to TV via HDMI Port: Practical Guide11 minutes read
 How to Connect Computer to TV: Complete Guide10 minutes read
 How to Secure Bluetooth Devices1 minutes read
 Why You Should Rename an Audio Device in Windows 10 and How4 minutes read
 Instructions for Connecting Speakers and Audio Systems at Home9 minutes read
Reader Comments 0
Sign in with email or Google to join the discussion.