Word 2016 Complete Guide (Part 13): Divide the text column
Split text columns is one of the familiar features when formatting text, especially with newspapers and magazines..
Sometimes the information you provide in a Word file is easier to understand when displayed as a column. With certain types of documents - such as newspapers, magazines - the column format is also used very often.
See the video below about the column division feature in Word 2016
Add columns to text
Step 1: Black out the text you want to format.

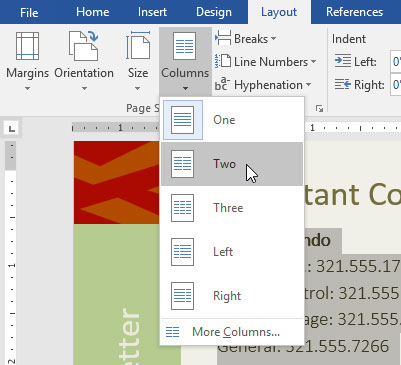
Step 2: Select the Layout tab , click Columns and a list will appear.
Step 3: Select the number of columns you want to create.
Step 4: Text will be formatted as a column.

The column-related options are not limited to the list you see. To open the Columns dialog box with all the options, click More Columns. Then select the number of columns in the Number of columns section.

If you want to change the distance or align the margins of the columns, click and drag the bookmark on the Ruler bar until the column displays as you want.

Delete column
Leave the column format just created, place the cursor at any position in the table, then select Columns on the Layout tab and select One.

Break the column
After the column has been created, the text will automatically display one after another from one column to another. If you want to control the exact start position of the new column, use the column break feature.
Create column breaks
In the example below, we will interrupt the column to put a paragraph of text into another column.
Step 1: Place the mouse pointer at the first position of the paragraph you want to interrupt.

Step 2: Select the Layout tab and click on Breaks. A list will appear later.
Step 3: Select Column in that list.

Step 4: Text will be moved to the following column.

Cancel column break
Step 1: By default, the column breaking option will be hidden. If you want them to display, you need to click Show / Hide on Word's Home tab.

Step 2: Place the mouse pointer to the left of the column break that you want to delete.

Step 3: Click the Delete button on the keyboard to remove column breaks.

With instructions for working with Word 2016 columns in this article, TipsMake hopes you will easily format beautiful text in a flash. Don't forget to share if you know more about Word 2016 tips .