Macromedia Flash - The blur effect changes between two images
This lesson will show you how to create a blur effect between two images. When a photo is blurred, the other image will appear clearly and vice versa. You can use this simple effect when you want to highlight something that is in many existing objects.
This lesson will show you how to create a blur effect between two images. When a photo is blurred, the other image will appear clearly and vice versa. You can use this simple effect when you want to highlight something that is in many existing objects.
Step 1
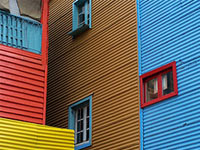
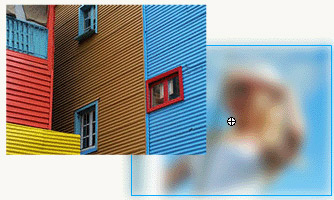
First, you have to have 2 photos as an example, you can download the 2 photos below that we use in this lesson:

Step 2
Create a new flash file. Select Modify > Document (Ctrl + J). Set the width of the file to 340px, the height to 200 px. Select any color as the background color of the file and set the Frame rate to 24 fps. Then click OK .
Step 3
Go to File > Import > Import to Stage (Ctrl + R) and Import the two selected photos into the flash file.
Step 4
Double click on layer 1 to rename its name into picture 1. Then, select only one photo and press Ctrl + X (Cut). Create a new layer above the layer picture 1 and rename it to picture 2.
Step 5
Select layer picture 2 and press Ctrl + Shift + V (Paste in Place).
Step 6
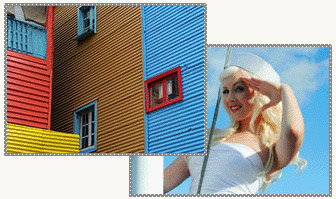
Use the arrow keys or mouse to place the two photos in the following position:
Step 7
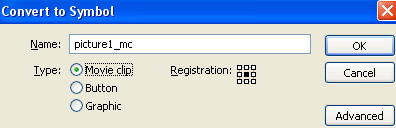
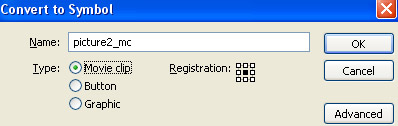
Return to picture 1 layer and press F8 key (Convert to Symbol) to convert the first image into a Clip Symbol. See the picture below.
Step 8
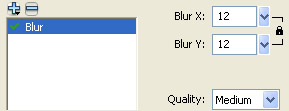
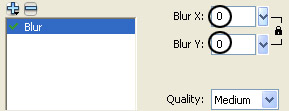
Pick the Selection Tool (V) and click once on the image to select it. After that, go to the Properties Panel (Ctrl + F3). Click the Filters tab in the Properties Panel. Click on the plus icon and select the Blur filter. Create the following parameters:
1. Blur X and Y: 12
2. Quality: Medium
And this is the result
Step 9
Click on frame 10, 30, 40 and 60 then press F6 key.
Step 10
Go back to Frame 10. Use Selection Tool (V) and click once on the picture 1 to select it. After that, go back to the Properties Panel, go to Filters section and reset Blur to the following parameters:
Repeat this process on frame 30 and 60.
Step 11
Right-click anywhere in the gray area between frame 1 and 10, 30 and 40, then select Create Motion Tween from the menu that must appear.

Step 12
Do the same steps as you did with picture 1 on picture 2
Step 13
Take the Selection Tool (V) and select the picture layer 2. Then press F8 key (Convert to Symbol) to convert the picture 2 into a Movie Clip Symbol.
Step 14
Click on frame 10, 30, 40 and 60 and press F6 key, respectively.
Step 15
Go back on frame 10 and repeat step 8 but it's a bit different now that you are working on the picture 2. Then repeat this process with frame 30.
Step 16
Right-click anywhere in the gray area between frame 1 and 20, 30 and 40, then select Create Motion Tween from the menu that must appear.

Check the product (Ctrl + Enter) and download it here if you haven't had time to practice yet.
Was this article helpful?
Your feedback helps us improve.
Related Articles
 Macromedia Flash - Running text effect2 minutes read
 Macromedia Flash - Product image advertising effects5 minutes read
 Macromedia Flash - Effects of lighting on photos3 minutes read
 Macromedia Flash - Effect of 'oil spill'2 minutes read
 Macromedia Flash - The spotlight2 minutes read
 Macromedia Flash - Water bubble effect4 minutes read
Reader Comments 0
Sign in with email or Google to join the discussion.