Corel Draw 12: Draw the globe
You want to draw a globe yourself? This exercise will guide you step by step so that you can practice through some of the basic tools that we have learned in the previous lessons.
Step 1
- Select the circle drawing tool ( Ellipse Tool ), draw a circle with a diameter of 10 cm by pressing Ctrl + left click and drag diagonally.
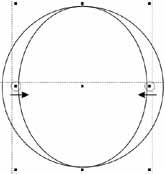
Figure 1
- On the properties bar in the Object box (s) Size, type 10 cm, in the Nonproportional Scaling / Sizing box, select the lock icon (locked).
Step 2: Draw meridians and latitudes
- Select the circle.
- Select Object - Transformations - Position :
+ Relative Position : select the box in the middle
+ Click Apply To Duplicate tab.
- Select the newly created circle, press Shift + Left click in the second row (right or left), then drag in. We get an Ellipse (Figure 1).
- Select Ellipse.
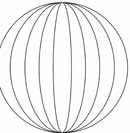
Figure 2
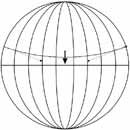
Figure 3
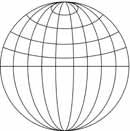
Figure 4
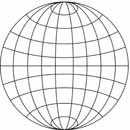
Figure 5

Figure 6

Figure 7
- Select Object - Transformations - Position :
+ Relative Position : select the box in the middle
+ Click Apply To Duplicate tab.
- Select the newly created Ellipse, press Shift + Left click in the second row (right or left) and drag in. We get a new Ellipse smaller.
- Similar to the previous step, we create two more Ellipse shapes so that the distance between the Ellipse shapes is equal. We now have meridian lines (Figure 2).
- Select the straight line drawing tool ( Bezier Tool ), draw a straight line 10 cm long.
- In the center of the circles and the Ellipse, we get the equator.
- Choose the equator.
- Select Object - Transformations - Position :
+ Relative Position : select the box in the middle
+ Click Apply To Duplicate tab.
- Select the Shape Tool , adjust the two ends of the line above the circle.
- Click on the straight line, on the properties bar select Convert Line To Curve , left click on the middle of the straight line, pull down a bit, we get a curve (Figure 3).
- Similar to the previous step, we draw 3 more curves then group all of these curves (Figure 4).
- Select Object - Transformations - Position :
+ Relative Position : select the box in the middle
+ Click Apply To Duplicate tab.
- In the properties bar select Mirror Buttons to flip back and move down the equator (Figure 5).
Step 3: Draw the globe
- Select the line drawing tool ( Bezier Tool ), draw the soil parts. Select the first circle, fill it with light blue, the meridians, the latitude and white, the soil is green (Figure 6).
Step 4: Axis and base
- Draw a circle with a diameter of 11 cm, cut in half vertically.
- Select Object - Transformations - Position :
+ Relative Position : select the box in the middle
+ Click Apply To Duplicate tab.
- Select the newly created half circle, drag a little bit. Select both halves of the circle, press Ctrl + L. Group it all, then turn to the right 15 degrees (Figure 7, 8).
- Select the line drawing tool ( Bezier Tool ), draw the base and the axis. Fill it with black, as shown in Figure 9.


Figure 8
Figure 9
Lam Khe
Was this article helpful?
Your feedback helps us improve.
Related Articles
 Corel Draw: What is Corel DRAW - Introduction11 minutes read
 Corel Shortcuts - All shortcuts in Corel Draw you need to know5 minutes read
 Corel Draw: Use the photo corner effect in Corel Draw3 minutes read
 Corel Draw 12 - Draw patterns in circles3 minutes read
 Corel Draw 12: Draw the butterfly2 minutes read
 Corel Draw: Draw a burning candle3 minutes read
Reader Comments 0
Sign in with email or Google to join the discussion.