Macromedia Flash - Product image advertising effects
In this article, we will show you how to create a product advertising effect in flash. You can use this effect when you need to introduce a new product launch or in banner ads. This effect does not need to use any Action Script code but only created with Mask in Flash.
In this article, we will show you how to create a product advertising effect in flash. You can use this effect when you need to introduce a new product launch or in banner ads. This effect does not need to use any Action Script code but only created with Mask in Flash.
Step 1
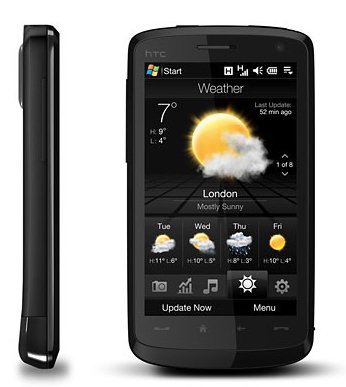
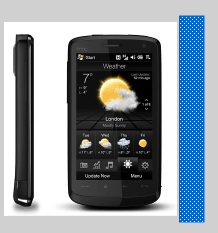
Prepare a product photo that you need to advertise. In this article we use HTC smartphone images.
Step 2
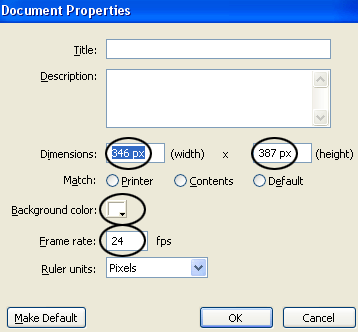
Create a new flash file. Press Ctrl + J key on the keyboard ( Document Properties ) and set its width to 346 px, height to 387 px (depending on the image your product has, the width and length may be different). ). Select white as background color, frame rate to 24 , then click OK .
Step 3
Go to File > Import > Import to stage (shortcut is Ctrl + R ) to load an image into the working Flash file.
Step 4
Select the image you just loaded, go to the Align Panel ( Ctrl + K ) and do the following:
- Make sure the To stage button in Align / Distribute is selected
- Click the Align horizontal center button
- Click on the Align vertical center button

Step 5
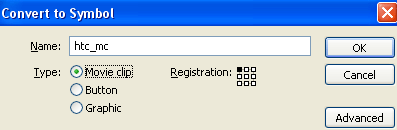
While the image is still selected, press F8 key ( Convert to Symbol ) to convert this image into a Movie Clip Symbol.
Step 6
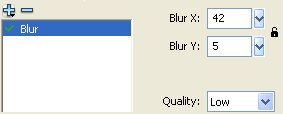
Click on frame 15 and press F6 key. After that, go back on the first frame, take the Selection Tool (V) and click on the image to select it. Go to the Properties Panel ( Ctrl + F3 ) and select Filters tab on the left. Click the plus icon and select the Blur filter. Make sure the parameters will be as follows:
Step 7
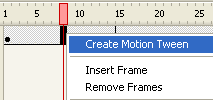
Right-click anywhere on the gray area between frame 1 and 15 on the timeline and choose Create Motion Tween from the menu that appears.
Step 8
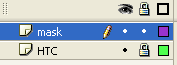
Grab the Selection Tool (V) and double click on layer 1 to rename its name into HTC. After that, create a new layer above the HTC layer and name it mask.
Step 9
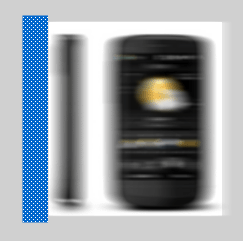
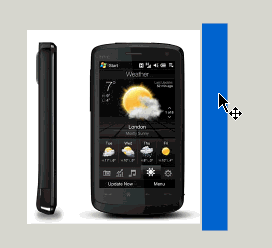
Select the layer mask you just created, take the Rectangle Tool (R) and draw a long rectangle on the left side of the image about 50 x 410 px (shown below).
Step 10
Click on frame 15 and press F6 key
Step 11
While you're still on frame 15, take the Selection Tool (V) and do the following.
Step 12
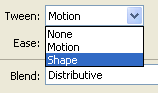
Select frame 1 and go to the Properties Panel . In the menu Tween choose Shape .
Step 13
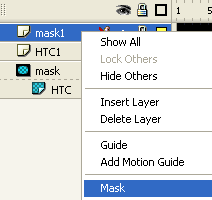
Select the mask layer and convert it to a mask by right-clicking on the layer name and selecting Mask .

Step 14
Create a new layer above the layer mask and name it HTC 1. Then go back to the first frame of layer HTC and press Ctrl + C key (Copy). Click on frame 15 of layer HTC 1, press F6 key and then press Ctrl + Shift + V (Paste in Place)
Step 15
Click on frame 30 and press F7 key (Blank keyframe). Go back on frame 15 and press Ctrl + C key (Copy). After that, go to frame 30 and press Ctrl + Shift + V (Paste in Place).
Step 16
Right-click anywhere on the gray area between frame 15 and 30 on the timeline and choose Create Motion Tween from the menu that appears.
Step 17
Create a new layer above the layer HTC 1 and name it mask 1.
Step 18
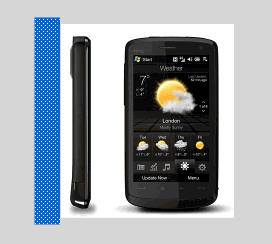
Select mask 1 layer, click on frame 15 and press F6. Then draw a rectangle on the right side of the image about 50 x 410 px.
Step 19
Click on frame 30 and press F6 key. After that, take the Selection Tool (V) and do the following procedure
Step 20
Go back on frame 15, go to the Properties Panel . In Tween menu, choose Shape .
Step 21
Select mask 1 layer and convert it to a mask by right-clicking on the layer name and selecting Mask .
Step 22
Click on frame 30 of layer mask and HTC, press F5 key in turn.
Once done, you can press Ctrl + Enter to see the product created.
Was this article helpful?
Your feedback helps us improve.
Related Articles
 Macromedia Flash - An attractive photo appearance effect4 minutes read
 Macromedia Flash: Create effects for nature photos3 minutes read
 Macromedia Flash - Photo effects with sound6 minutes read
 Macromedia Flash - Effects of lighting on photos3 minutes read
 Macromedia Flash - Animation and rotation effects4 minutes read
 Macromedia Flash - Making fireworks effects3 minutes read
Reader Comments 0
Sign in with email or Google to join the discussion.