Table of Contents
Learning how to standard font formatting on word doesn't have to be complicated. This updated guide presents a clear workflow, practical checks, and troubleshooting advice you can use while completing the process.
Key Takeaways
- Review format using font window.
- Explore format right on the toolbar.
- Follow the recommended steps in order to avoid common mistakes with standard font formatting on word.
1. Format Using Font Window
Step 1: Open the text content you want to format the font. Next, select (highlight) the text you want to format. Right-click and select Font to format (you can use the shortcut Ctrl + D to do this).
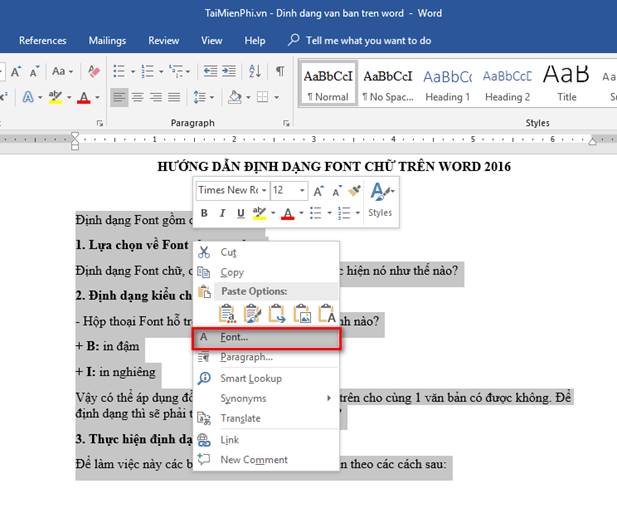
Step 2: In the Font window, there will be many font formats for you to choose from. Please choose the format that suits your needs.

Please note the parameters described below:
+ Font: You can choose different font styles to apply to your text. Please note that the font format in Word must match the Code Table and Typing Style of the Vietnamese keyboard to avoid font errors when typing. + Font style: Allows you to choose font styles such as bold, italic, underline or just use lowercase letters.
You can use the shortcut Ctrl + B to create bold text, Ctrl + I to create italic text, Ctrl + U to create underline text after highlighting the text. You can combine 2 or all 3 of these shortcuts to create bold, italic, or bold and underline text.
+ Size section: Allows you to choose the size for the entire highlighted paragraph. + Font color: Allows you to choose the color of the text paragraph. + Underline style: Allows you to use different types of lines to underline text. + Underline color: Allows you to choose the color for the underline line under the text.
In addition, you can also use some other effects in the Effects section, with 11 different types of effects:
+ Strikethrough: Strikethrough. + Double strikethrough: Double strikethrough. + Superscript: Superscript. Can use shortcuts: Ctrl + Shift + = + Subscript: Subscript. Can use shortcuts: Ctrl + = + Shadow: Create shadow text. + Outline: Text with an outline. + Emboss: Lightly raised letters (white) before. + Engrave: Lightly raised letters (white) after. + Small caps: Small capital letters. + All caps: Large capital letters. + Hidden: Hide text in text.
Below is the Preview section so you can preview the text format before applying it. Finally, click OK to save the formatting changes for the selected text.
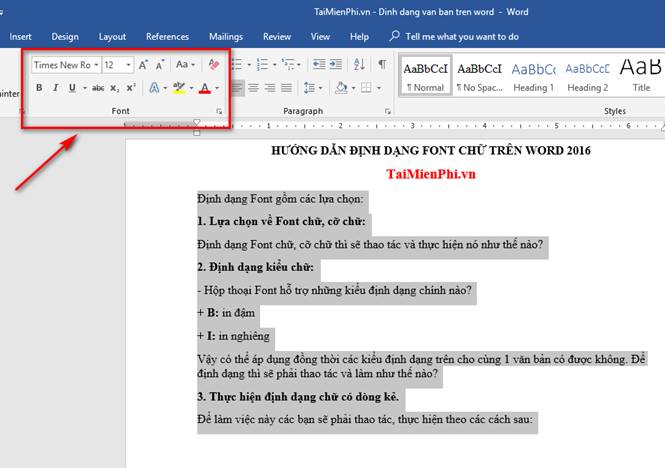
2. Format Right on the Toolbar
With this method, you can immediately use the editing items on the toolbar on Word.
Formatting fonts in Word is an important step to make your text more professional and easier to read. Formatting operations such as selecting fonts, adjusting size, color or applying effects can be done easily on all versions of Word. You can follow the instructions above to edit quickly.
In addition, when editing text, many people encounter font errors due to using the wrong encoding or typing style. Try checking your Unikey settings or using a transcoding tool to fix it if you are experiencing this situation. The above editing steps can all be applied to Word 2010, 2003, 2016, 2013.
Final Thoughts
The most reliable way to handle standard font formatting on word is to follow the process in order, verify each important setting, and test the result before moving on. Use the guidance above as a practical reference, then adjust the details for your device, software version, or specific goal.
Frequently Asked Questions
What should I check before I standard font formatting on word?
Use the latest available software, confirm that your device meets the requirements, and make sure you have the necessary permissions, account access, or backup before changing anything.
Why might I be unable to standard font formatting on word?
Common causes include outdated software, missing permissions, incompatible settings, incomplete setup steps, or a temporary network problem. Recheck the process from the beginning and restart the app or device if needed.
Is it safe to standard font formatting on word?
It is generally safe when you use official tools, review every permission, and back up important data before making system-level or account-level changes.
Was this article helpful?
Your feedback helps us improve.
Related Articles
 What Is the Standard Font Size in Word?5 minutes read
 Instructions for Setting the Default Font in Microsoft Word4 minutes read
 Font Format in Word4 minutes read
 Instructions to Change the Numeric Style When Listing a List Used in3 minutes read
 How to Keep Word Format When Sharing Documents: Word Tips4 minutes read
 Instructions on How to Fix Font Errors in Word4 minutes read
Reader Comments 0
Sign in with email or Google to join the discussion.