10 Useful Table Formatting Tips in Microsoft Word
Inserting tables into Microsoft Word documents is a great way to organize and present information. But you don't have to stop there. With just a few simple formatting adjustments, you can turn basic tables into professional, visually appealing elements.
1. How to create a table in Word
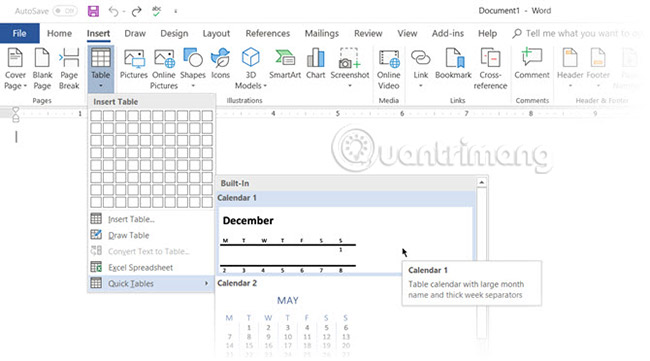
Using tables and even changing them based on data has become much easier in newer versions of Word, like Microsoft Word 2019 and Office 365. Visual formatting features give you more control over your data (and faster, too). But first, go to Ribbon > Insert > Table > Insert Table to create your own table.
Word gives you five options for creating tables.
The quickest way to get started is with Quick Tables. The built-in designs are quite useful, even if you don't have much design skills. You can modify the design by adding rows and columns or removing unnecessary ones.
Another quick way to create a table in Word is with the Insert Control feature. You can create a new column or row with one click. Hover over a table. A bar will appear just outside your table between the two existing columns or rows. Click it when it appears and a new column or row will be inserted in that spot.

When you want to move or sort a row around, use Alt + Shift + Up Arrow and Alt + Shift + Down Arrow to sort the row up or down. Move adjacent rows by selecting all of them.
See also how to create tables in Word 2007 and Word 2016.
How to position tables on the page?
Right-click on the table and select Table Properties from the context menu. The Table Properties dialog box is a tool for precise control over the data and how it is displayed. Control the size, alignment, and indentation of your table.
By default, Word aligns a table to the left. If you want to center a table on the page, select the Table tab. Click Alignment > Center.
The left indent controls the distance of the table from the left margin.

Choose the position of the table based on the surrounding text, so that the overall document has a visually pleasing appearance. Use the handles to adjust the table. The text will automatically change from None to Around. From the Table Positioning dialog box , you can set the distance from the text to each side of the table.
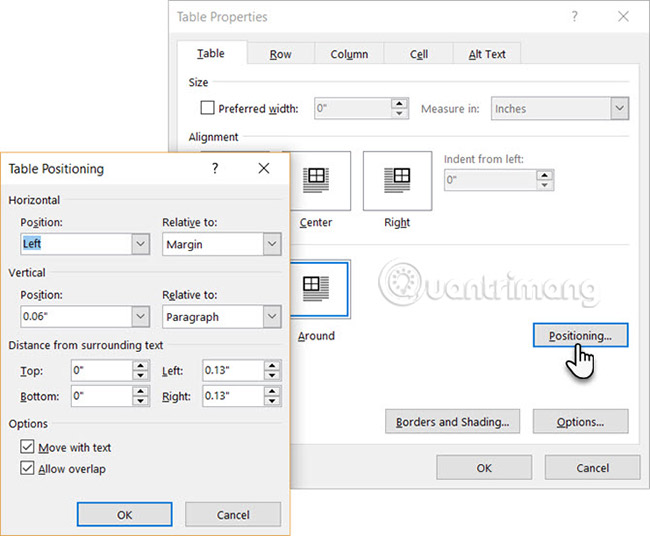
Select Move with Text if the text is directly related to the table data. The table is vertically aligned with the surrounding paragraphs. If the data in the table applies to the entire document, you can ignore this option.
2. Using the Ruler tool
Sizing and positioning tables is an art. If you need precise measurements to size table rows and columns, use the Ruler tool.
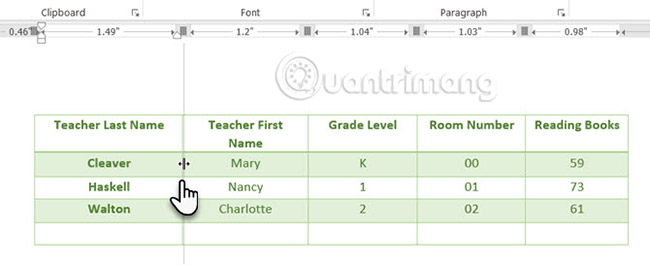
Hover over the border. When the double-arrow pointer appears, click the border and hold down the ALT key. Microsoft Word will display specific measurements on the Ruler. Move the rows and columns to fit your desired size.
3. Distribute rows and columns evenly
Want to create a table with evenly spaced rows and columns? The good news is you don't have to adjust each row or column manually.
Just select the entire table and go to the Table Layout tab . In the Cell Size group , click Distribute Rows or Distribute Columns and Word will automatically adjust the rows or columns to ensure equal spacing.

4. Change the layout and appearance of the table
Once your table is positioned and the rows and columns are adjusted, you can further improve the layout and look of the table to match the style of your document.
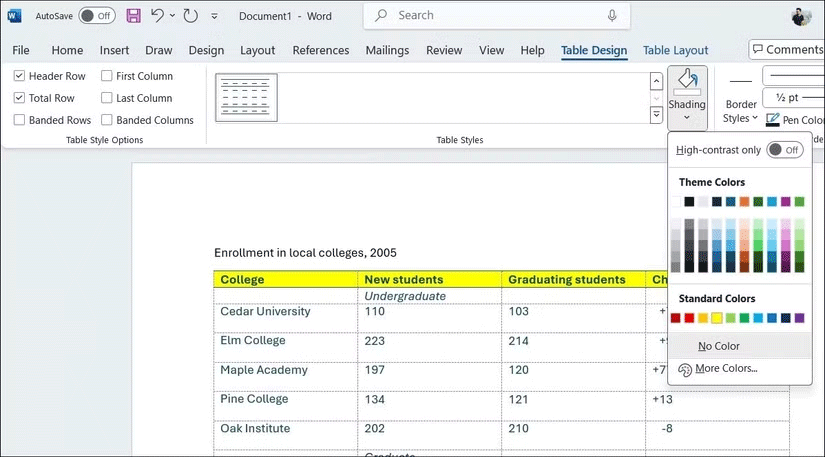
You can go to the Table Design tab and use the Shading tool to add a background color to individual cells, rows, or columns. In the same tab, the Table Styles menu offers a variety of pre-designed styles that can instantly apply cohesive formatting to your entire table.
5. Convert text to table (and vice versa)
Tabular data provides information about its structure. It would be frustrating if Word didn't have something to handle non-tabular data. You can convert data into a table instantly with the Insert Table command.
Select text. Go to Ribbon > Insert > Table > Insert Table.

Microsoft Word converts text to table
Microsoft Word determines the number of rows and columns required by looking at the text delimiters and then automatically fits the contents. The Convert Text to Table dialog box gives you more control if the previous operation does not work properly. You can also choose how the table contents will appear on the page.
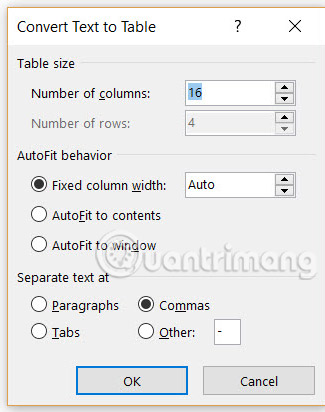
You can specify how Microsoft Word will separate data into rows and columns. Paragraphs, tabs, commas, or any other delimiter character. This allows you to easily import non-tabular data from plain CSV or TXT files and convert them into formatted tables.
Convert table to text
Reverse the process if someone asks you to send them files with comma-separated values (or any other delimiter). Select the entire table by clicking the 'move' handle above the table.
Go to Ribbon > Table Tools > Layout . In the Data Group, click Convert to Text.

Plain text can be boring. When you have the chance, turn your data table into a more visual chart, using one of these underused features in Microsoft Word.
See also: Instructions for converting table format in Word 2010 to text.
6. Fill in column numbers automatically
Microsoft Excel makes it easy to automatically fill in a series of sequential numbers. Microsoft Word does not, and you may have to do this manually. However, there is an easier way.
Create a new column for the serial numbers (if it doesn't already exist). Select this column by hovering over the entire column.
With the column selected, go to Home > Paragraph, then click the Numbering button to insert a numbered list.
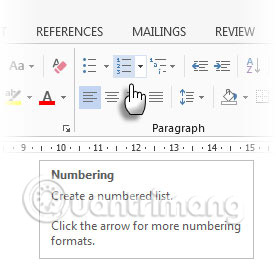
A series of numbers will be automatically inserted into the column.
7. 'Freeze' the board!
Microsoft Word tables resize to accommodate new data. There may be times when you don't want these tables to resize, even when new data is inserted. So 'freeze' the cells in the table.
The first step is to specify a fixed size for your cells. Go to Table Properties > Row, then enter a value in the Specify height box. For Row height , select Exactly from the dropdown menu.
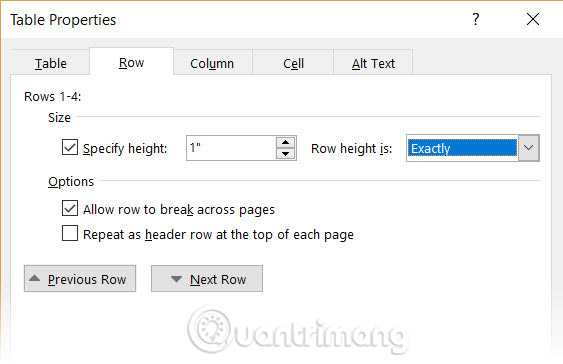
Now select the Table tab, click the Options button, uncheck the Automatically Resize to Fit Contents checkbox .

Click OK twice to exit the Table Properties dialog box.
This also solves the problem of inserting an image into a cell without causing it to expand to accommodate the image. If the image is larger than the available space in the cell, the image will be cropped to fit the cell.
8. Change rows to columns in a table
There are situations where you need to convert rows into columns and vice versa (columns into rows). One situation that can happen is when the number of columns exceeds the page margin. Converting columns around to rows and vice versa is called transposition.
The bad news is that Word doesn't have a built-in way to handle this. Microsoft recommends that you copy and paste your table into Microsoft Excel and use the Transpose command there. Then, copy and paste the converted table back into Microsoft Word.
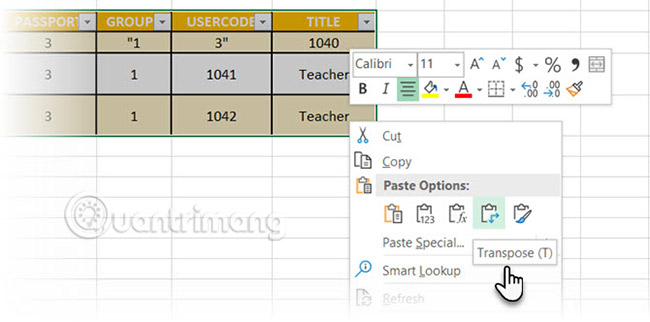
Refer to the article: How to convert columns to rows, rows to columns in Excel for detailed instructions.
9. Paste Excel tables into Gmail
You'll find an easy way to do this. By default, Gmail doesn't retain spreadsheet formatting when you paste from Microsoft Excel. To email table data without sending it as a separate attachment, use Microsoft Word as a bridge.
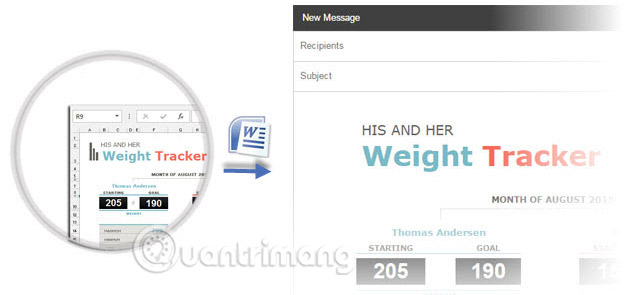
Select, copy, and paste the Microsoft Excel table into a Microsoft Word document with the source formatting. Now copy and paste from Microsoft Word to Gmail. As you can see from the screenshot, the problem is solved. You may have to tweak the formatted tables a bit more, but most of the formatting is retained.
10. Reuse your tables to save time
You can save a lot of time by reusing tables when you create professional reports and documents. Save blank table formats and insert new data when required. With this quick save feature, you won't have to recreate the layout from scratch for new data.
Select a table. Go to Ribbon > Insert > Text group > click Quick Parts > Save Selection to Quick Part Gallery.

Once you save your selection to the Quick Part Gallery , you can reuse your selection by clicking Quick Parts and selecting that option from the gallery.
Use the Building Blocks Organizer to preview any boards you've created. You can also edit properties and delete boards from here.
These are just some basic tips that TipsMake wants to share with readers. Of course, they may not be enough for your daily work, but they are quite useful for beginners.
Tables are something Microsoft Word and Excel have in common. Microsoft Excel is a better tool for handling tables, but being able to manage tables well in Word is also a necessary skill. Use them everywhere you get the chance!
Good luck!
See also: