Instructions on how to change the default font in PowerPoint
Typically, on Office tools we have a fixed font format for text pages. However, when working with different purposes, you will need a different font for each different presentation. To meet that need, you need to know how to change the default font in PowerPoint. Please refer to the following article now!
At this article, Thuthuatphanmem.vn uses PowerPoint 2013 version, you can apply the same for PowerPoint 2016, 2019 and Microsoft 365. Previous versions will no longer be suitable for this tutorial.
Change the default font in PowerPoint
PowerPoint has a built-in Slide Master feature so you can edit slide formats like effects, colors, background styles, and fonts. You will set these settings for the first slide, the next slide will automatically be applied as such.
Step 1: At the interface working with your presentation, select View on the menu bar, then select Slide Master in the tools section.

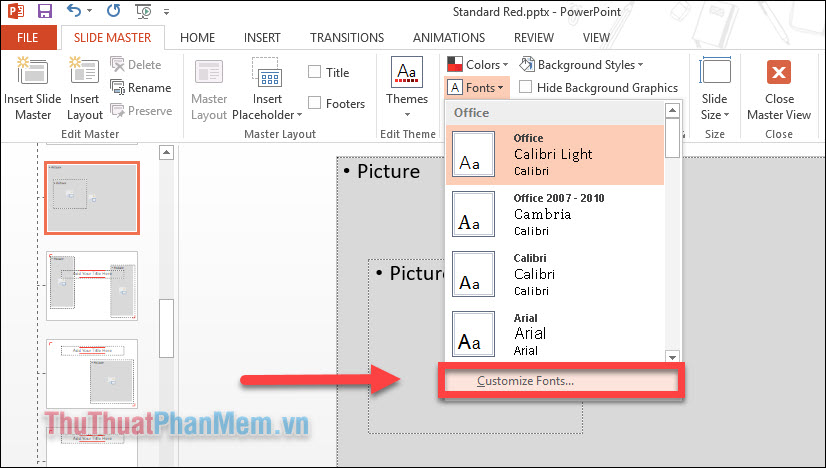
Step 2: Now you will see the column on the left as the slides are simplified, showing only the slide layout. Click on the first slide. Now pay attention to the Background, open Fonts . Here, drop down a list of default font options for Heading (Body) and Body (content) slides. You can immediately choose one of them if you like it.

If not, pay attention to the end of the list and click Customize Fonts . to create your own new option.

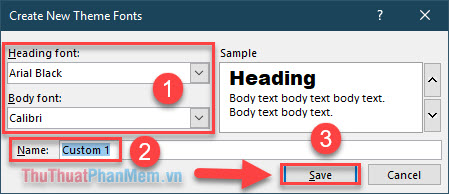
Step 3: A small window appears, Create New Theme Fonts , you proceed to change the font as you want for Heading font (font for title) and Body font (font for content) (1) .
Give it a memorable name (2) and finally Save (3) .

Step 4: Go back to the Slide Master interface and the Fonts section , now a new option will be displayed. Click on this setting .

Step 5: Select the View >> Normal tab again to return to your usual slide editing interface.

Check the font section and you'll see the results that the font for Heading as well as Body has changed to your liking.

Save the font template to use for later
After you have completed the steps to change the default font for PowerPoint as above, you can save it for future use without reset.
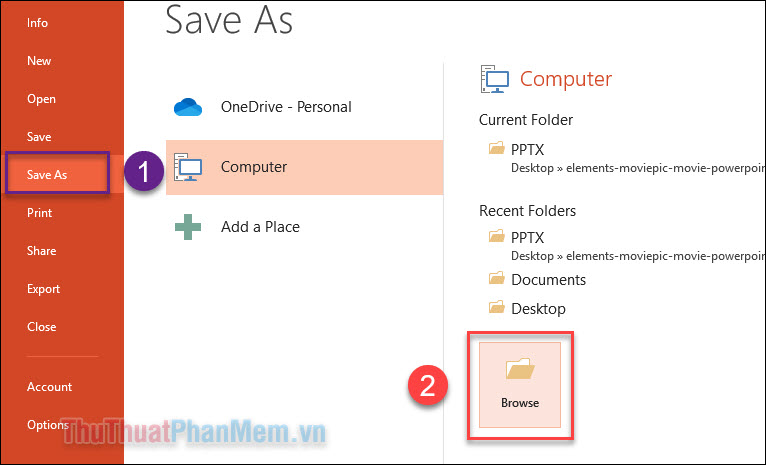
Step 1: In the editing interface, slideshow, click File >> Save As or press the key combination Ctrl + Shift + S .


Step 2: In the file saving window, navigate to the DocumentsCustom Office Templates folder .

Then name the presentation template and select the file type as PowerPoint Template (* .potx) , note the file ending with .potx .

So you've completed the steps to save the presentation template, including the default font settings for PowerPoint.
The next time you use it, open it as follows:
Open PowerPoint , in New , click on PERSONAL. Here will appear the slideshow template you saved earlier, just click open it and start editing!

Above is the guide to change the default font in PowerPoint. If you have any further questions, please comment below the article! Good luck!