Conquer Word 2007 (V period)
Formatting becomes simpler in Word 2007 with new features but it is really complicated if you do not know where to format.
 Conquer Word 2007 (period I)
 Conquer Word 2007 (phase II)
 Conquer Word 2007 (3rd installment)
 Conquer Word 2007 (Term 4)
LETTER FORMAT IN WORD 2007
Bold
1. Select the text you want to bold, place your cursor in the selection until the Mini toolbar appears.
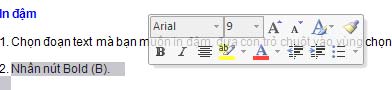
2. Click the Bold button (B).
You can also use the keyboard shortcut Ctrl + B.
Note, press Bold (or Ctrl + B) again if you want to leave bold.
Italicized
The implementation is similar to bold, but instead of pressing the Bold button, press the Italic button (shortcut Ctrl + I).
Underline the text
Press Ctrl + U to underline the selected text. Press Ctrl + U again to remove the underline.
There are also many other types of underline:
* Underline words, except spaces:
- Select the text you want to underline.
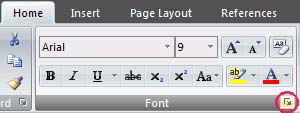
- At the Home tab, the Font group, press the arrow button in the lower right corner.
- In the Underline style box, select Word only. Click OK.
* Double tiles below from :
Perform steps 1 and 2 similar above.
In the Underline style box, select the double line icon. Click OK.
* Decorative underline :
Perform steps 1 and 2 similar above.
- In the Underline style box, choose the style you like.
- To change the color of the underline, click on the Underline color box and select the color you like. Click OK.
Change the font color
1. Select the text you want to change color, move the mouse pointer to the selection to appear Mini toolbar.
2. Press the Font Color button and select the color you like.
Change the font size
1. Select the text, move the mouse pointer to appear the Mini toolbar.
2. To increase the font size, press the Grow Font button (Ctrl + Shift +> shortcut). To reduce the font size, press the Shrink Font button (Ctrl + Shift + <).
Highlight the text
Highlight the text to make it look more prominent. Doing:
1. At the Home tab, the Font group, click the arrow next to the Text Highlight Color button.
2. Choose a color that you like to highlight (usually yellow).
3. Use your mouse to select the text you want to highlight.
4. To stop marking, click the arrow next to the Text Highlight Color button, select Stop Highlighting, or press ESC.
Remove text markup mode
1. Select the text you want to remove the bookmark mode.
2. On the Home tab, the Font group, click the arrow next to the Text Highlight Color button.
3. Select No Color.
Quickly search for highlighted words
1. In the Home tab, Editing group, press the Find button.
2. If you don't see the Format button, press the More button.
3. Click the Format button, then select Highlight.
4. Click Find Next.
Create an indented uppercase letter (Dropped Cap)
There are 2 modes :
1. Dropped cap.
2. In-margin dropped cap.
How to do it :
1. Click on the text you want to start with an indented uppercase letter.
2. In the Insert tab, the Text group, press the Drop Cap button.
3. Choose Dropped or In margin option.
Superscript format, lower number (Subscript)
1. Top number (Superscript); 2. Subscript.
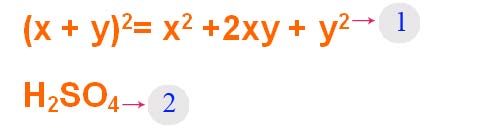
Select the text to format. In the Home tab, the Font group, press Superscript (Ctrl + Shift + =) to format the above index, or click the Subscript button (Ctrl + = shortcut) to format the lower index.
DOCUMENT ADMINISTRATION
Left, right, middle, or flat soup
1. Select the text you want to edit.
2. In the Home tab, the Paragraph group, press the Align Left button to align the left side, press Align Right to right-click, press the Center button to center (between the left and right margins), or press the Justify button to align the sides.
Align multiple modes on the same line
1. Change text view mode to Print Layout or Web Layout (In the View tab, group Document Views, select Print Layout button or Web Layout).
2. Click on the new line and do the following:
- Insert left-aligned text: Move the mouse pointer I to the left until the position to type text, double-click and type in the text.
- Insert the middle text: Move the mouse pointer I to the middle of the line until the position to type. Double click and type in the text.
- Insert the right text: Move the mouse pointer I to the right until the position to type text, double click and type in the text.
Change the vertical alignment of the text
1. In the Page Layout tab, the Page Setup group, click the arrow button in the lower right corner.
2. In the Page Setup dialog box, click the Layout tab. At Vertical alignment, you choose a type of alignment you like (Top, Center, Justified, Bottom).
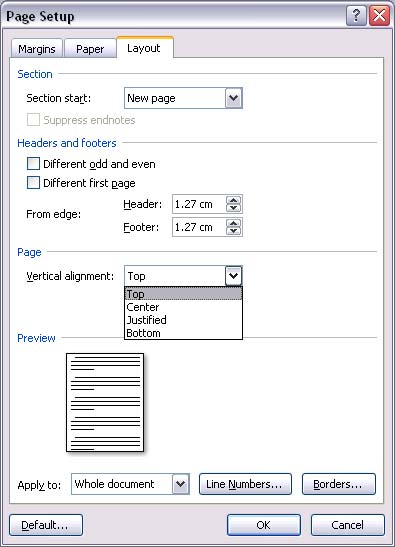
3. In Apply to, select the applicable range is Whole document, This section (current area), or This point forward (from here onwards). Click OK.
Center the top and bottom margins
1. Select the text you want to center between the top and bottom margins.
2. In the Page Layout tab, the Page Setup group, click the arrow button in the lower right corner.
3. In the Page Setup dialog box, click the Layout tab. At Vertical alignment, select Center.
4. At Apply to, select Selected text. Click OK.
Indent the first line of the paragraph
1. Click on the paragraph where you want to indent the first line.
2. In the Page Layout tab, click the arrow button at the lower right corner of the Paragraph group.
3. In the Paragraph dialog box, select the Indents and Spacing tab. In the Special section, select First line. In the By section, select the indent distance. Click OK.
Adjust the indent distance of the entire paragraph
1. Select the text you want to adjust.
2. In the Page Layout, Paragraph group, click on the up, down arrows next to Left to increase, reduce the left indent, or at Right to adjust the indentation right.
Retrieve all lines, except the first line of the paragraph
1. Select the text you want to adjust.
2. On the horizontal ruler, click on the Hanging Indent mark and drag to the position where you want to start indenting.
If you don't see the horizontal ruler, press the View Ruler button at the top of the vertical scroll bar to display it.
Create an indentation
Instead of indenting, you can adjust the indentation to the left margin by:
1. Select the text you want to expand left.
2. In the Page Layout, Paragraph group, press the down arrow button in the Left section until the text is in the position you like.
CHANGING DIVISION IN TEXT
Create double spacing between lines for the entire document
The default distance between lines for any blank document is 1.15. You can create double spacing (2) if desired by the following way:
1. In the Home tab, the Styles group, right-click the Normal button, select Modify.
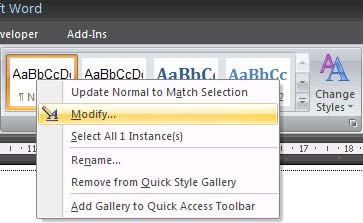
2. Under the Formatting group, press the Double Space button. Click OK.
Change the line spacing for the currently selected text
1. Select the text you want to change.
2. In the Home tab, the Paragraph group, press the Line Spacing button.
3. Choose the distance you want, such as 2.0
Note : If you want to set multiple spacing between lines but this distance is not included in the menu that appears when pressing Line Spacing button, select Line Spacing Options, and enter the distance you like.
Types of line spacing that Word supports:
- Single (single line). This option supports the largest font in that line, adding an additional amount of extra space. The amount of additional space depends on the font you are using.
- 1.5 lines: 1.5 times more than single line spacing.
- Double: Twice the single line spacing.
- At least: This option sets the minimum line spacing needed to match the largest font or graphic on the line.
- Exactly: Fixed line spacing and Word will not adjust if you later increase or decrease the font size.
- Multiple: Determine the increase or decrease of line spacing in proportion to the single line you specify. For example, entering 1.2 means that the line spacing will increase by 20% from the single line.
Change the distance before or after the paragraph
1. Select the text you want to change the distance before or after it.
2. In the Page Layout tab, Paragraph group, click on the arrow next to Before (before) or After (after) to change the value you want.
Change the distance between characters
1. Select the text you want to change.
2. In the Home tab, click the arrow button in the lower right corner of the Font group to open the Font dialog box.
3. Click the Character Spacing tab in this dialog box. In the Spacing section, click Expanded to expand or Condensed to close the gap and specify the distance in the By section.

Text scaling horizontally
1. Select the text you want to stretch or record.
2. In the Home tab, click the arrow button in the lower right corner of the Font group to open the Font dialog box.
3. Click the Character Spacing tab in this dialog box. In the Scale section, enter the percentage you want. If this ratio is greater than 100%, the text will be pulled out, otherwise, it will be recorded.
Mark changes and notes in the document
Track changes while editing
1. Open the document you want to track.
2. In the Review tab, group Tracking, click the Track Changes button.
3. Change documents as you like (insert, delete, move or format text .). Immediately on the side of the document page, bubbles will appear showing this change.
Turn off the change tracking mode
In the Review tab, the Tracking group, click the Track Changes button again to turn off the tracking mode while editing.
Change the way Word marks
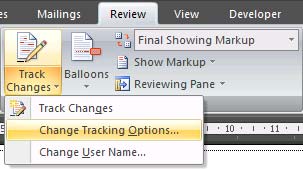
- You can change the color and the formats Word uses to mark changes in documents by clicking the arrow next to the Track Changes button, and clicking the Change Tracking Options button.
- If you want to see all the changes in the document instead of displaying the bubbles on the side of the document, on the Tracking group, click the Ballons button, then select Show all revisions inline.
- To highlight the display area of the bubble (on the sidelines of the document), click the Show Markup button and select Markup Area Highlight.
Insert a note
 1. Select any text or object in the document you want to note.
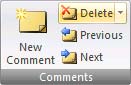
2. In the Review tab, the Comments group, click the New Comment button.
3. Enter your note in the bubble displayed in the frame next to the document.
Delete notes
- To delete a note, right-click the note, select Delete Comment.
- To quickly delete all notes in the document, click on any note. In the Review tab, the Comments group, click the arrow below the Delete button and select Delete All Comments in Document.
Change notes
1. If the notes are not displayed in the document, click the Show Markup button in the Tracking group of the Review tab, then check Comments.
2. Click inside a bubble with the note to fix. Then edit the content to your liking.
Change the note's name
Next to each note is always the name of the user. If you want to change this name, do the following:
1. In the Review tab, click the Tracking group, click the arrow below the Track Changes button, then select Change User Name.
2. In the dialog box that appears, under Personalize . ., enter your name, then click OK.
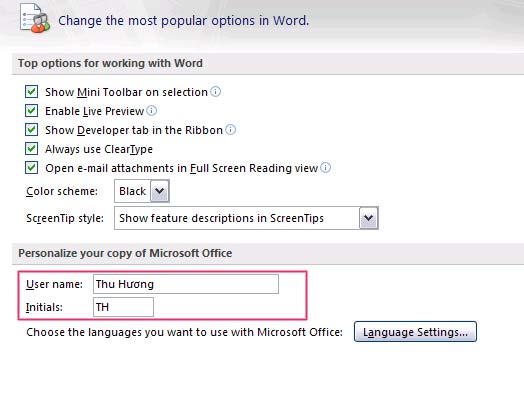
Note that the notes from now on will work with the new name.
Print the document with the note and the changes marked
1. Click the Microsoft Office Button, then select Print.
2. In the Print dialog box, in the Print what section, select Document showing markup and click OK.
Print a list of changes in the document
1. Click the Microsoft Office Button, then select Print.
2. In the Print dialog box, in the Print what section, select List of markup and click OK.
Do not print changes and notes
1. Click the Microsoft Office Button, then select Print.
2. In the Print dialog box, under Print what, select Document and click OK.
 Conquer Word 2007 (last term)
Nguyen Hong Phuc
Was this article helpful?
Your feedback helps us improve.
Related Articles
 Conquer Word 2007 ... (period III)18 minutes read
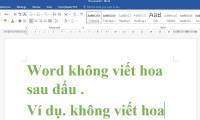 Word error does not capitalize after a period and how to fix it effectively4 minutes read
 EA remake Command & Conquer with 4K graphics, new multiplayer mechanism, will be released in June this year2 minutes read
 Conquer Word 2007 (Term 4)20 minutes read
 Conquer Word 2007 (phase II)13 minutes read
 How to type a dot in Word extremely quickly1 minutes read
Reader Comments 0
Sign in with email or Google to join the discussion.