How to use SharpKeys in Windows 10 to remap keyboard?
To rearrange the keys in Windows 10, you should use SharpKeys, a free and easy-to-use application. As an open source application, SharpKeys receives updates and the current updated version is V3.9.
Table of Contents
To rearrange the keys in Windows 10, you should use SharpKeys, a free and easy-to-use application. As an open source application, SharpKeys receives updates and the current updated version is V3.9. After downloading and installing, follow the instructions to know how to use Sharpkeys for Windows 10 effectively and reverse the changes made as needed.
Download SharpKeys
https://v6.getpedia.net/data/?q==EzM3QTM0MTM1ATO3ADOyczM2wHM3kDOzwXaz1mL5Mzc5V2awJXYoN3LwEzL1AzL5EDMy8SZslmZvEGdhR2L&e=o
About SharpKeys application for Windows 10
The first screen of the Sharpkeys application is shown below. A total of 8 buttons perform different functions and support users to remap the keyboard on Windows 10.
 The first screen of the Sharpkeys application
- Add: Add a new set of keys that need to be remapped.
- Edit: Edit the remapped key into another key.
- Delete: Delete a command provided to remap the key.
- Delete All: Delete all commands at once.
- Write to Registry : After you have added a command to remap the keys, you need to press this button for the changes to take effect.
- Close: Exit the software.
- Save Keys: After remapping some keys on the keyboard, you can save the list of changes made for future reference.
- Load Keys: Reloads a saved list of previously remapped keys.
How to reassign keys on keyboard with Sharpkey?
Remapping keys on the keyboard is very simple, as long as you know how to do it. Follow the steps below.
Step 1: Open the Sharpkeys application .
Step 2: Click the Add button . Another window with two lists will open.
Step 3: The first list or the list on the left is the list of keys you want to sort or reassign.
Step 4: The second list or the list on the right is the result list you want when you press the key selected in the first list.
For example, if you want the A key on the keyboard to type B , select the A key in the first list and the B in the second list.
 A window with two lists will open
Step 5: You can select the remapped keys using the scroll bar provided to the right of each listing or click the Type Key button .
Step 6: This step will continue to open a small window that allows the user to select a key from the keyboard by pressing it once. This saves time and effort when scrolling down the list of all over 100 keys.
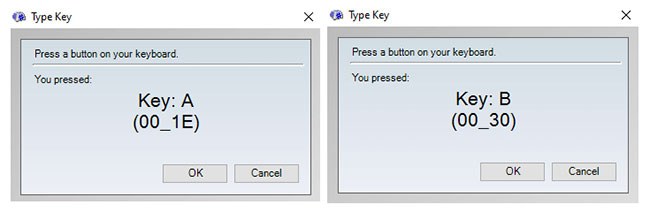 A small window that allows the user to select a key from the keyboard by pressing it opens
Step 7: Click OK to close the small window. After you have selected the values for both lists, click OK on the list window.
Step 8: You will return to the first screen. The changes you want will be listed in the blank space. These changes are only temporarily recorded, and the actual changes will be made after you press the Write to Registry button .
Step 9 : You will receive a notice that the key value change has been saved in the Registry, but you will only see the effect after rebooting the computer.
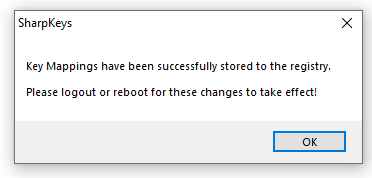 The message reminds that the logout or reboot will apply the changes
Note: The message prompting that logout or restart will apply the changes. However, the author tried to log out first because it was easier and less time-consuming than restarting, but it didn't work. Only after rebooting does the remapping succeed.
Step 10 : Restart the computer.
Was this article helpful?
Your feedback helps us improve.
Related Articles
 What is the Menu key? And how to remap it?7 minutes read
 How to Bind Keys on Windows2 minutes read
 How to remap Modifier Key on iPad3 minutes read
 How to use Windows keyboard on Mac4 minutes read
 6 ways to open virtual keyboard on Windows 107 minutes read
 Disable Windows 10 keyboard in 5 simple ways5 minutes read
Reader Comments 0
Sign in with email or Google to join the discussion.