How to shrink the text in Word
How to shrink the text in Word. When you want to print a file and suddenly realize that the number of pages to print is too much while the content of the document is not much. The large gap in the page occupies much of the 'space' of the file.
Table of Contents

When you want to print a file and suddenly realize that the number of pages to print is too much while the content of the document is not much. The large gap in the page occupies much of the "space" of the file. If you encounter this problem, you can read the following article of TipsMake.com to know how to shrink text in Word.
There are a lot of things that leave your writing with unnecessary redundancy, so we'll analyze each of the most interesting aspects.
1. Paper margins
A standard Word document usually has a margin of 2 to 3 cm. But if your text adjusts the width of the margin on the left margin, the left margin of the right margin is too large, it will make the margin space become too wide, not only losing the aesthetics of the presentation but also causing your text to be stretched unnecessarily. set.
To adjust the margin of a text, you can adjust the ruler directly on the ruler.
Clicking on the communication position between gray and white and dragging it to the top of the ruler will narrow the margin of your text.

If you don't see the ruler bar displayed, you can go to View and add a checkmark to the Ruler line in the Show section .

And if you do not want to use the function on the ruler because you think it is not very accurate, you can use the Margins function of Word.
Open the Layout ribbon on the toolbar, at the Page Setup section you will see the Margins icon .
In the Margins also common types of hinges so you can choose to use it to file your documents. Besides, there will be clear comments on the margins on the top (Top), the bottom margin (Bottom), the left margin (Left) and the right margin (Right).
But if you want to choose the margins more freely, you can go to Custom Margins at the bottom.
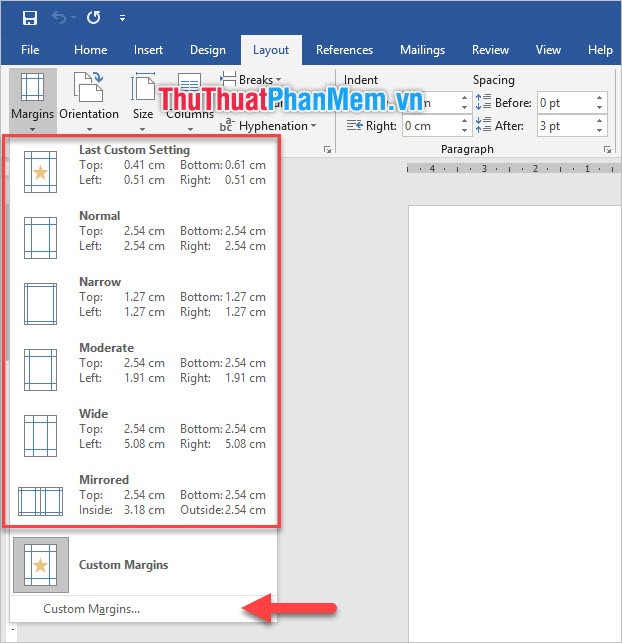
In this function dialog box, you can adjust the margin gap at the Margins tab Margins .
With Top being the upper margin is the distance from the first line to the top edge of the paper.
Bottom is the bottom margin that is the distance from the bottom line to the bottom edge of the paper.
Left is the left margin calculated by the distance from the left edge of the paper to the text character.
Right is the upper margin that is the distance from the right edge of the paper to the text character.
Particularly for Gutter , it is the distance for you to close the book (or understand the back of the book) so you can customize all 4 positions on the 4 sides, it will leave a small space anymore so that when printed, you can bring close the book without affecting the distance of the previously adjusted margins.
If you do not want to customize Gutter, you can add manually to the margin distance above, for example, I added 1.5 cm to the left margin (Left).
After adjustment is complete, click OK to confirm the entire setting.

2. Paragraph and line spacing
The length between two paragraphs and lines together is also an issue in this article zooming out:
The distance between two paragraphs is not necessarily too large, just about one line of words is enough. Normally, the spacing of paragraphs with the same section of the chapter should be as wide as one line of text, but if it is too far apart, you should adjust it.
Similarly the space between two lines of text in the same paragraph does not need to be too large.

To close the spaces, highlight the paragraphs that have extra spaces between the paragraph and the line. Or if you want to adjust this throughout the text, you can use Ctrl + A to highlight the whole thing.
Then go to the Layout ribbon , click the expand arrow in the Paragraph section to open the Paragraph function dialog box .

In the dialog box of this function, the Spacing item is the item we need to pay attention to when minimizing the text.
With Before we adjust the distance of the selected text with the text above and vice versa with After , we adjust the distance of the selected text with the text below.
Normally if you do not use Enter as a paragraph separator method, you can leave each one as 6 pt, plus the total distance between the paragraphs will be 12 pt.
The distance is approximately equal to one line of paragraph if you use the font 12 for all your text.
If you have used Enter as a method of line spacing, you can set both Before and After to 0.
Line spacing is the distance between lines. The space between lines you can leave by default is 1.5 lines or set between 1 and 1.5 pt. This is moderately spaced for lines in text layout.
3. Character format
Adjusting the font size and font also helps you significantly narrow your drafting text.
3.1 Batch size adjustment
For normal administrative documents, the font size ranges from 12 pt to 14 pt. Some texts use smaller custom sizes.
When adjusting the Size , you need to highlight all the text to adjust and go to Home , change the Size in Font .

In addition, the font is also a factor to note, the font often used in Vietnam administrative editor is usually Times New Roman or Arial . If you use larger, more colorful fonts, it also takes up a bit more writing area. For documents that are hundreds of pages long, just a little change across the entire document will make your document tens of pages longer.

3.2 Scale to scale
With the above adjustment method, you can resize the characters you have highlighted in black to the size you choose. But there is a problem here: if there are paragraphs that have to be bigger or smaller, then adjusting the batch size will cause formatting errors for lines of different sizes. there.
Therefore, we can use the size down function in bulk to avoid the above problems.
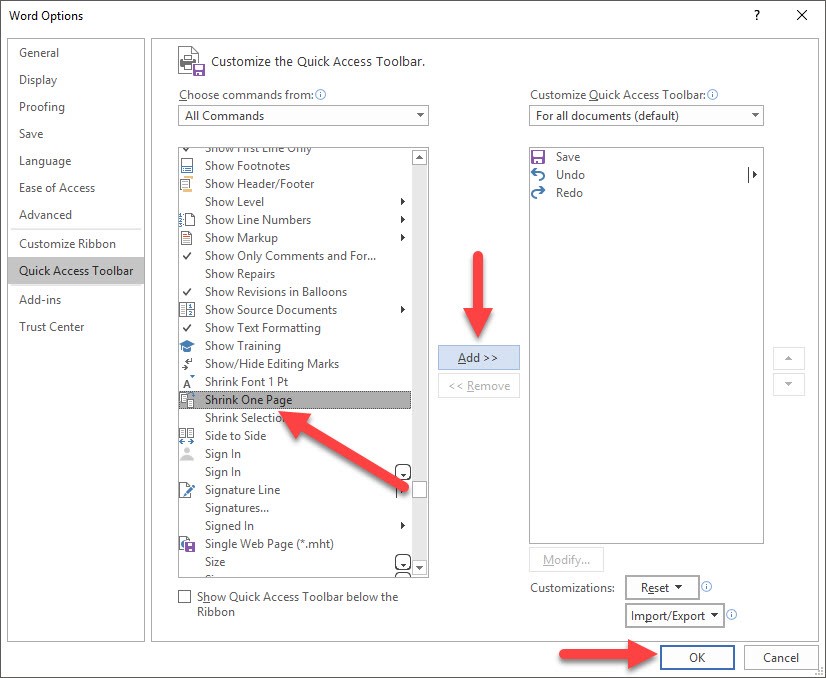
First, click on the down arrow icon in the corner of the Customize Quick Access Toolbar .
Then select the More Commands line .

In the Word Options function dialog box , change the Choose commands from option to All Commands .

Then scroll down and select Shrink One Page . The list of All Commands will be arranged in alphabetical order, so you can scroll down and look for the lines with the letter S to see Shrink One Page more simply.
After selecting Shrink One Page , click Add to add it to the Customize Quick Access Toolbar .
Then click OK to confirm the installation.

Then you can see the Shrink One Page (Shrink to Fit) you just added will appear on the Quick Access Toolbar .
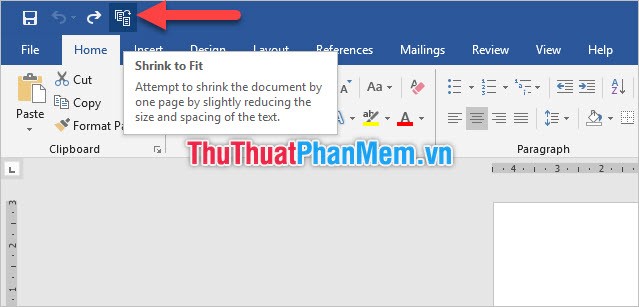
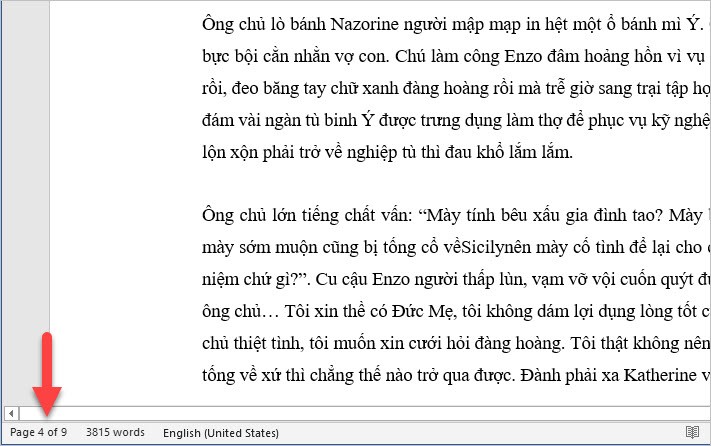
When you click on this icon, you will see the font size of the entire text will be scaled down in proportion.
After trying to correct all of the above issues, you can see that your draft text has significantly shrunk.
Thank you for following the article of TipsMake.com on how to shrink text in Word. Hopefully this article is helpful for you and that helps you to accomplish this job. Please follow more articles at TipsMake.com to support us and increase your knowledge.
Was this article helpful?
Your feedback helps us improve.
Related Articles
 How to put pages in Word, collapse text in Word2 minutes read
 How to automatically collapse Word documents3 minutes read
 Control formatting when pasting text in Word23 minutes read
 Align text, adjust font in Word 20138 minutes read
 Full Word tutorial 2016 (Part 4): Formatting text5 minutes read
 How to use Hidden Text in a Word document9 minutes read
Reader Comments 0
Sign in with email or Google to join the discussion.