Table of Contents
How to Schedule Automatic File Deletion in the Folder Download is easier to understand when the core ideas are paired with practical examples. The sections below explain the topic clearly, highlight useful steps, and point out details that can prevent common errors.
In addition to using additional system cleaning software such as CCleaner or Clean Master, we can use automatic scanning of junk files on Windows 10 systems.
On Windows 10 there is a set of Storage Sense with features to automatically delete junk files, file cache or even files in the Downloaded folder under fixed time for about 30 days. When users turn on these options, we will not have to delete the junk files manually. This is also considered to be one of the ways to speed up Windows 10 computers , preventing junk files from taking up memory on the system.
- How to clean up Windows 10 according to the timetable
- Maintain Windows effectively with 5 professional software
- Clean up the system with PrivaZer
How to delete downloaded files automatically after 30 days
Note to users , not all data in Download will delete automatically after 30 days. Only files that do not have any changes after 30 days will be deleted from the directory only. Files that have changed, such as installing certain software files in the Download section, or editing certain files in this folder will be kept.
Step 1:
First, go to Settings on the system or press Windows + I key combination to quickly open the Windows Settings interface on the system.

Step 2:
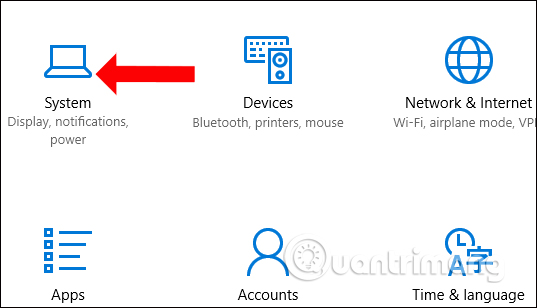
At the new interface, we click on System settings .
Step 3:
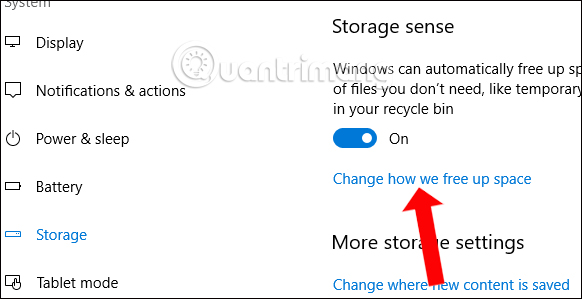
Switch to the new interface, users click on Storage settings in the list to the left of the interface. Look to the right of the Storage Sense section, turn on the switch to On mode . Continue to click Change how we free up space .
Step 4:
In the Change how we interface free up space, push the horizontal bar to the right in Delete files in my Downloads folder that has not been changed for over 30 days , to turn on the feature to automatically delete data in the Download folder.

- Comprehensive care of computers with Advanced SystemCare
- Remove root malware (malware) on Windows 10 computers
- How to use the Bitdefender Adware Removal Tool to remove adware on Windows
I wish you all success!
FAQ
How to delete downloaded files automatically after 30 days?
Note to users, not all data in Download will delete automatically after 30 days. Only files that do not have any changes after 30 days will be deleted from the directory only. Files that have changed, such as installing certain software files in the Download.
What is How to Schedule Automatic File Deletion in the Folder Download?
In addition to using additional system cleaning software such as CCleaner or Clean Master, we can use automatic scanning of junk files on Windows 10 systems.
Why is How to Schedule Automatic File Deletion in the Folder Download important?
A clear understanding of How to Schedule Automatic File Deletion in the Folder Download helps you make informed decisions, avoid common mistakes, and use the relevant tools or techniques more effectively.
Related Articles
 Set to Automatically Delete Files in the Download Folder on4 minutes read
 How to Save Files to Multiple Folders on the Web Browser: Save in5 minutes read
 Fix the Problem of Opening the Download Folder on Windows 10 Too3 minutes read
 How to Set Password for Folder and File in Windows9 minutes read
 How to Schedule Automatic Maintenance of Windows 10 System4 minutes read
 How to Change the Download Folder Windows Update in Windows 105 minutes read
Reader Comments 0
Sign in with email or Google to join the discussion.