Table of Contents
How to Turn on Auto-release Memory Mode Windows 10 Creators is easier to understand when the core ideas are paired with practical examples. The sections below explain the topic clearly, highlight useful steps, and point out details that can prevent common errors.
One of the reasons for the slow system is files created by installation software, cache, temporary files. taking up memory on the system. In such a case, we will use the Disk Cleanup tool available on the system to automatically free up hard drive space on a Windows 10 computer.
And in Windows 10 Creators Update, we can use Storage Sense feature in Settings to delete files created by the application and junk files after 30 days. So how to turn on auto-release mode on Windows 10 Creators Update?
- How to enable Dynamic Lock in Windows 10 Creators Update
- 7 ways to do, customize in post will help your Windows 10 "as fast as wind"
- Attractive features on Windows 10 Creators Update
Step 1:
We go to Settings> System> Storage , and then look at the content on the right of the Storage Sense section to switch to On mode to enable Storage Sense.
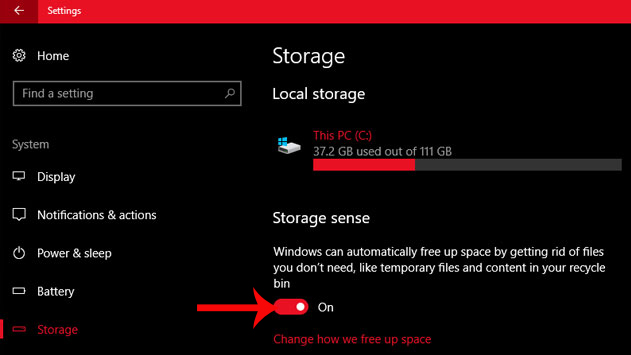
Such junk files will automatically be deleted from the computer within 30 days. If you do not need to use these files, a practical approach is to press delete manually, creating free space for the system.
Note to readers , when you enable the Storage Sense feature, you will not delete the junk folders created by the previous version of Windows 10 when you upgrade to Windows 10 Creators Update. So we must manually delete.
Step 2:
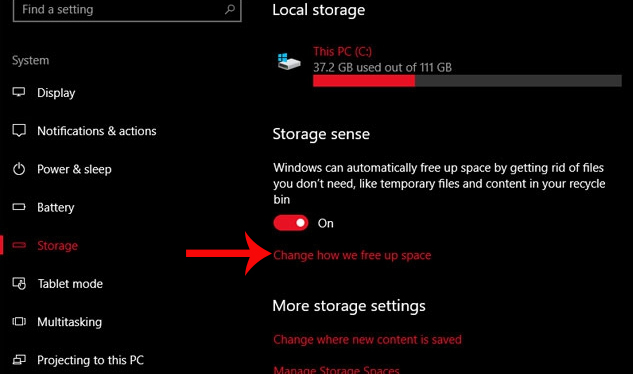
Once activated, you will configure the storage feature on the system. You can also access Settings> System> Storage , and then click Change how we free up space on the right interface.
Step 3:
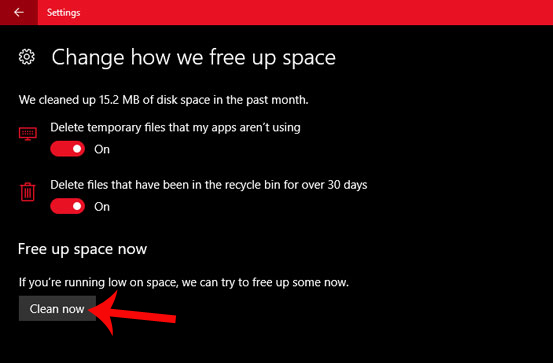
Change interface appears we free up space. The user chooses the item to delete from the computer, including:
- Delete các tập tin tạm thời mà không dùng: delete temporary files on the system that do not need to use.
- Delete files that đã được trong recycle bin cho over 30 ngày: delete files in the trash when 30 days have passed.
We switch to ON mode on the items, by swiping the horizontal bar to the right.
Finally click Clean now to complete the process of deleting the junk files on your computer.
Storage Sense feature on Windows 10 Creators Update gives users the option to delete junk files, increase the capacity for the system thereby reducing the slow status for the device. a practical approach is to choose to delete temporary files that are not used and delete junk files within 30 days, to completely remove junk files on the system.
I wish you all success!
FAQ
What should you know about step 1?
We go to Settings> System> Storage, and then look at the content on the right of the Storage Sense section to switch to On mode to enable Storage Sense.
What should you know about step 2?
Once activated, you will configure the storage feature on the system. You can also access Settings> System> Storage, and then click Change how we free up space on the right interface.
What should you know about step 3?
Change interface appears we free up space. The user chooses the item to delete from the computer, including:
Related Articles
 How to Disable Windows 10 Creators Update Ads7 minutes read
 How to Install Windows 10 Creators Update Using a USB Drive4 minutes read
 Windows 10 Creators Update Is Now Available for All Compatible3 minutes read
 Turn Off the Win 10 Update, Stop Windows 10 from Updating9 minutes read
 How to Enable Dynamic Lock in Windows 10 Creators Update6 minutes read
 Microsoft Died of Windows 10 Creators Update Version3 minutes read
Reader Comments 0
Sign in with email or Google to join the discussion.