Automatically frees free space on Windows 10 after 30 days
If you are facing problems with the performance of your Windows 10 computer, the computer is running slowly. The advice for you is to regularly clean junk files, empty the Recycle Bin. In fact, many users often clean up junk files on their computers in this way.
On Windows 10, Microsoft added an option to automatically delete temporary files and contents in Recycle Bin after 30 days and this option is integrated in the Settings application. And when using this option, users will not have to manually delete junk files on the system by hand anymore.
If you do not want to use temporary files that exist on the operating system for a period of 30 days before you can set the storage option to delete those files from your computer permanently. However, when using this method, you cannot recover your files from the Recycle Bin, and these files will be automatically deleted after 30 days. By default, the Storage sense setting is disabled, so if you want to use it you will have to enable the option.
Setting up this Storage is not new and has been integrated by Microsoft on previous versions.
Note: Storage sense feature is a feature available on Windows 10 Creators Updates that will be released in April 2017.
Free up free space on Windows 10 automatically
To free up free space on Windows 10 automatically, follow the steps below:
Step 1:
First press Windows + I key combination to open the Settings window. On the Settings window, find and select System .

Step 2:
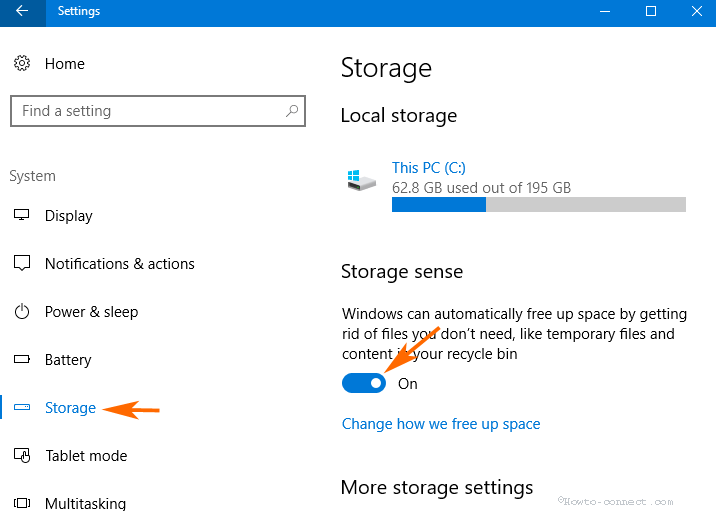
Click on Storage in the left pane of the System Settings window.
Step 3:
Look at the right pane, find the section named Storage sense . Your task is to switch the Storage Sense status to ON . After activating this option, your Windows 10 computer will automatically free up free space after 30 days.

Step 4:
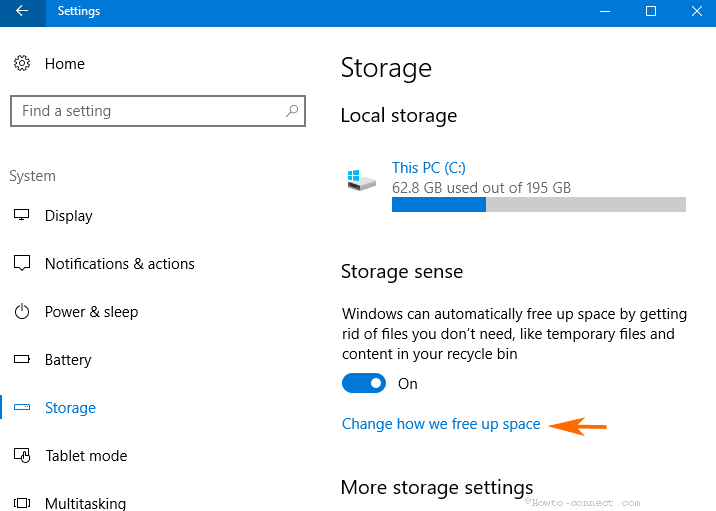
Click Change how we free up space located under the Storage sense section .

Delete files from Temp and Recycle Bin
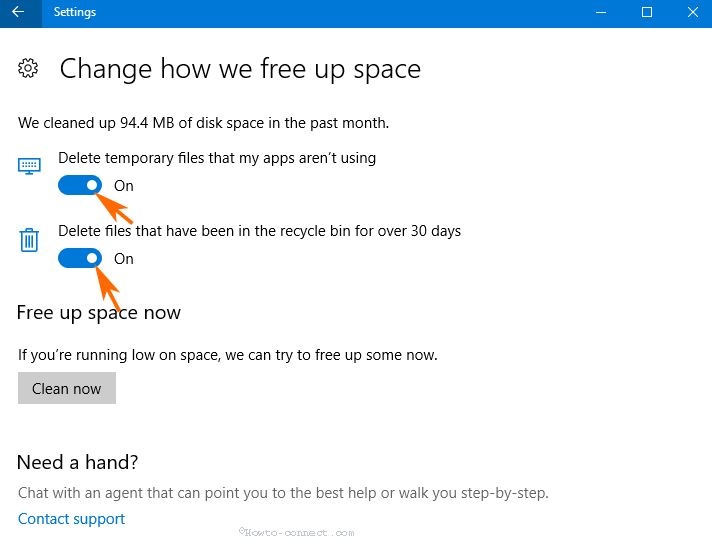
On the Change how we free up space window you will see 2 settings and you can enable or disable the deletion of temporary files and contents in Recycle Bin.
Step 5:
Setting 1 is named: Delete files temporary that my app không dùng . Your task is to switch the option state to ON to activate.
Step 6:
Setting 2 is called Delete files that have been in the recycle been for over 30 days , and you also switch the setting status to ON to activate.

Clean up your Windows computer instantly
Step 7:
If you want to clean up your Windows 10 computer right away, simply click Clean Now .
And your computer will be cleaned up. The process will take about 4-5 minutes and will display on the screen the amount of deleted data.
Refer to some of the following articles:
- Compress hiberfil.sys file to free up disk space on Windows 10
- What is the directory $ WINDOWS. ~ BT, can delete $ WINDOWS. ~ BT or not?
- Free memory space after updating Windows 10 Anniversary
Good luck!
You should read it
- ★ How to turn on auto-release memory mode Windows 10 Creators Update
- ★ How to automatically clean junk on Windows 10 computers
- ★ Free up hard drive space automatically on Windows 10 with Disk Cleanup
- ★ Delete junk files and clean up your Windows 10 computer
- ★ Free up space on Windows 10 by deleting temporary files