How to name an Excel cell or data area - Define Name feature on Excel
In Excel, users can name each individual cell or certain cells to easily remember the address of the corresponding cell when referring to the data area.
Table of Contents
Formulas in Excel often use data and values from other cells by using references to those cells. If you have many formulas, cell references can cause confusion, making your formulas difficult to understand.
The Defined Names feature in Excel makes formulas, as well as other data, less confusing and easier to understand. Instead of referencing a cell containing a value or formula, or a range of cells by row and column headings (A1, B2, etc.), you can use a defined name to assign to the cell or range. that box.
Today, TipsMake will introduce how to work with named ranges, including creating names, rules, and ranges for names, as well as how to edit, delete, view, and use those names. This.
Distinguish between Defined Names and Table Names in Excel
Don't confuse Defined Names with Table Names . Excel Table is a collection of data stored in records (rows/rows) and fields (columns/columns). Excel assigns a default name (Table1, Table2, etc.) to each table you create, but you can change it if you want.
Previously, TipsMake introduced you to tables in Excel and provided a more thorough tutorial on the subject. To learn more about tables in Excel, see Microsoft's support page.
support.office.com/en-us/article/create-and-format-tables-e81aa349-b006-4f8a-9806-5af9df0ac664?ui=en-US&rs=en-US&ad=USRules for Defined Names in Excel
When creating Defined Names in Excel, you must follow certain rules. For example, these names cannot contain spaces and the first character must be a letter, an underscore (_), or a backslash ().
For a full list of rules, see the ' Learn about syntax rules for names ' section on Microsoft's support page.
support.office.com/en-us/article/Define-and-use-names-in-formulas-4D0F13AC-53B7-422E-AFD2-ABD7FF379C64#bmsyntax_rules_for_namesRange for Defined Names in Excel
The scope of a Defined Name in Excel refers to where the name is recognized without conditions, such as the name of a worksheet or workbook file. Each name can have local spreadsheet level or workbook level scope.
For more information about this issue, see the ' The scope of a name ' section on Microsoft's support page (link above).
Create a Named Range in Excel
You have a few different options for creating a Named Range in Excel. You can specify the name using the Name box on the Formula bar, using the title cell text for a group of selected cells, or using the New Name dialog box.
Names do not have to refer to cells. You can use a name to label a value or formula that you use in multiple places in the workbook.
When specifying a name for a cell or range of cells, an absolute cell reference is used by default.
Specify the name using the Name box
Using the Name box is the easiest way to specify a name for a group of cells. Defining a name using the Name box only creates a name with workbook-level scope, meaning the name can be referenced anywhere in the workbook it was created in, without the need to add any worksheet names or workbook file names.
The article will cover another method that allows you to create worksheet-level names in the following section.
To use the Name box to define a name, do the following:
1. Select the cell or range of cells you want to name.
2. Enter the name you want in the Name box to the left of the Formula bar and press Enter.
Make sure you follow the rules for names mentioned earlier.
Name a range of cells in Excel using the text in the cell title
If you've added row or column headings to your data, you can use these as names.
To determine the name from a title, do the following:
1. Select the cells you want to name including the labels on the row or column.
2. On the Formulas tab, click Create from Selection in the Defined Names section or press Ctrl+ Shift+ F3.
If the label contains spaces or other invalid characters such as ampersands (&), they will be replaced with underscores.

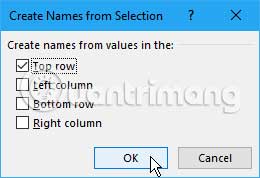
On the new Create Names from Selection dialog box that appears, users will have additional options:
- Top row: Take the top row as the title.
- Left Column: Take the left column as the title.
- Bottom Row: Take the bottom row as the title.
- Right Column: Take the right column as the title.
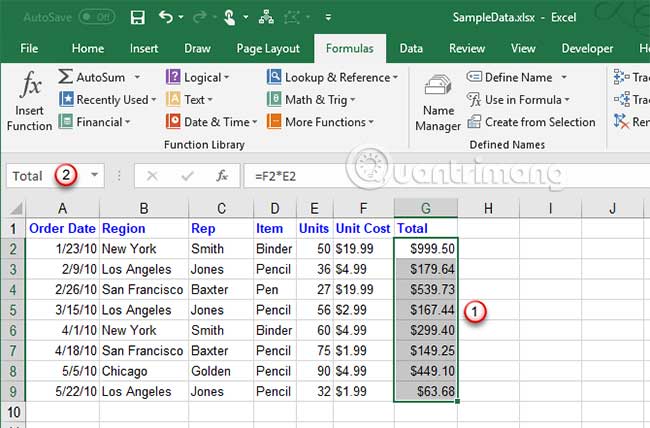
For example, the title label in the image above is at the top of the selected column, check the Top row box and click OK.
This name is a workbook level name and applies to all selected cells except the title label cell. When you select cells that are mentioned by name, without the cell title label, you will see the name in the Name box.

Specify the name using the New Name dialog box
The New Name dialog box provides more options when creating a name, such as specifying a worksheet-level range or adding comments to the name. Additionally, the New Name dialog box allows you to specify a name for a value or formula.
To use the New Name dialog box to name a cell or range of cells, start with the following:
1. If you are naming a cell or range of cells, select the cells you want to name. If you specify a name for a value or formula, you can select any cell.
2. On the Formulas tab, click Define Name in the Defined Names section .

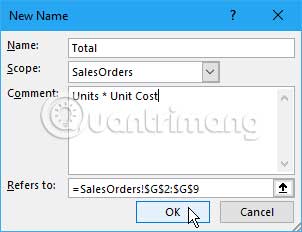
On the New Name dialog box , specify the following information:
- Name: Enter a name according to the rules for the defined name.
- Scope: By default, Workbook is selected as the scope for the name. If you want to give a worksheet-level scope name, select the worksheet you want from the Scope drop-down list.
- Comment: Add any notes you want to the name.
- Refers to: The currently selected cells and the name of the current sheet (or tab) are automatically entered in the Refers to box . If you define a name for a value or formula, replace what's in the Refers to box with an equals sign ( = ), followed by the value or formula.
The button to the right of the Refers to box allows you to minimize the New Name dialog box and select cells on the worksheet to enter a range of cells. The article will talk more about how to use that button in the next section, ' Editing a Named Range '.
When you're done entering information for the name, click OK to return to the spreadsheet.
Instructions for naming a range of cells in Excel
Step 1:
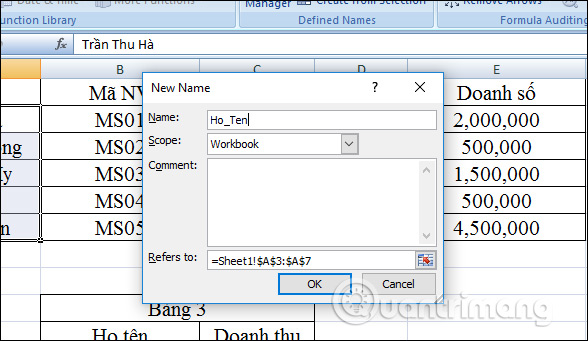
In the data table you are working with, click on the column you want to name, select the Formulas tab on the toolbar, then select Define Name as shown below.

Step 2:
In the new dialog box that appears, there will be items for which content needs to be selected.
- Name: Enter the name of the range. The name should be written immediately or with underscores.
- Scope: Range of the range. Select Workbook if you want to apply to this Excel file or you can choose to apply to a specific Sheet.
Click OK to set up.
The given names will then be in the Use in Formula section in the Formulas tab.

Edit Named Range in Excel
After defining a name, you can change its name, comments, and references.
To edit the Named Range, click Name Manager in the Defined Names section of the Formulas tab.

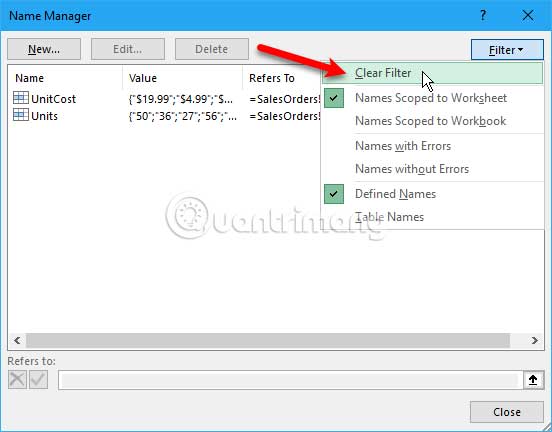
If you have a long list of names, you can filter them to find the name you want to edit.
Click Filter in the upper right corner of the Name Manager dialog box . Then, choose the type of name you want to display. You can select multiple filters by clicking Filter again and choosing another option.

To clear all filters and display all names again, click Filter and select Clear Filter.
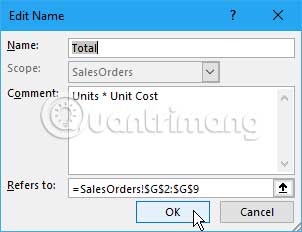
To change the name or comment, select the name you want to change and click Edit.

Change the Name, Comment , or both, and click OK.
You cannot change the Scope of an existing name. Let's delete the name and once again define the exact range.
You can change the cells in Refers to on the Edit Name box. But you can also do this directly on the Name Manager dialog box (find out in the next section). The method for changing the Name Manager cell reference is the same on both dialog boxes.
To change the cell or cell range to which this name refers in the Name Manager dialog box , first select the name for which you want to change the cell reference. Then, click the up arrow button to the right of the Refers to box .
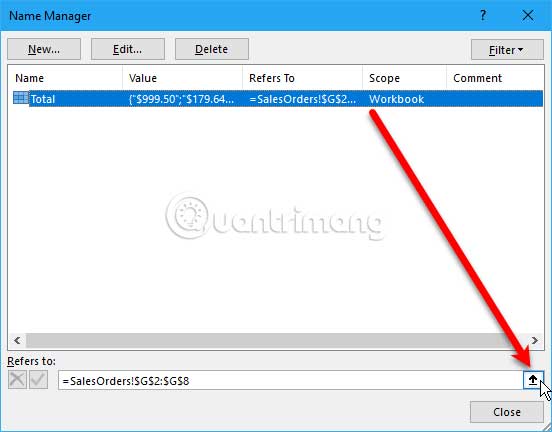
The Name Manager dialog box is reduced to just the Refers to box . To change cell references, do the following:
1. Select a cell or range of cells on the spreadsheet.
2. Click the button to the right of the Refers to box .

You will see the new cell reference in the Refers to box and the Name Manager dialog box is fully restored.
To accept the new cell reference, click the green check button. Or to revert the change back to the original cell reference, click the black X button.
Click Close to close the Name Manager dialog box.

See all Defined Names in Excel workbooks
The Name Manager dialog box lists all the worksheet-level and workbook-level names that you have defined in the workbook, regardless of which worksheet is active. But while the dialog box is open, you can't work on your spreadsheet.
It would be helpful to have a list of names directly on the current spreadsheet. That way, you can freely move around and decide which names need editing or which names you want to delete while consulting your list.
You can create lists directly on an empty area of the spreadsheet. This list includes the worksheet and workbook level names that have the scope in the currently active worksheet.
To start creating a list of names, do the following:
1. Locate an empty area of the current spreadsheet where two columns are available and select the cell that will be the upper left corner of the list.
2. In the Defined Names section of the Formula tab, click Use in Formula and select Paste Names or press F3.

On the Paste Names dialog box , click Paste List .
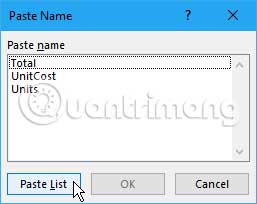
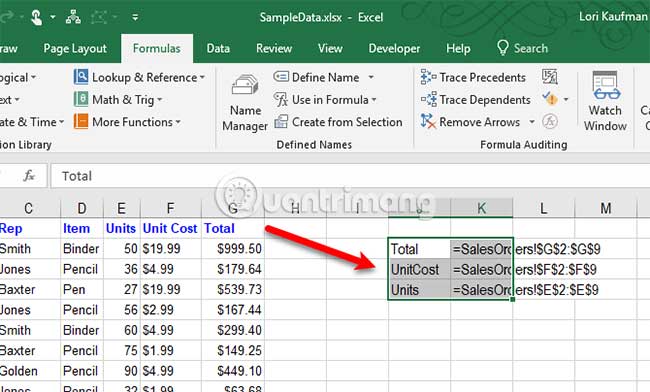
The names, cell references, values, and their corresponding formulas are pasted into the cells on the worksheet.
Now you can review your list and decide what to do with the names on it. You can delete this list on the spreadsheet once you no longer need it.
Delete Name Range in Excel
If there are some names that are no longer used, it is best to delete them. Otherwise, the list of names will be messy and difficult to manage.
To open Name Manager , click Name Manager in the Defined Names section of the Formulas tab.
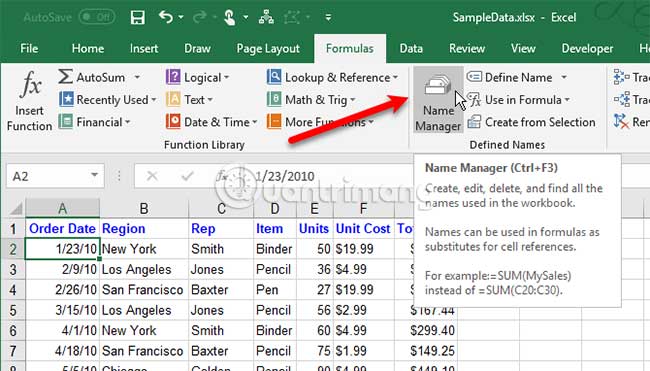
On the Name Manager dialog box , select the name you want to delete and click Delete. Click OK on the confirmation dialog box.

Use names for quick navigation in Excel
If the name refers to a range of cells, you can use the name to quickly navigate to and select the range of cells.
To go to a named range, click the down arrow on the Name box to the left of the Formula bar and select the name you want.
The worksheet-level name only displays in the Name box drop-down list, if the worksheet created in it is the currently active worksheet.
Alternatively, you can enter a name for a range of cells you want to move to in the Name box and press Enter. But make sure you specify the name. Otherwise, you apply that name to the currently selected cell or range of cells.

Use names in Excel formulas
Using Defined Name in a formula makes it easier to understand.
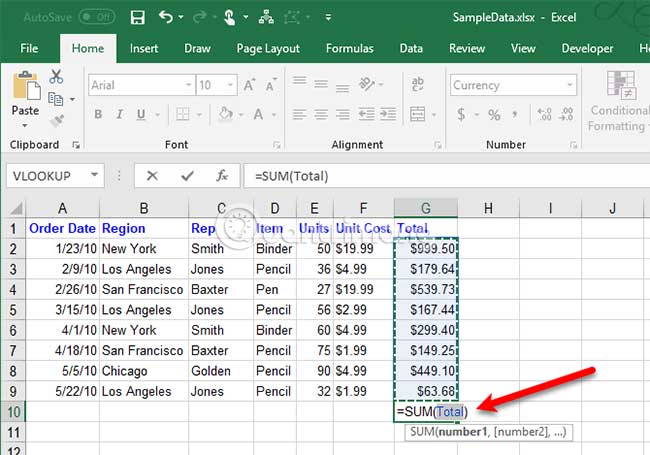
There are several ways you can enter names into a formula. If you know the exact name you want to use, you can enter it directly into the formula.
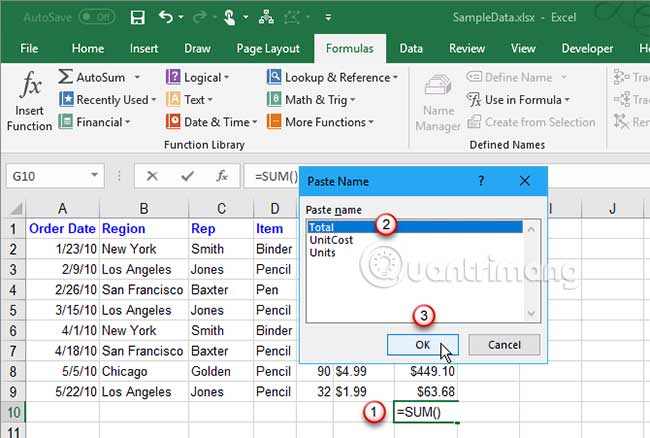
You can also use Formula AutoComplete . When entering a formula, Excel automatically lists valid names and you can select one to enter it into the formula. For example, the name Total is suggested in the following spreadsheet because the selected cell range has that name.
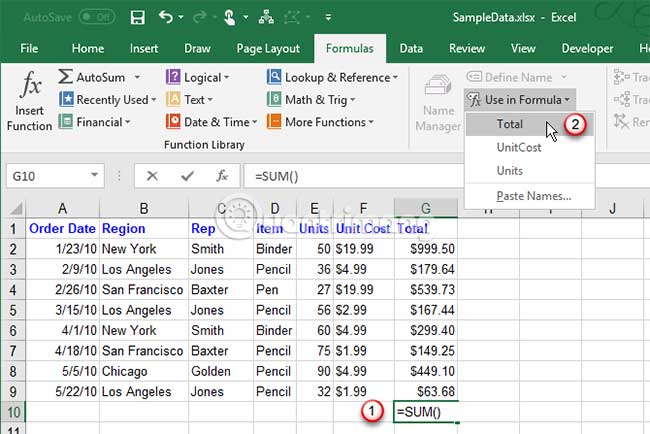
You can also start typing your formula and then click Use in Formula in the Defined Names section of the Formula tab. Then, select the name you want to use in the formula from the drop-down list.
The final method for using names in a formula is to start typing your formula and press F3. Then, select the name you want to use on the Paste Name dialog box and click OK, or press Enter.
Defined Names in Excel can help keep your worksheet organized and easy to understand. Use this name for not only cell ranges but also for values and formulas you use frequently.
To learn more, see the beginner's guide to Microsoft Excel.
Wishing you success!
Was this article helpful?
Your feedback helps us improve.
Related Articles
 How to name a cell or Excel data area5 minutes read
 How to use Focus Cell to highlight Excel data2 minutes read
 How to name, comment and protect cells in Excel3 minutes read
 Complete tutorial of Excel 2016 (Part 5): Basics of cells and ranges11 minutes read
 Excel 2016 - Lesson 5: Basic concepts of cells and ranges11 minutes read
 MS Excel 2003 - Lesson 3: Manipulating data in spreadsheets4 minutes read
Reader Comments 0
Sign in with email or Google to join the discussion.