Table of Contents
This updated guide explains how to Merge Mail (Mail Merge) in Word through clear steps, practical examples, and important checks that help prevent common errors.
Although this feature is very useful, many people do not know or pay attention to this mail merge. You refer to this guide to know how to merge mail in Word 2007.
First, you need to have the Word template file created to insert information. Then you do the following:
Step 1: Open the sample Word file, select the Mailings tab -> Start Mail Merge -> Step by Step Mail Merge Wizard .
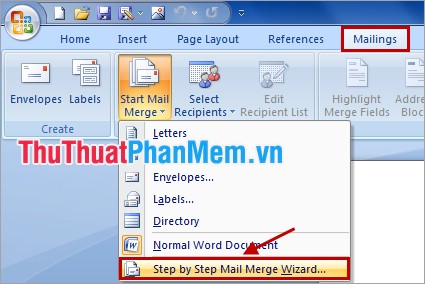
Step 2: Mail Merge appears on the right side of Word, select Letters in Select document type and select Next: Starting document .

Step 3: Continue to select Use the current document and select Next: Select recipients .

Step 4: In Select recipients , select Use an existing list if the list is available, you can select Type a new list to create a new list . Then click Next: Write your letter .

Step 5: In the Select Data Source dialog box, select the available lists and click Open .

Step 6: Select the sheet containing the data to use. For example, in this Excel file sheet1 is the sheet containing data, we select Sheet1. Then click OK .

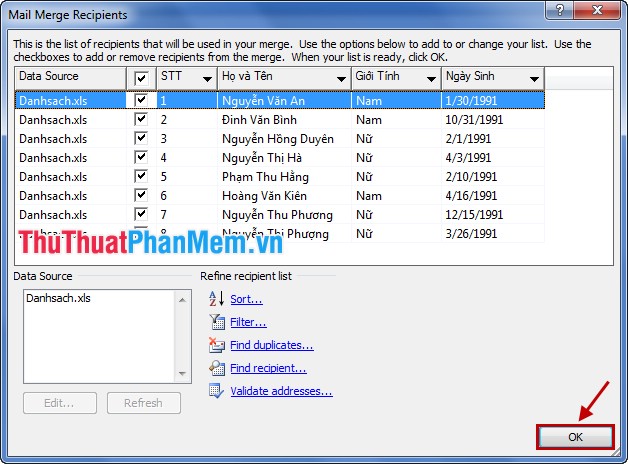
Step 7: In the Mail Merge Recipients dialog box, select the data to insert by checking the boxes before that data. If insert all you choose tick the box next to Data Source .
After selecting you click OK .
Step 8: Select Next: Write your letter .
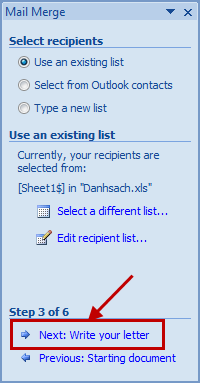
Step 9: In the next step, you place the cursor in the position to insert data, then click More items .

Step 10: Appears the Insert Merge Field dialog box, select the field with the content next to the cursor and click Insert to insert.

After inserting, click Close to close.
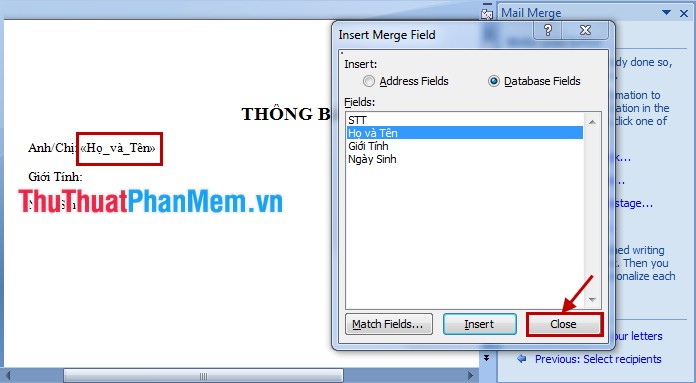
Step 11: Insert one by one until all the data fields into the existing Word template. Click Next: Preview your letters .
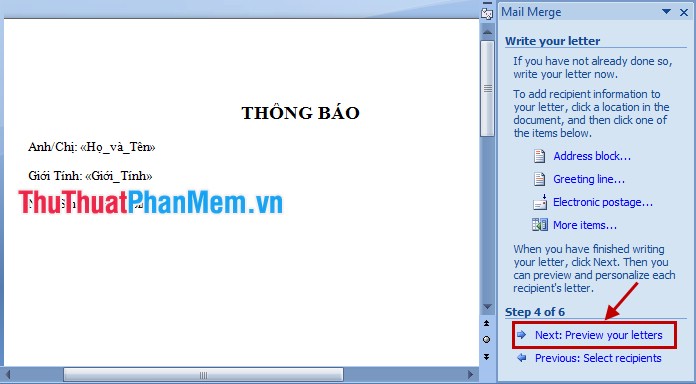
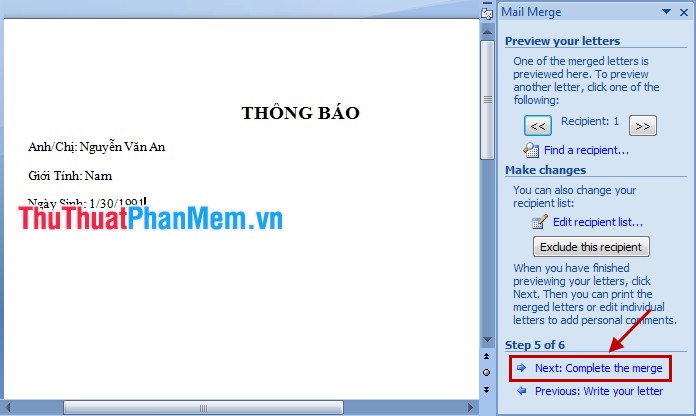
Step 12: Select Next: Complete the merge to complete the mail merge process.
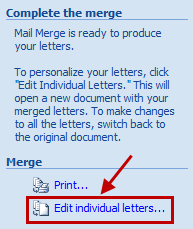
Step 13: To see all the pages after mixing, select Edit individual letters .
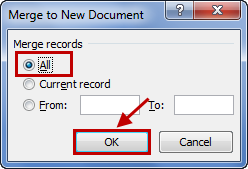
Select All -> OK .
Step 14: You can save the file by selecting File -> Save or Ctrl + S , name the file and select the folder containing the file.
FAQ
What is the easiest way to Merge Mail (Mail Merge) in Word?
Start with the requirements in this guide, then follow each step in order. Check the result after every major change so problems are easier to identify.
Can beginners follow these instructions?
Yes. The process is organized into practical steps, and you can repeat any step before moving forward.
What should I check if the method does not work?
Confirm your software or device version, permissions, settings, file format, and internet connection when the task depends on online services.
Related Articles
 How to Merge Text, Merge Mail Merge Messages in Word 2016: Mix Text6 minutes read
 Instructions on Using Mail Merge in Word to Merge Documents3 minutes read
 How to Use Mail Merge in Word to Merge Text: Step-by-Step Guide6 minutes read
 How to Fix Number Formatting Errors When Using Mail Merge in Word12 minutes read
 Improved Email Performance with the Microsoft Word Mail Merge9 minutes read
 Mix Text, Merge Messages, Mix Excel Tables into Word 2007 Documents2 minutes read
Reader Comments 0
Sign in with email or Google to join the discussion.